This Distance Education Handbook has been developed through the efforts of the Distance Education Committee. The intent of this document is to provide guidance and resources to faculty and administrators who are involved in the delivery of distance education courses at South Suburban College. This handbook compiles existing processes and procedures developed by the Distance Education Committee and will continue to be updated as needed based on this committee’s recommendations.
A SSC staff username and password are required to access the following resources.
Multi-Factor Authentication is now required for SSC cloud-based services like Office 365, Teams, D2L Brightspace, and the VPN. What is MFA and why is it important? Multi-Factor Authentication enhances our cyber security by requiring users to identify themselves by more than a username and password (which can be stolen). MFA requires an additional verification code to a mobile app (Microsoft Authenticator) or SMS on a mobile device (phone). You may already use MFA with your bank or credit card company.
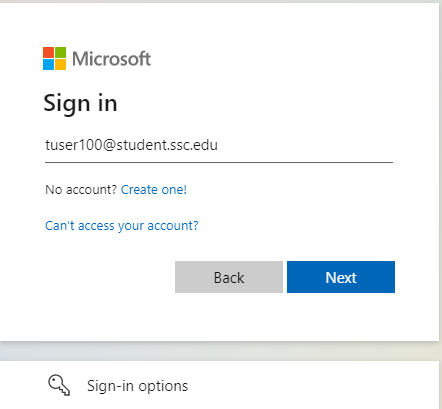
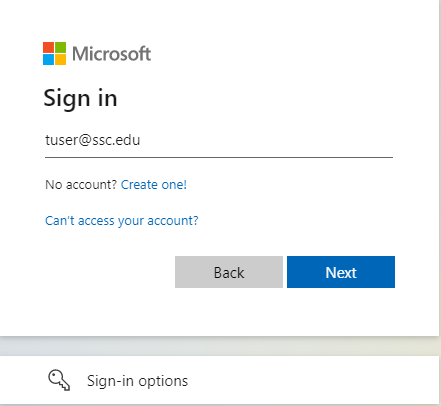
STEP 1: Visit https://www.office.com/, enter in your SSC email address, and click “Next”. If you are a student your email address will end in @student.ssc.edu, if you are an employee your email address will end with @ssc.edu.
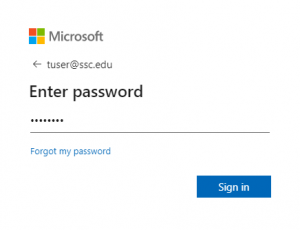
STEP 2: Enter in your SSC issued password and click on “Sign in”.
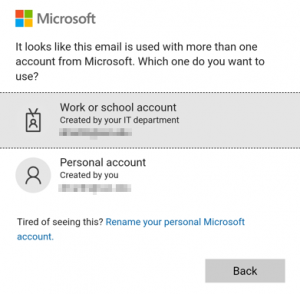
STEP 3: If you are prompted to select an account type, select “Work or School Account”.
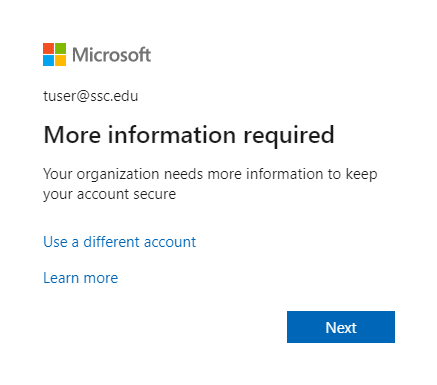
STEP 4: At the “More information required” screen, select “Next”.
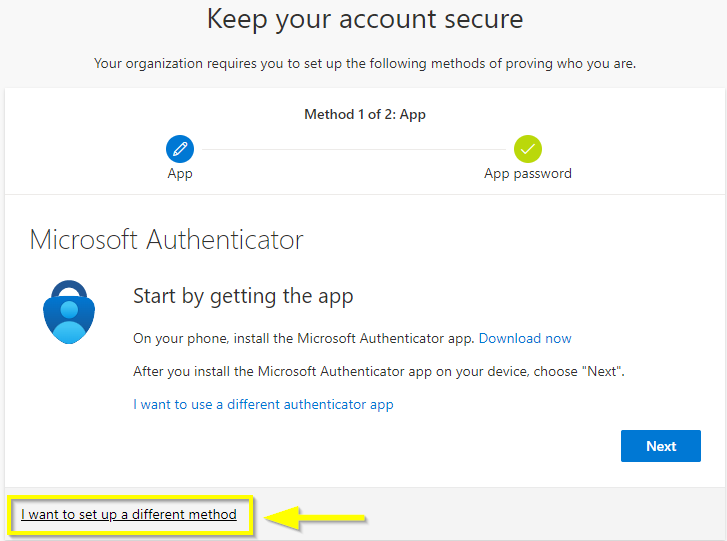
STEP 5: It is recommended that you set up two methods to keep your account extra secure, which also allows the use of self-service password reset. Method 1 uses the Microsoft Authenticator application that is downloaded to your Mobile Device. Method 2 uses your mobile phone number to send a text message code.
Method 1: The default authentication method is to use the free Microsoft Authenticator app. If you have it installed on your mobile device, select Next and follow the prompts to add your account information.
Method 2: Provides for SMS text messages sent to your phone. Select I want to set up a different method for Method 2. Microsoft 365 will ask for your mobile number, then send you an SMS message containing a 6-digit code to verify your device.
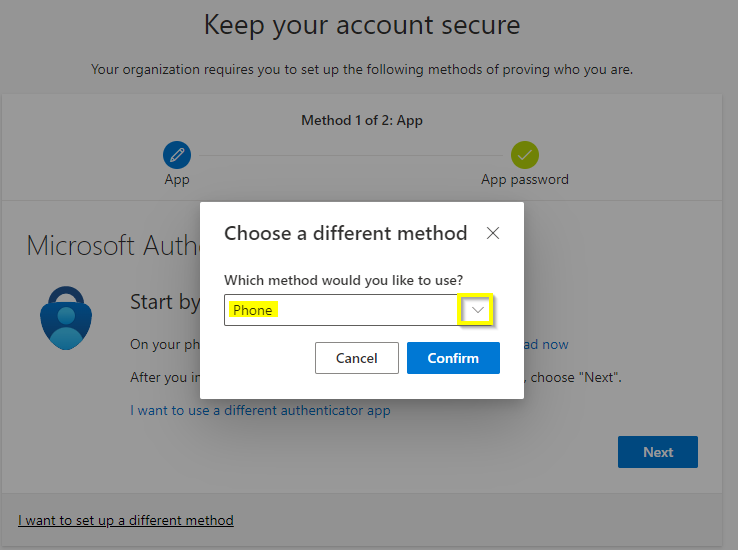
STEP 6: Method 2: In the dialog box titled “Choose a different method” select the drop-down box, and choose “Phone”, then select “Confirm”.
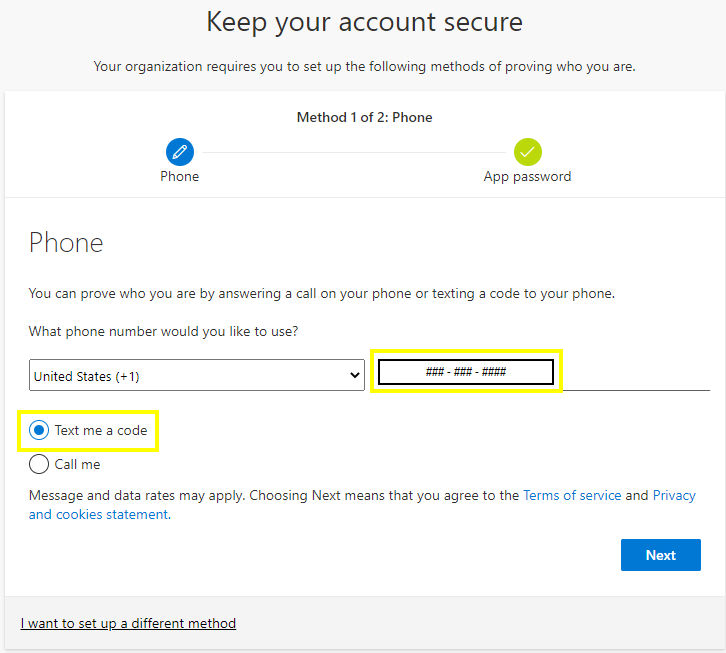
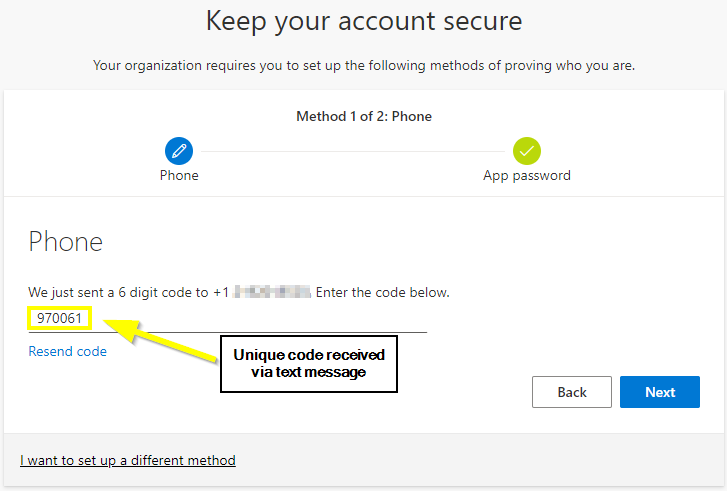
STEP 7: Enter your cell phone number in the box to the right of the country code. Verify that “Text me a code” is selected, select “Next”.
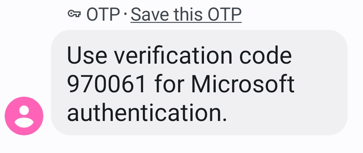
STEP 8: On your mobile phone, you will receive a unique verification code in your SMS messaging app.
STEP 9: When prompted on your device, enter the unique verification code that you received via text message, then select “Next”.
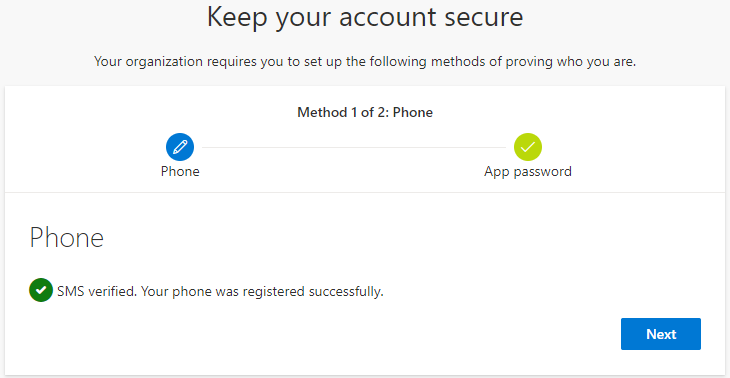
STEP 10: A message will appear stating “SMS verified. Your phone was registered successfully”, select “Next”.
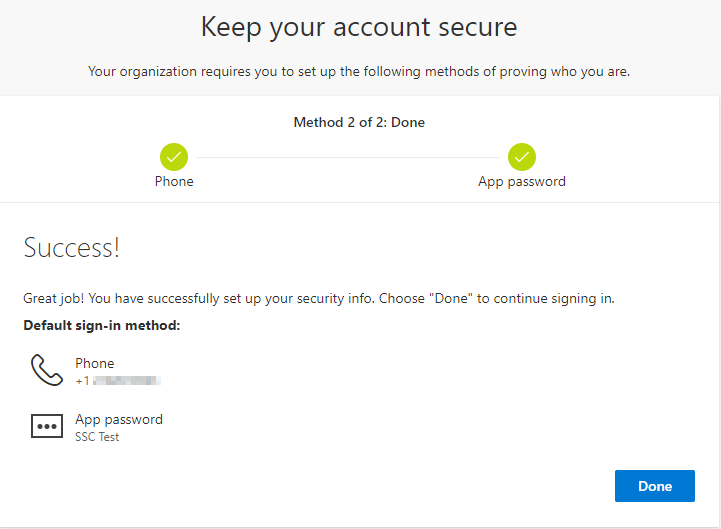
STEP 11: You have successfully registered your device for MFA, select “Done”. These steps only need to be completed once, unless you change your mobile number. Now that you have registered your mobile device, a unique verification code will be generated each time you sign into a service or site that requires Multi Factor Authentication, e.g., D2L, Office 365, AnyConnect VPN, and other college resources.
SSC maintains one academic year of courses materials on the Learning Management System (D2L), with all other content being moved to an external archive. Archived course content will be retained for an additional four years (five years total). (Effective January 1, 2026)
Instructors are encouraged to export their D2L course content and store it in a safe location for future use. The College is not responsible for lost, stolen, or corrupted materials stored on the servers, services, and technologies provided. (SSCFA 6.18.15)
Step 1: Export your course as a Brightspace package
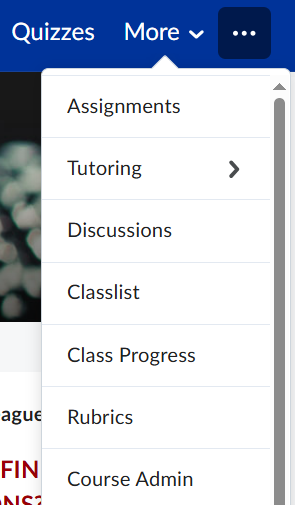
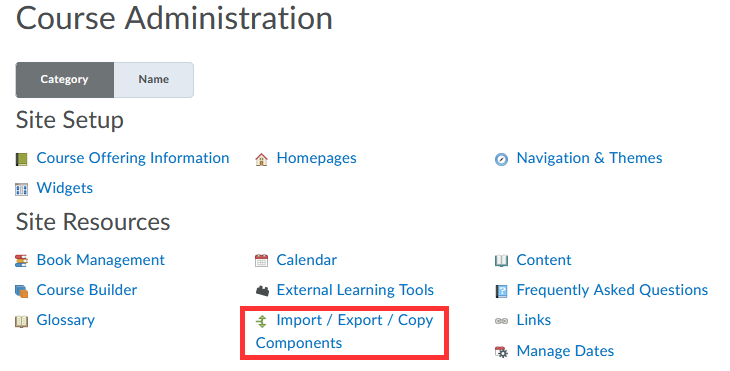
In your D2L course, go to the More > Course Admin.
Select Import/Export/Copy Components.
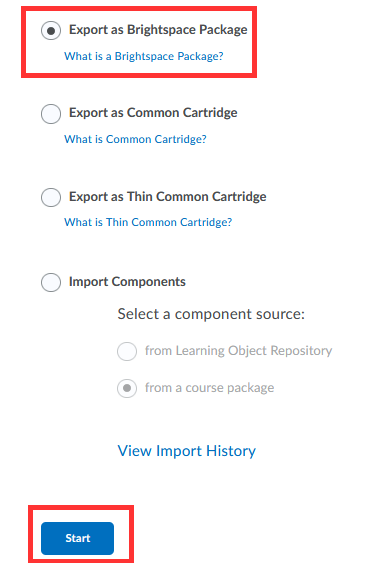
Select Export as Brightspace Package > Start.
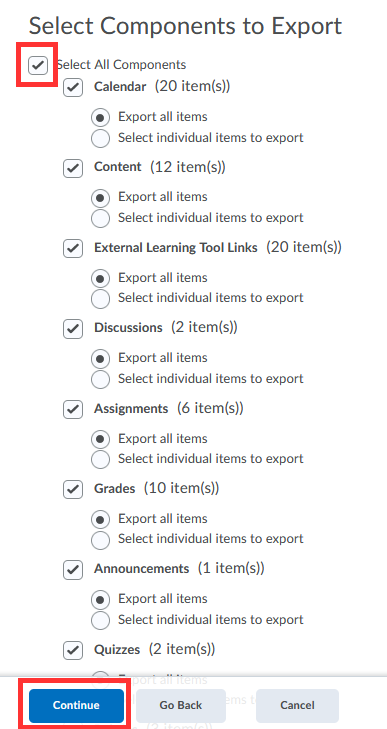
Select Components to Export > Continue.
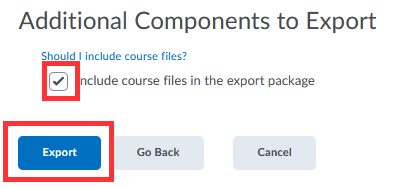
Important! – Under Additional Components to Export, select Include course files in the export package > Export.
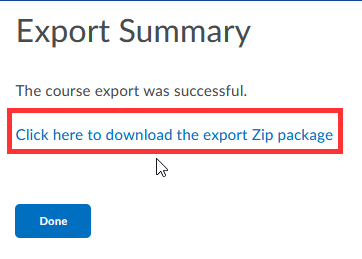
The Export will start. You’ll be notified on the Updates Alerts icon in D2L when the export is ready to download (orange dot indicates new notification).
Select Export Finished in the Updates Alerts to download the Export Package (zip).
Click to download the Export Package (zip).
The zip file will initially be saved to your local computer’s Download folder.
Step 2: Save Your D2L Course Backup File to a Secure Location
Recommendations for storage:
It is recommended that you move this Zip file to a devoted folder labeled “D2L Course Backups”.
Sometimes the zip file can be large in size, so saving the zip file to a cloud based storage would provide more storage space.
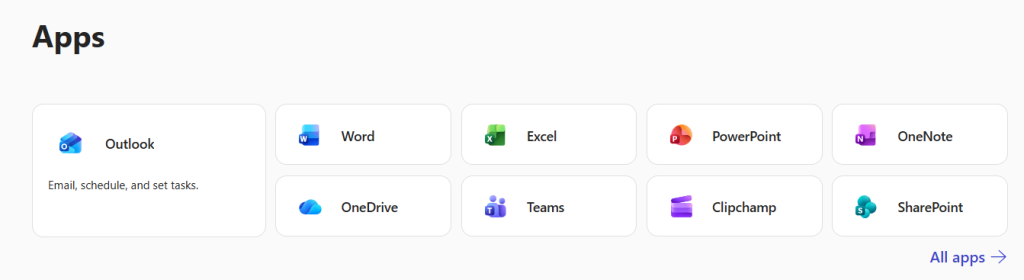
As part of Microsoft 365 suite of applications, each instructor is provided a cloud based storage area called OneDrive
Access to M365 OneDrive
You can access OneDrive by visiting Office.com and logging in with your regular credentials.
Click on the Apps icon to discover all M365 suite of apps available to instructors. Select OneDrive.
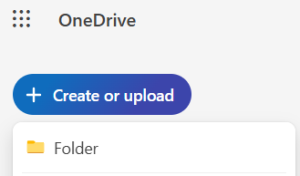
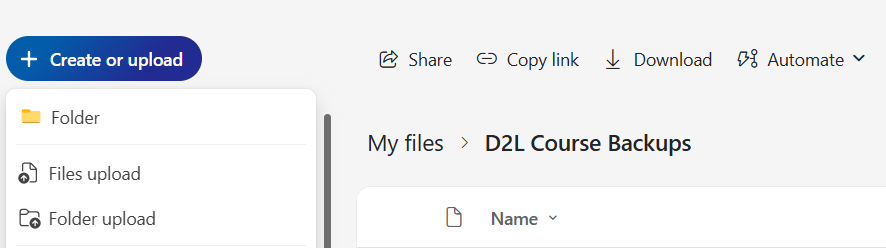
Select My Files for your personal cloud storage area.
Create a new folder. Under Create or Upload, select Folder.
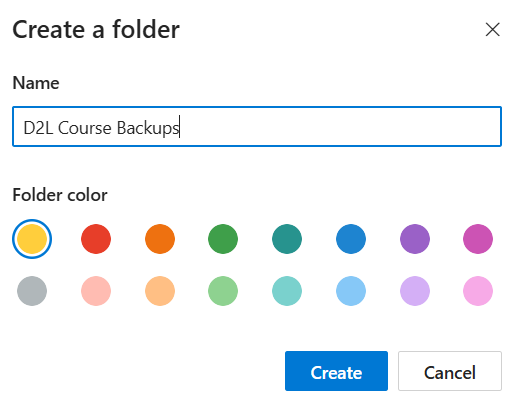
Name your Folder “D2L Course Backups”
Upload your Zip file to this folder by selecting Create or Upload and Files Upload.
Some online courses are designed to be completely self-paced, meaning students work through the material on their own without interacting with an instructor. For example, the course might present content in a logical sequence with self-scored assessments like online quizzes. In these types of courses, students typically don’t receive personalized feedback on their work, don’t interact with classmates, and have no one to ask for help if they struggle to understand a concept.
The U.S. Department of Education classifies these self-paced online courses as correspondence courses, as they do not include Regular and Substantial Interaction. Courses in this category are not eligible for federal financial aid, meaning students cannot receive financial assistance for taking them.
What is “Regular and Substantial Interaction”?
According to the U.S. Department of Education (34 CFR 600.2, 2001), online college courses must include meaningful, ongoing interaction between students and instructors to be considered distance education—rather than just self-paced learning.
What does it mean?
Regular = Happens on a schedule (not just once or randomly).
Substantive = The interaction must be educational and meaningful, not just checking in.
If an instructor sets up an online course and then doesn’t return to actively engage with students—such as responding to questions, giving feedback, or leading discussions—the course likely does not meet federal standards for distance education.
Here are some best practices instructors can follow to meet this requirement:
Provide Weekly Instruction or Guidance:
Post weekly announcements in your D2L course summarizing key points or giving direction.
Perhaps record a quick audio or video using D2L Media Library to discuss what’s coming up next week or to clarify a concept.
Respond Promptly to Student Questions:
Answer messages or email discussion posts within 24-48 hours.
Be available through email, course messaging or virtual office hours.
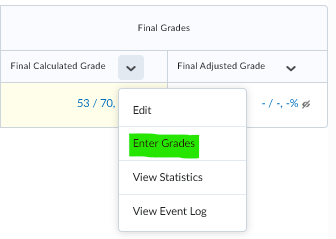
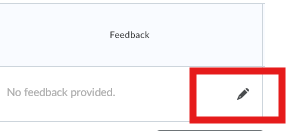
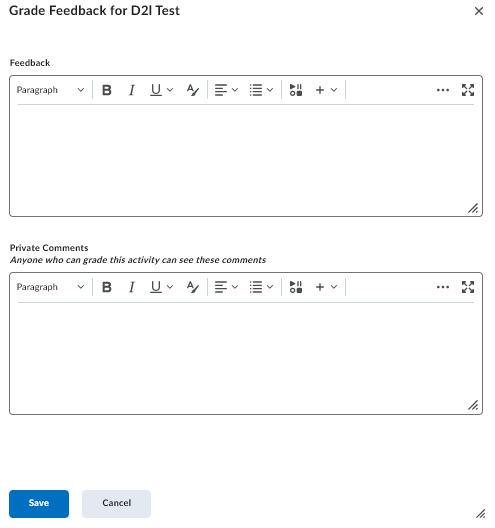
Offer Personalized Feedback:
Give meaningful, individual feedback on assignments, not just grades.
Use rubrics and comments to explain how students can improve.
Facilitate Discussions:
Lead or participate in weekly online discussions in D2L.
Ask open-ended questions and reply to student post to guide learning.
Initiate Contact (Don’t Wait for Students):
Reach out if a student is falling behind or seems disengaged.
Schedule check-ins or send reminders about upcoming work.
Following these best practices helps ensure that online courses are engaging, supportive, and meet federal definitions of distance education, protecting both the student’s learning experience and the South Suburban College’s eligibility for financial aid.
Copyleaks can verify the authenticity of content and report if something has been written by AI or a human. It is an integrated tool within our D2L Brightspace environment.
There is a difference between using a writing tool and a grammer checker.
It’s important to note that the use of writing tools such which offers a genAI option to help re-write content entirely will most likely get flagged as AI if used because, simply put, it is AI-generated. Translation tools, are also commonly powered by AI models and will be flagged as AI content.
In contrast, the Copyleaks’ Grammer Checker does not get flagged as AI, nor does any of the content from Grammarly, Microsoft Word, etc. changed to fix grammatical errors, tone issues, etc., because they do not use genAI to power these features or functionalities.
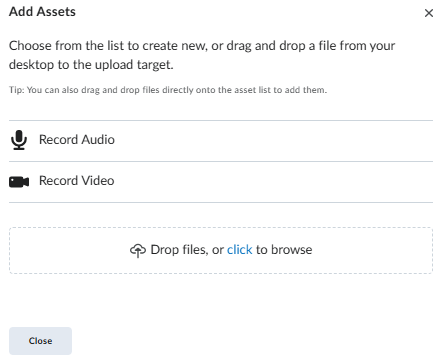
You can create directly in the media library, then place video in a course.
Access your Media Library by:
Click on the settings cog wheel at the top right of your D2L homepage:
Find the Media Library option:
Select the Add Assets option, there you can either record video, record audio, or upload a pre-existing video file that will be placed into the Media Library.
Another way to add video is to add a new module in your course or select an already designed module within your course and add a video note.
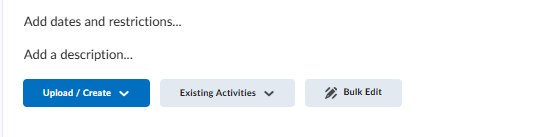
Click on the desired module and then click on the Upload/Create: Create a file
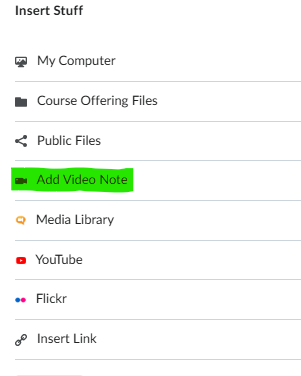
Inside the text box there is an ‘INSERT STUFF’ icon as shown below. By selecting this icon the menu will show a Video Note selection, click on Video Note.
Please note the video recording in this mode has a 30 minute time limit.
Method 2: Use a Teams Meeting to Record Video
Log in to office.com and go to the Teams app
Go to the Calendar and set up a new meeting:
After you fill out the requirements for the meeting it will show up on your Teams Calendar. Double Click on the meeting and select Join the meeting now.
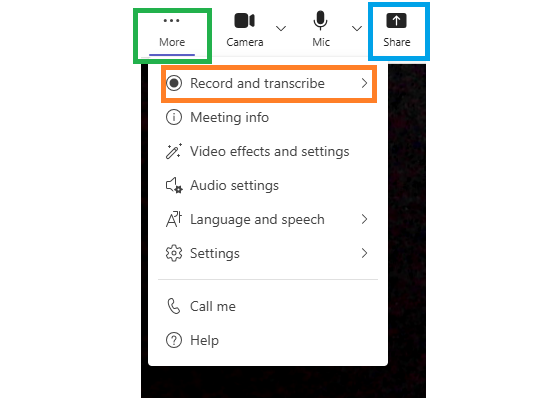
Share your Screen as you talk through your video recording
1- More
2- Record
3- Share
When you are finished stop recording, then just leave the meeting.
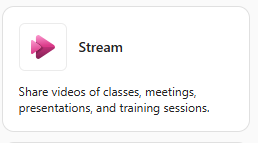
Now it is time to find your recorded video, it is only a few small steps.
Log in to office.com
Find where your apps are listed.
Look for the STREAM APP
Your Teams recording will be in this application, in MP4 format.
Select Download
Go into D2L an upload the video file.
Select the module where you want to upload the video.
Select Upload/Create option and select Video or Audio.
Select Upload and browse to the Teams video file.
NOTE: Make sure you know where your video files or any files for that matter go when you save them on your device. [EX: Downloads folder, pictures folder, etc.]
Method 3: Clipchamp
Clipchamp is an advanced video editing tool that is part of Office.com
Take a look at the Clipchamp web site to learn more about online recording tools.
Cengage Unlimited textbooks and learning content integrates with D2L Brightspace courses. Students must access their Cengage material through their SSC D2L courses.
Instructors and students can follow these easy directions should they have any trouble.
D2L is a cloud-based learning management system that updates each month with new features and improvements. This page summarizes these monthly improvements to keep instructors up-to-date and provide information to improve course content.
August, 2025
Quizzes
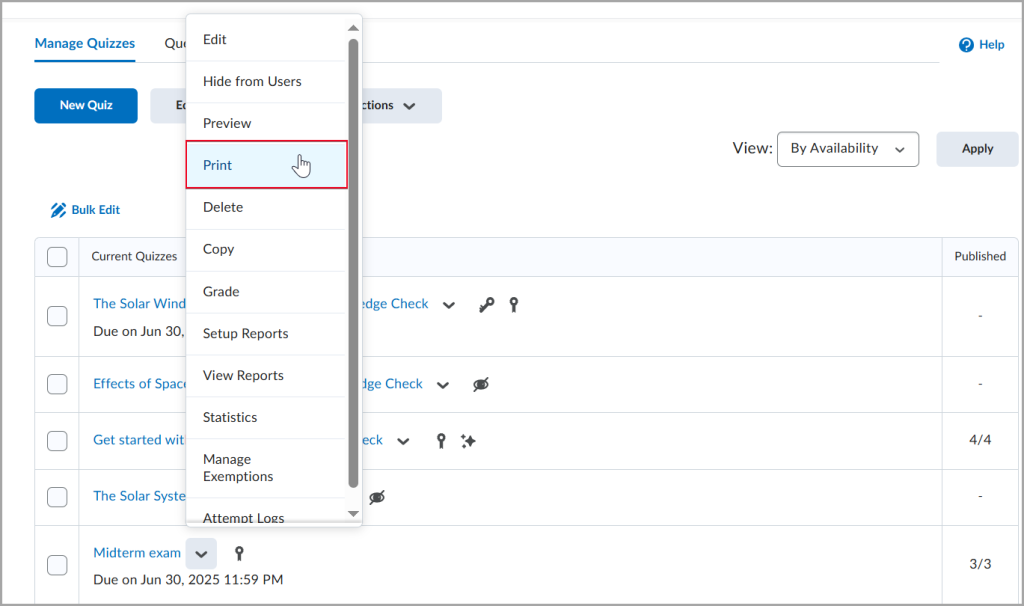
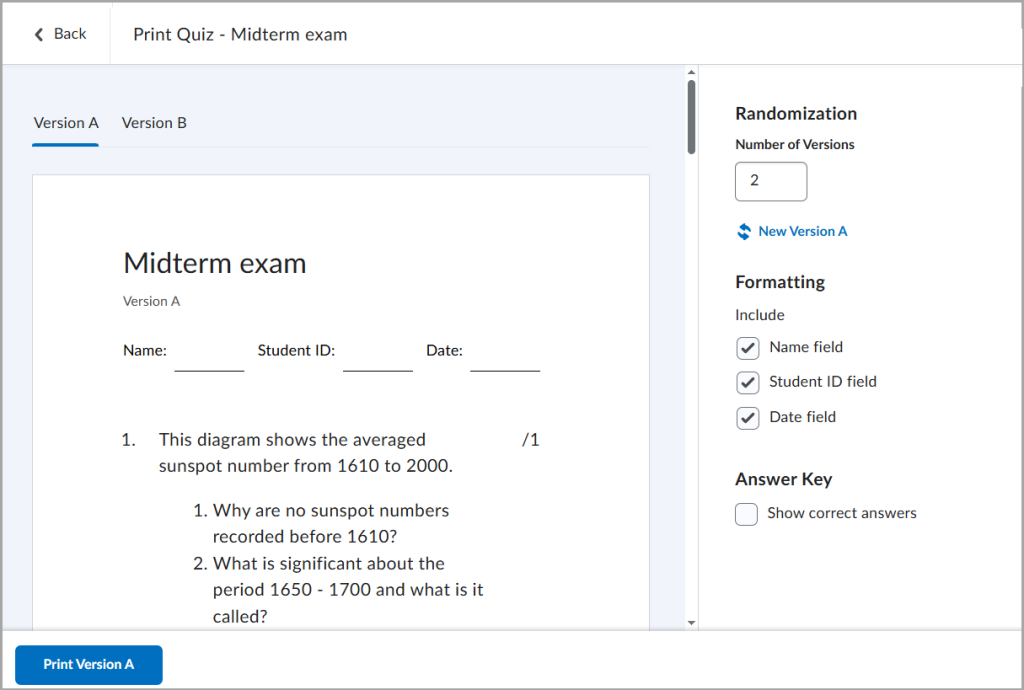
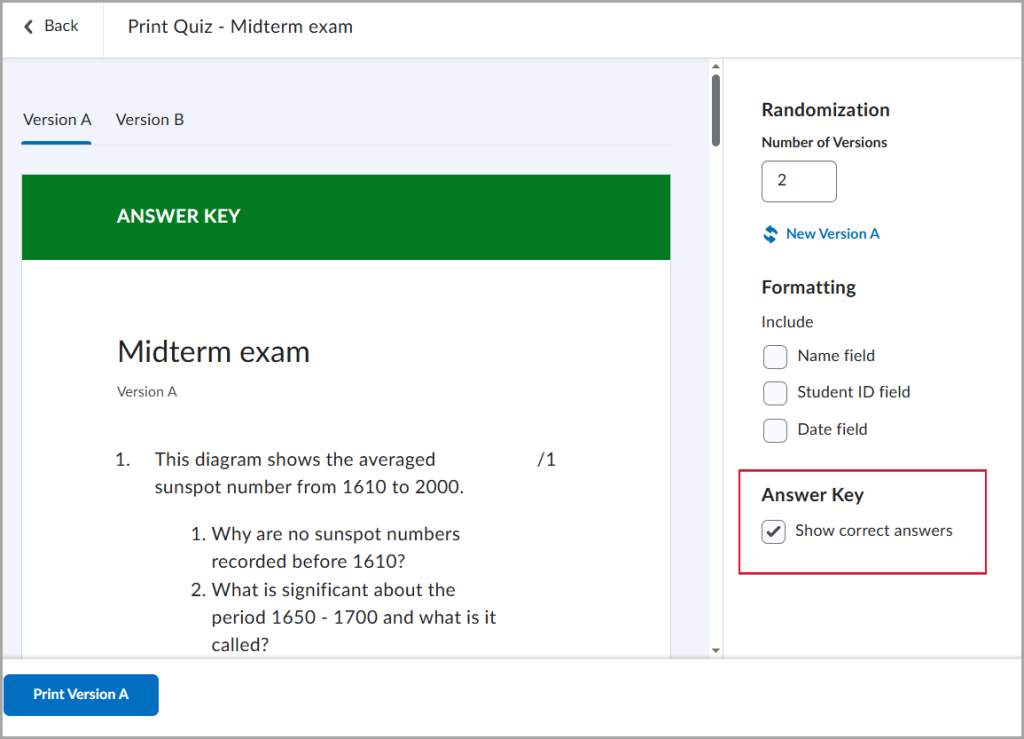
In response to customer feedback, instructors now have a simple way to print an offline quiz that supports all native Brightspace quiz question types, shuffling and randomization options, question pools, multiple versions, and an Answer Key.
From the Manage Quizzes page, click the drop-down besides the quiz name and select Print.
From the Print Quiz page, select formatting, such as including student name, etc, or an Answer Key.
July, 2025
Assignments
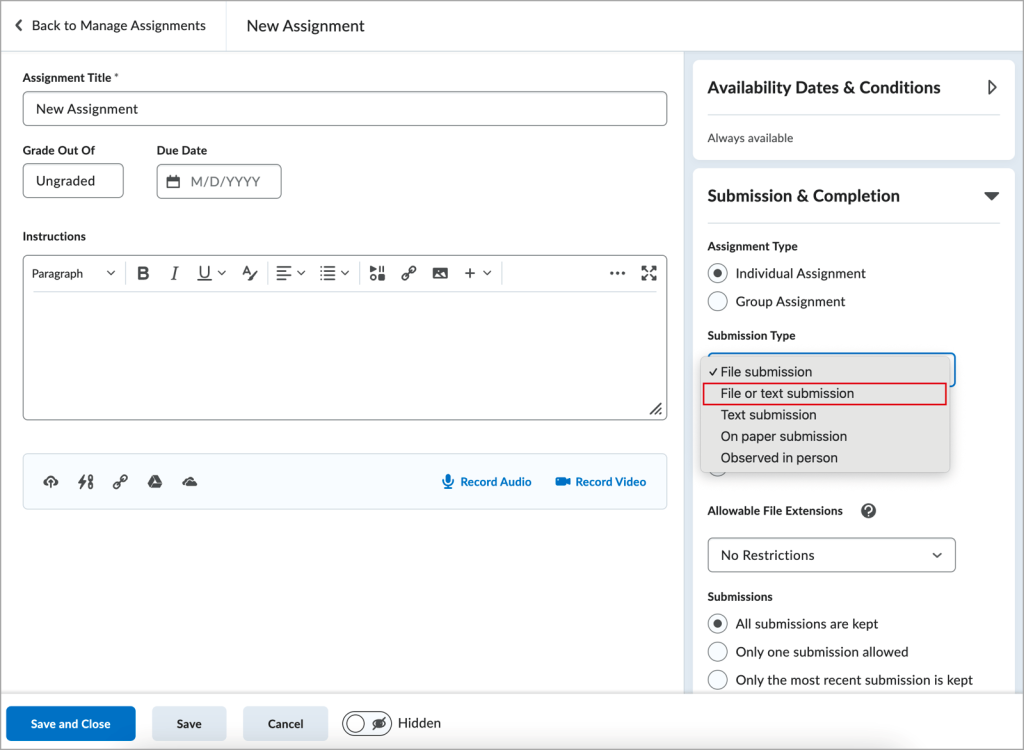
When creating an assignments, instructors only had file submission, text submission, on paper submission and observed in person. Now instructors have the option to select file or text submission to provide students options.
Quizzes
Instructors can now reopen a submitted quiz attempt.
April, 2025
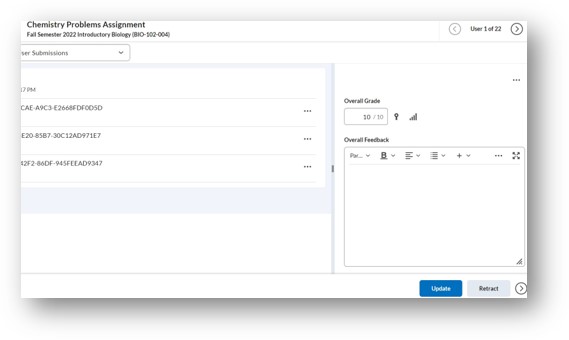
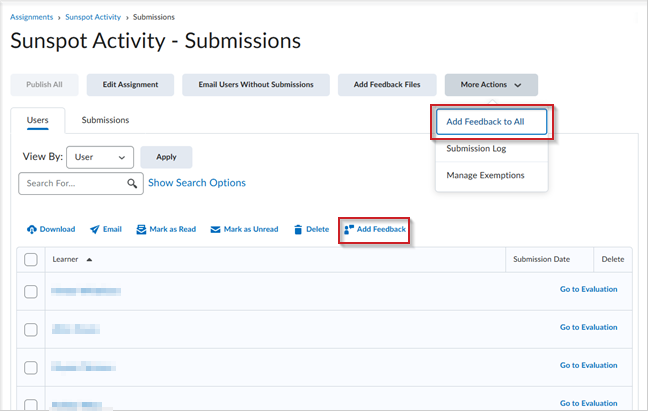
Assignments and Discussion – Bulk Feedback
Instructors can now provide bulk feedback to all students who submitted assignments or discussions.
Assignments
Discussions
March, 2025
Quizzes
New questions types were added within quizzes to include:
Arithmetic
Matching
Ordering
Multi Short Answer
Significant Figures
September 2024
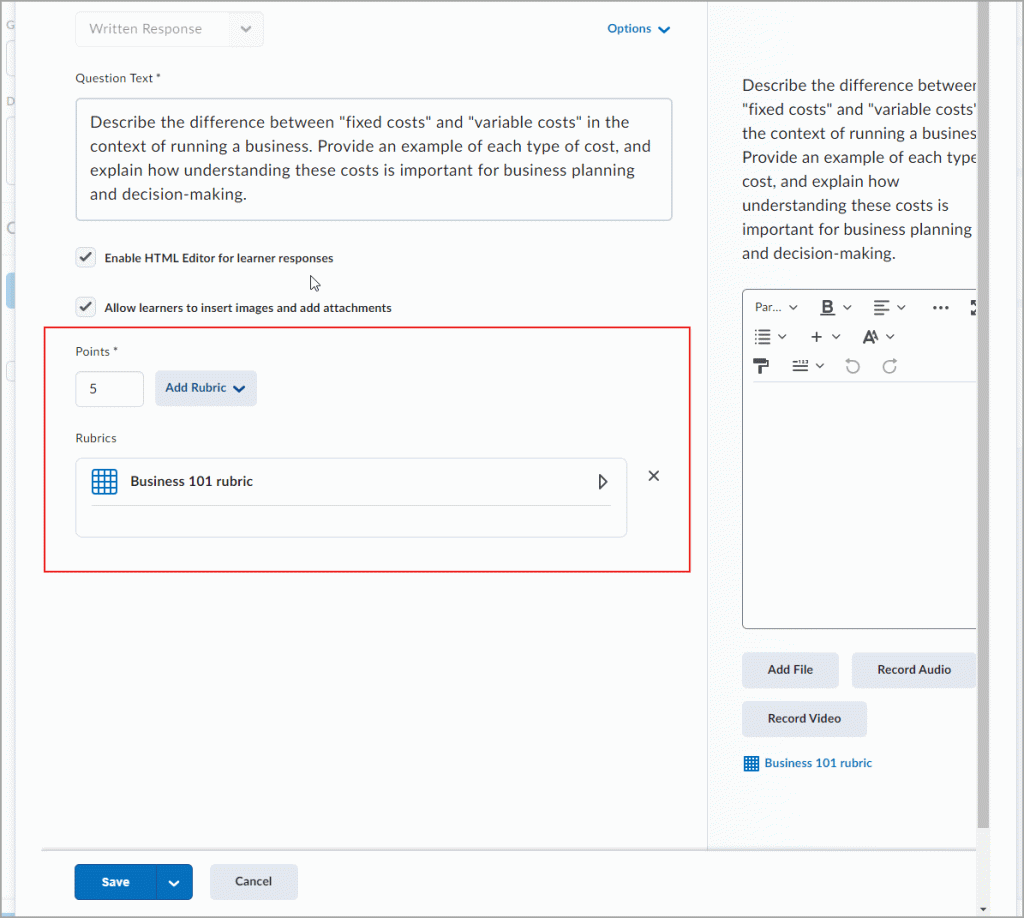
Quizzes and Rubrics
Rubrics can now be added to written response questions in Quizzes.
May, 2024
Grading
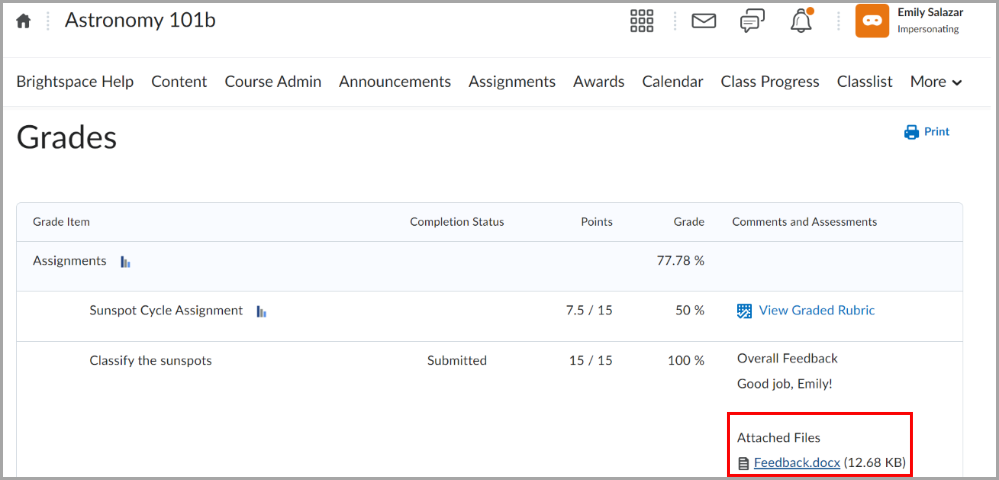
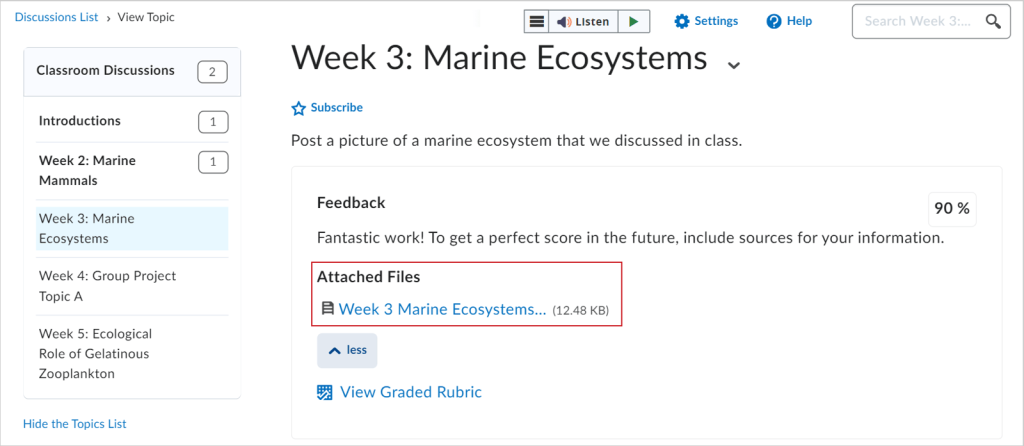
Feedback files are now available in Grades for Assignments, Quizzes and Discussions.
April, 2024
Discussions
Instructors’ attached files now appear in the Attached Files section for each learner’s discussion evaluation. Learners can view attached file feedback when viewing their evaluated discussion topic.
November, 2023
Announcements
D2L implemented the ability to copy announcements to other courses.
September, 2023
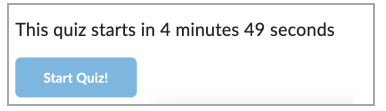
Synchronous Quiz
Instructors can facilitate quizzes where learners take their attempts simultaneously, which is convenient for in-class sessions.
When setting up the D2L Quiz, under Timing and Display, select Time Limits, then Synchronous.
Students will take their quizzes in-class, either in a computer lab or using their laptops. When students begin taking the quiz, they will all receive a pop up message telling them when the quiz will begin.
Virtual Assistant Introduced
A contextual help tool is now integrated into D2L. Students and instructors can ask help questions anywhere in D2L.
August, 2023
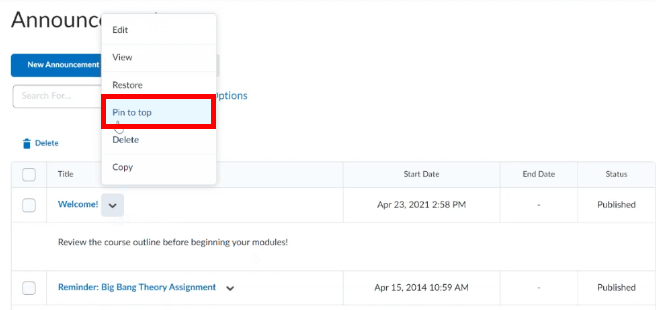
Announcements
When an instructor creates an announcement in their D2L course, that they want to stay at the top of their announcement list, there is now an option to “pin it to the top”.
July, 2023
Quizzes
Students:
Students can elect to Hide the Timer when taking a quiz. This may reduce anxiety during quiz taking.
Warning are displayed at certain times to support awareness of time left.
1 minute remaining on quiz.
5 minutes remaining on quiz (only on quizzes with 10 minutes or longer time limit)
Half of the elapsed time (only on quizzes with 20 minutes or longer quiz time limit)
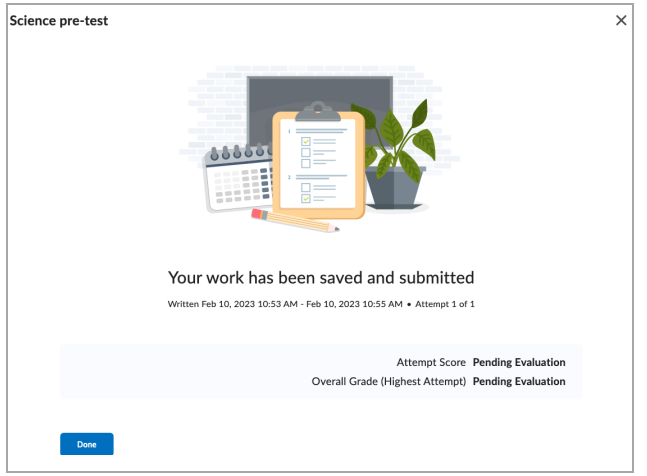
Submission View has been changed to Quiz Results Page. After students submits a quiz, they will see the Quiz Results Page.
The Quiz Results page shows learners the status of their quiz and their score.
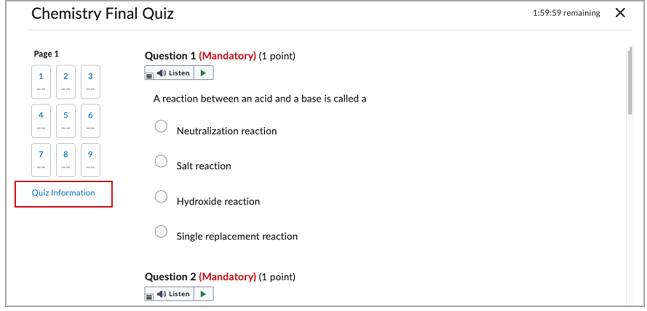
Students can now see information about the quiz, while they are taking the quiz.
Quiz Information option on the quiz page to view instructions and other information. This does not leave the quiz.
April, 2023
Discussions
Discussions have been improved to look similar to Assignments and Quizzes.
Example of New Discussion Look and Feel
Quizzes
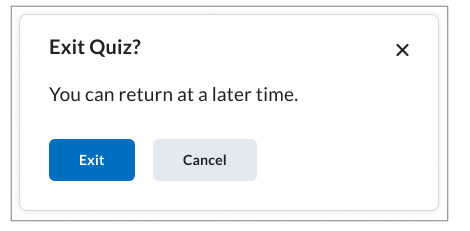
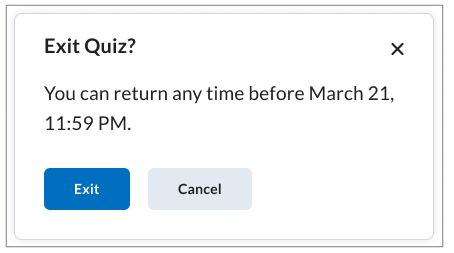
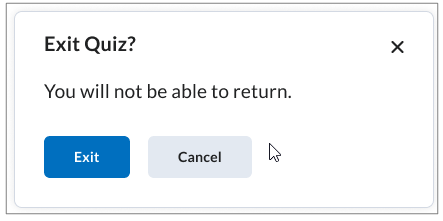
Previously, when a student accidentally exited a quiz, there was not a dialog or warning.
Students are now shown a context-based confirmation dialog message.
Students now see one of the following:
The Exit Quiz confirmation dialog for quizzes with no time limit, no end date, or a time limit that expires before the end date.The Exit Quiz confirmation dialog for quizzes with a time limit and no end date.The Exit Quiz confirmation dialog for quizzes with an end date, no time limit, or an end date that will arrive before the time limit expires.The Exit Quiz confirmation dialog for quizzes that have an end date in the past.
February, 2023
Quizzes
Instructors can now add quiz availability dates to the Calendar tool in the Availability Dates & Conditions menu in the new quiz creation experience.
Instructors can select the Add availability dates to Calendar checkbox when creating a quiz to add quiz availability dates to their Calendar.
Previously, only the Due Date was automatically added to the D2L Calendar.
Instructor have more options now on how many questions are presented to students; all questions displayed together, 1 question per page, 5 questions per page, 10 questions per page, or add page break after each section of questions.
January, 2023
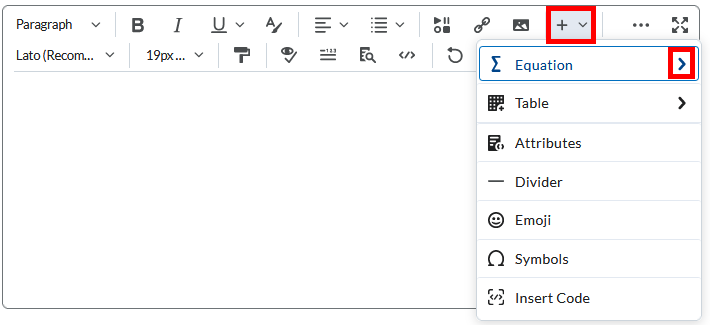
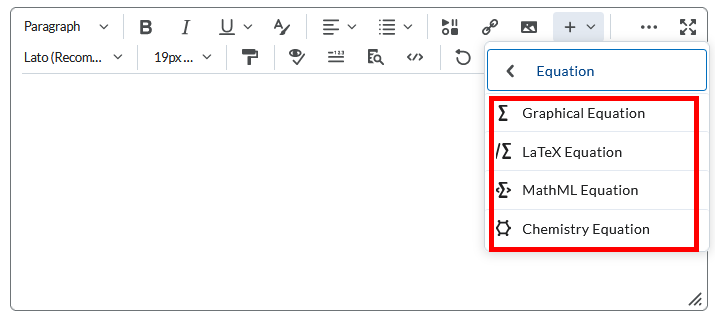
Equation Editor
The Equation Editor has been improved with better rendering features.
When creating assignments, discussions and quiz questions, within any textbox, instructors can insert equations.
Example of inserting an equation into D2LExample of inserting an equation into D2L
December, 2022
Assignments
Under Available Dates and Restrictions, Instructors can choose what students see of the assignment before submission using the visible with access restriction feature. See it in Action
November, 2022
Media Library Update
The new Media Library (assess is wheel icon next to profile name in D2L) now has a record video/audio option.
Videos uploaded to the Media Library or video/audio recorded by instructors can be used in multiple courses.
An example would be a welcome video recorded by an instructor and easily placed in various courses.
October, 2022
Pulse Mobile App
To help improve the flexibility of push notification, users will be able to choose which push notifications they receive. Previously, it was not possible to limit or control push notifications.
September, 2022
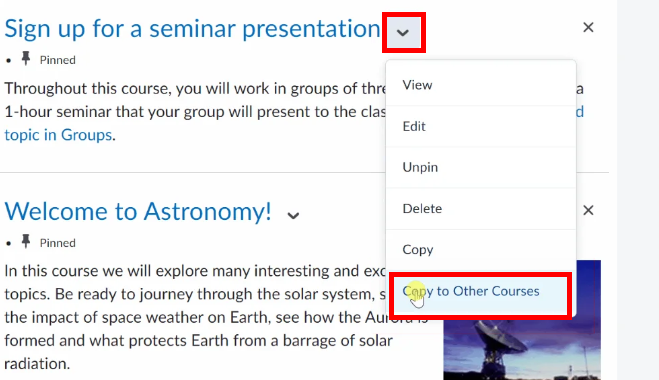
Assignments
Instructors who teach multiple courses can now copy assignments to other courses. To copy assignments, select the down arrow next to the assignment name and select “Copy to Other Courses”.
Quizzes
“No Time Limit” is now a quiz timing option and has become the default time setting (previously default was 120 minutes). If a time limit is desired, instructors must manually select the desired time.
When evaluating student assignments using D2L’s annotation feature, instructor can now use the new undo/redo button. Previously, the only way to remove the annotation was to use the eraser tool.
Media Library Updates
Early updates shown below provide information on the new streaming Media Library.
Under Insert Stuff, the Media Library is now an option. This allows instructors to upload video in multiple places in D2L.
Quizzes
Instructors now have the ability to restore a quiz they may have deleted in error.
Under Quizzes > More Actions > There is now a restore option.
May, 2022
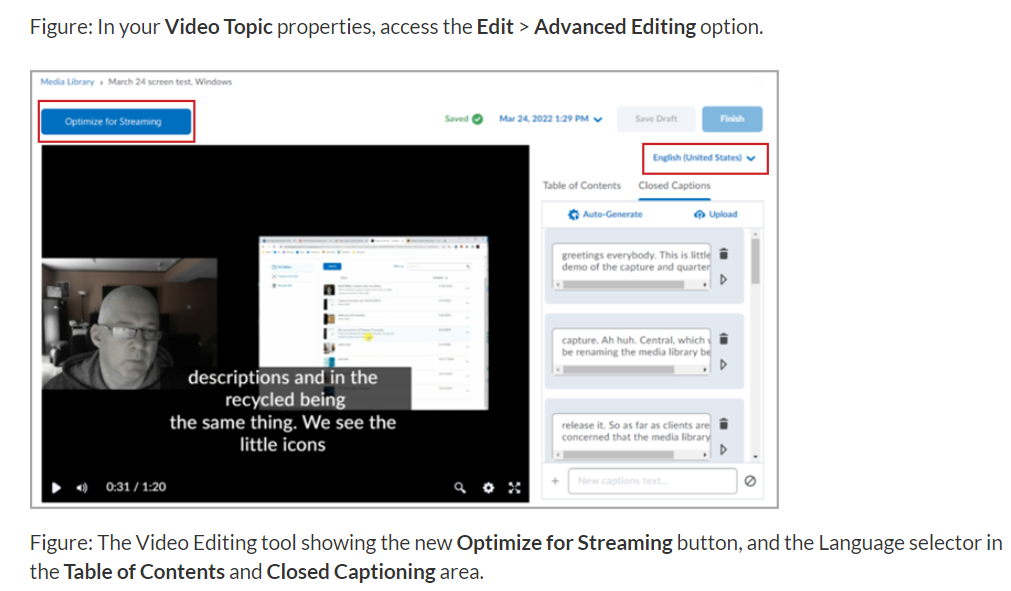
Video/Audio and the New Media Library
Under the advanced editing option on any video uploaded to D2L, there is now an optimize for streaming button.
Pulse Mobile App
Brightspace Pulse users can now use @mention push notifications. Originally, @mentions came through the LMS but were only visible if the user opened Pulse and viewed their Subscriptions tab under Notifications. Now, the new functionality sends a push notification to the user when they are @mentioned.
Updates and subscriptions in the Pulse App are now aligned to show the same items as the Alert Bell in D2L.
April, 2022
Intelligent Agents
The Create Agent page has a new modernized user interface.
Subject line of intelligent agent emails now supports 128 characters.
March, 2022
Announcements
Course announcements now have a copy feature.
New Media Library
A streaming media library is now available for D2L courses. New videos posted to a D2L course will be placed in this streaming media library. Videos previous uploaded to D2L will not be automatically transferred to this new media library, so instructors will have to manually transfer.
Workflow improvements for Media
When creating new video and audio, instructors no longer must wait for the uploaded media file to process. While the media file remains unavailable during processing, instructors can navigate away to work on other tasks. When processing is complete, instructor will be notified.
February, 2022
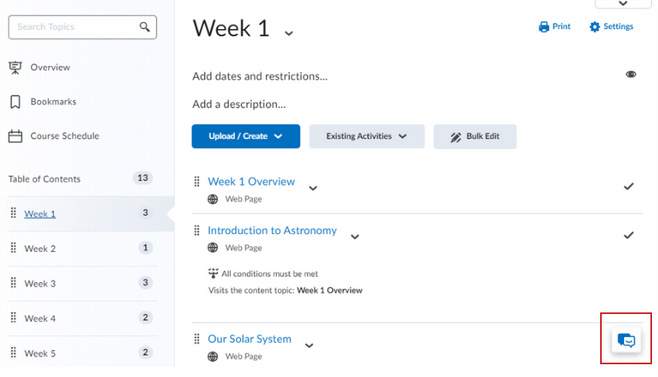
Content – Print and Download Buttons
The Print and Download buttons are now better positioned when viewing content within a module.
Print and Download
January, 2022
Video/Audio and New Media Library
What improved?
Table of Contents: Instructors can apply meaningful segments to larger videos.
Audio Generated Closed Caption: Instructors can select language, with the ability to edit.
Video Editing: Minor video editing is available – Seek, Mark and Cut.
How to implement?
Within a module in your course, select Upload/Create, then Video and Audio.
Video will take a few minutes to process after uploading.
Select Advance Settings after the video uploads to gain access to these new features.