Tag: Registration

Cross-listed Courses in D2L

Seeing triple or more?  When a course that is cross-listed  in Colleague is batched to D2L at least three shells are created.  One shell for each of the individual courses (ART-130-003 and then ART-E77-703) and one shell with the courses combined (ART-130-003, ART-E77-703).  This process allows instructors increased flexibility.  If you do not plan to post material by section (ART-130-003) and only to use the combined section (ART-130-003, ART-E77-703) you can make the individual course shells inactive which will hide them from the view of both you and your students.  The individual shells themselves can not be deleted without impacting the enrollment of the course.

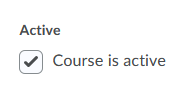
While in the course shell you wish to hide follow these steps:   

  1. Wait until the Day Your Course Begins.
  2. Select Course Tools
  3. Select Course Admin
  4. Select Course Offering Information
  5. Uncheck the box that reads “Course is Active”
Course is Active option in D2L

So What Does this Mean for Dual Delivery Courses?

You have two options for managing your D2L class shells for Spring 2022.

1) Use the individual Parent Shells for each Specific Section (usually 2 per course)

  • This will allow you to post different information (due dates, announcements, assignments, quizzes, etc.) to each section of that one course.
  • For example, you might post instructions for the virtual students (one parent section (PSY-211-002)) that are different than what the in-person students (a second parent section (PSY-211-072)) will do.
  • The downside is you may have common information for both groups and you would have to post this information twice (one in each parent section).
  • With this option you would hide the combined child section (PSY-211-002, PSY-211-072) when it becomes active on the first day of your class.

2) Use the Combined Child Shell that Includes all Parent Sections for that Course (1 per course)

  • This allows you to post information once and all students in the class will see the same thing, regardless of the child section they are in (i.e. virtual or in-person).
  • Good if each section is taking the same quizzes and doing the same assignments.
  • If desired, students can be sorted by sections. This can be done in D2L under Course Tools > Admin or in the Gradebook.
  • The downside is that if different parent sections have different information (due dates, announcements, etc.) you will have to insure each section knows which information pertains to them.
  • With this option you would hide the individual parent sections (PSY-211-002)(PSY-211-072) when they become active on the first day of your class (see above instructions).

Student Self-Service: Student Planning & Registration

Step 1: Go to https://www.ssc.edu and click on the SELF-SERVICE LOGIN or go directly to https://selfservice.ssc.edu then enter your username and password

College Home Page

Step 2: Once in Self-Service, you have several options. Click “Student Planning”

Self-Service Homepage

Step 3: Click option 1, “Go to My Progress” to view your academic progress in your degree, determine which courses are still remaining, and search for courses.

Planning Overview

Step 4: View of program progress and requirements page. Click on each course that you would like to plan.

View your programs

Step 5: Once a course is selected click “Add Course to Plan”

Add Course to Plan

Step 6 & 7: You must “Select a term” that you intend to take the selected course. Then hit “Add Course to Plan.” This will add the course to your timeline.

Search for Courses and Sections

Step 8: Repeat steps 4-7 until all remaining required courses have been added to your plan.

Step 9: Proceed to “Timeline” to review your courses.

Step 10: Your timeline can be viewed by selecting “Student Planning,” then “Plan and Schedule,” then “Timeline”.

Review your timeline

Step 11: When your degree plan planned courses) is ready for review by the counselor, send an email to  counselingcenterquestions@ssc.edu and place “Degree Audit” in the subject line, or contact SSC’s  Counseling center at (708) 596-2000 Ext. 5724 and let them know that you are ready for the counselor to review your plan or Degree Audit.

NOTE:  This does not mean that you are registered for classes.

Please proceed to the next steps to determine how to plan a specific section of a course and register.

Step 12: From the Student Planning overview screen, select option 2: “Plan and schedule.”

Select Register for Classes

Step 13: View available course sections by clicking “View other sections.” Use the arrows under that link to see more options. Each section block lists the course date and time, available seats, and the instructor.

View available sections

Step 14: Once you find the section you wish to register for, you can click either the box in the section list (left side), or the calendar planner (right side).

Add section to plan

Once you select the section, a pop-up box will open. Click “Add Section

Add the section

Step 15: Once you add the section, that course will stay on your weekly calendar so you can continue to build your schedule. The planned/selected section will show up in YELLOW.

Planned sections will be in yellow

Step 16: Repeat steps 13-15 until you have a complete schedule. Choose the schedule that best fits your needs. You are almost finished, but you are not registered, yet!

Step 17: Once you have chosen a section for each class, review your schedule one last time. Online classes will be listed at the bottom. You can remove sections by clicking the circled X in each section box.

Remove section by clicking the "x"

Step 18: When your schedule is complete, click the “Register Now” button in the top right corner. This box will turn BLUE and you will be able to click when registration is open.

Click register now

The yellow boxes will turn green when you have registered.

FINAL STEPS:

  • If any of the sections remain yellow or have a red outline (meaning there are no seats available), you will need to click the circled X in that box and find another section. Make sure each section you try to register for has available seats and is not full.
  • Any notifications about registration holds, business office holds, parking fines, or prerequisite issues will pop up in the top right corner of the screen. If this happens, you will need to contact your advisor.

How to get to Self Service for Students

When searching for registration options or class schedules, students can use the Self Service page.  This page allows the student to manage course set up, create a calendar schedule for classes that they want to register for, and essentially ensure their registration is official.  It is an easy way to manage the student schedule, as well as, take a look at class synopsis’ and other information provided about course content, time, and date availability.  Its your one stop shop for taking classes at South Suburban.

On the www.ssc.edu home page, the lower right hand corner, click on SSC Self Service. It will ask you to log in with your SSC credentials, and from there you will be all set to start the registration process.