Category: Training Modules (Page 2 of 8)

What’s New in D2L?

D2L is a cloud-based learning management system that updates each month with new features and improvements.  This page summarizes these monthly improvements to keep instructors up-to-date and provide information to improve course content.

August, 2025

Quizzes

In response to customer feedback, instructors now have a simple way to print an offline quiz that supports all native Brightspace quiz question types, shuffling and randomization options, question pools, multiple versions, and an Answer Key.

From the Manage Quizzes page, click the drop-down besides the quiz name and select Print.
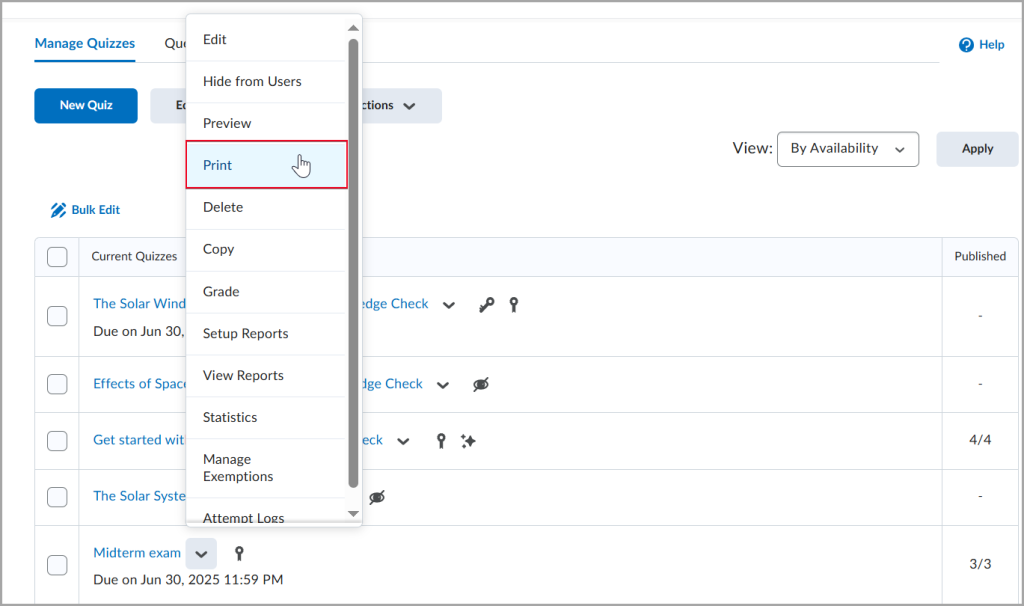
Manage Quizzes page, with drop down menu options for print answer key

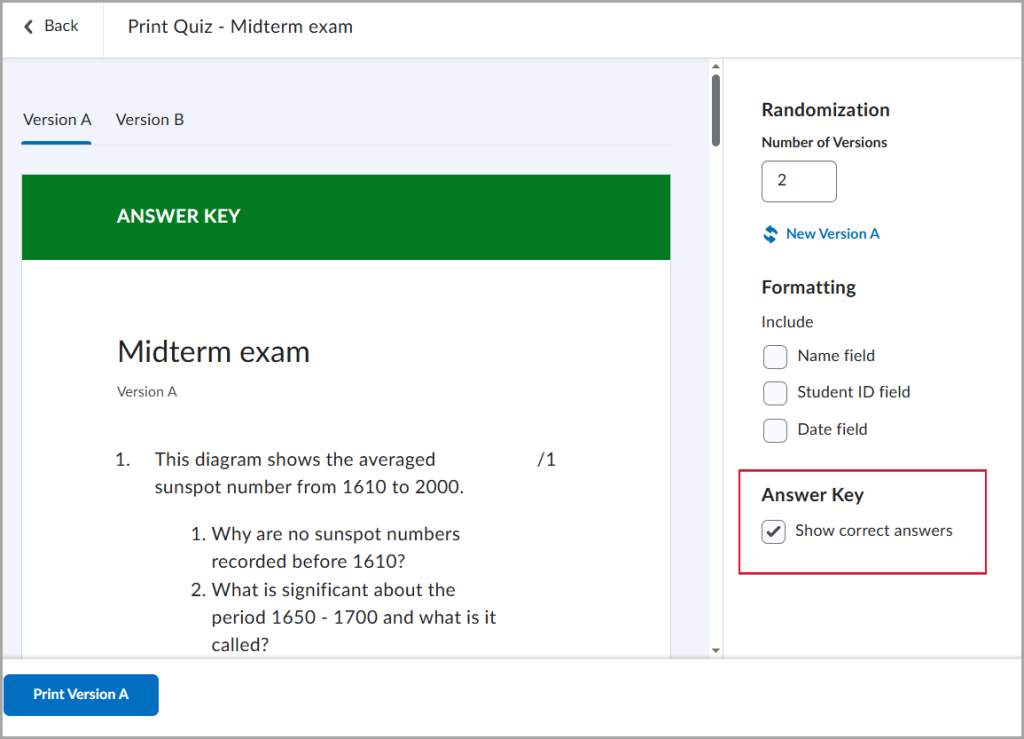
From the Print Quiz page, select formatting, such as including student name, etc, or an Answer Key.
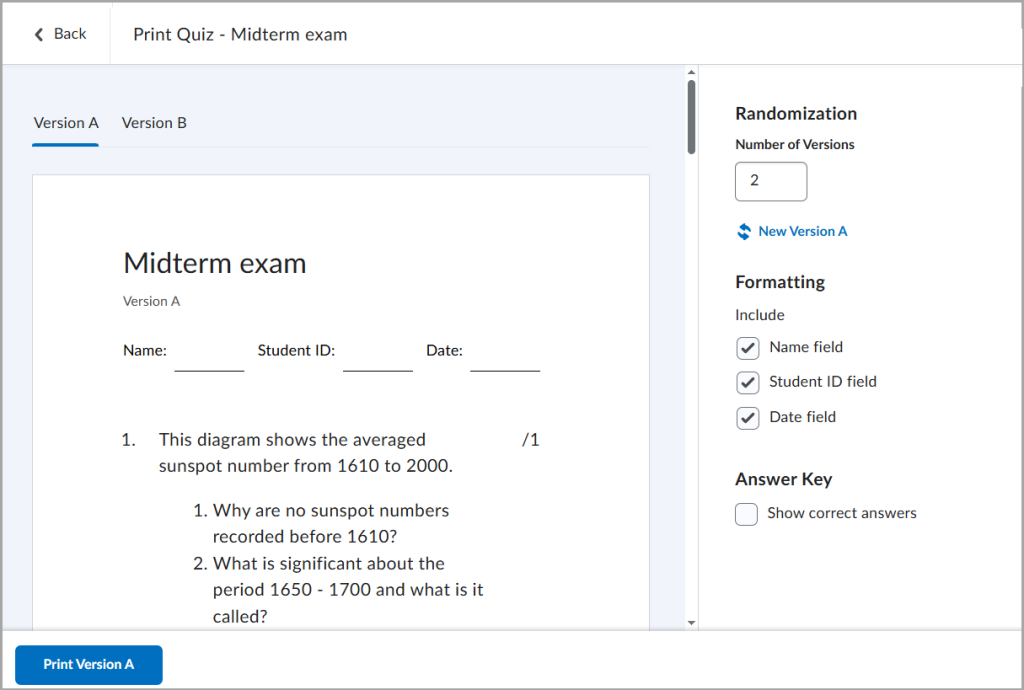
Sample Picture of an exam for printing format
Example of Answer Key Print options

July, 2025

Assignments

When creating an assignments, instructors only had file submission, text submission, on paper submission and observed in person. Now instructors have the option to select file or text submission to provide students options.
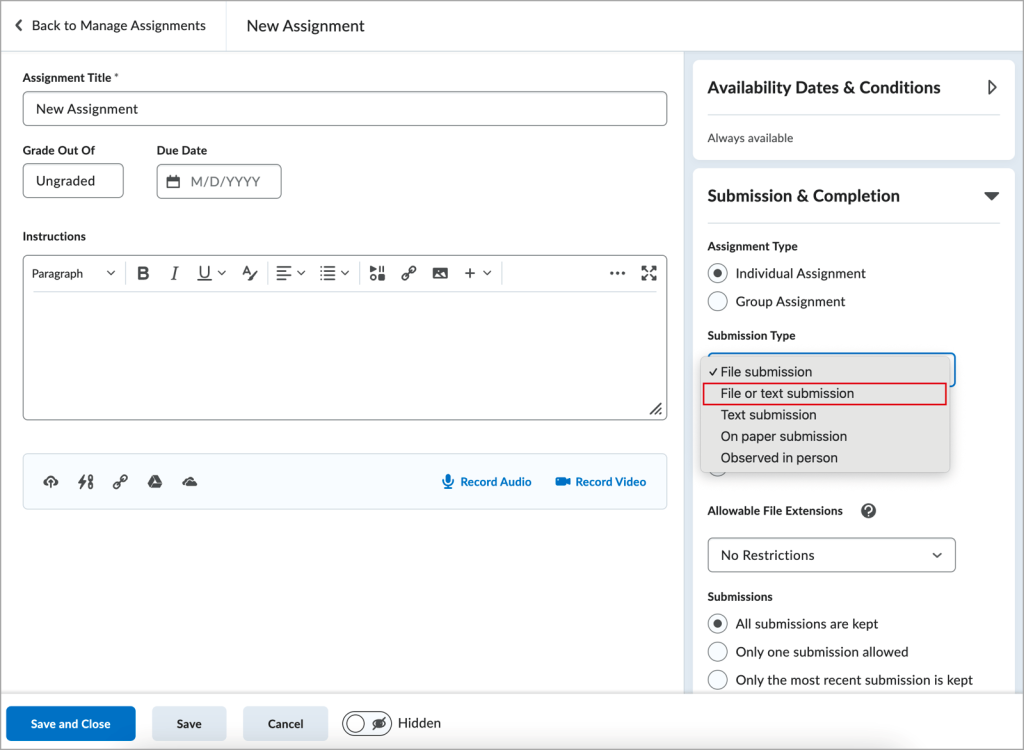
Creating assignments and submission intructions

Quizzes

Instructors can now reopen a submitted quiz attempt.
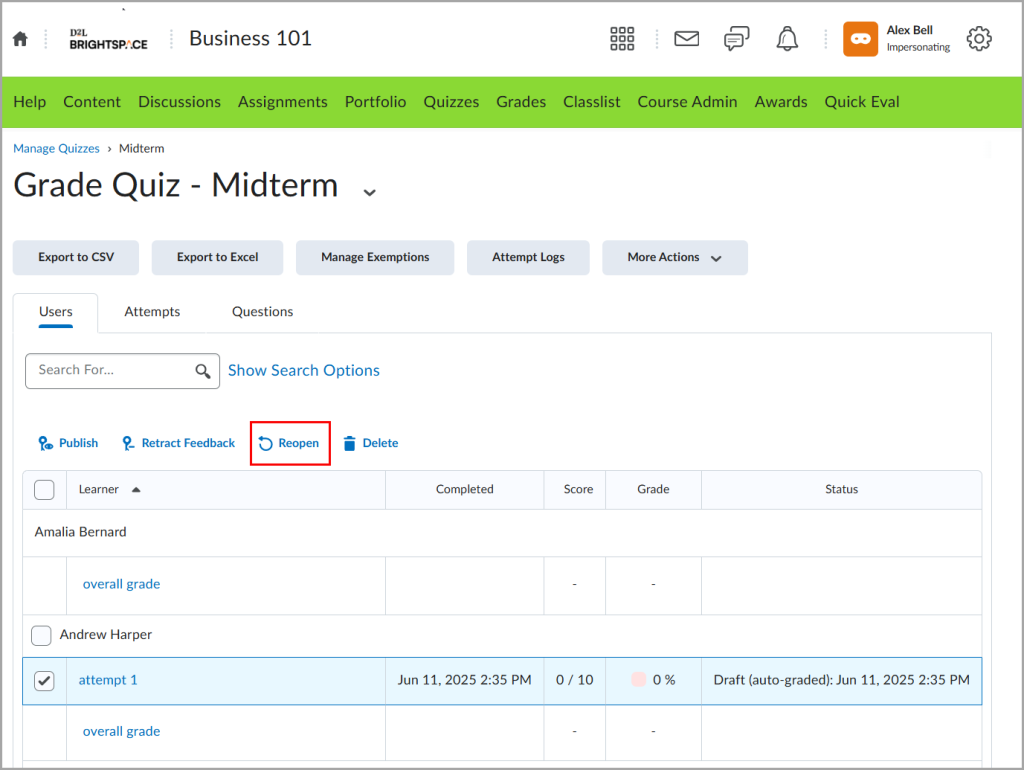
Grade Quiz options box

April, 2025

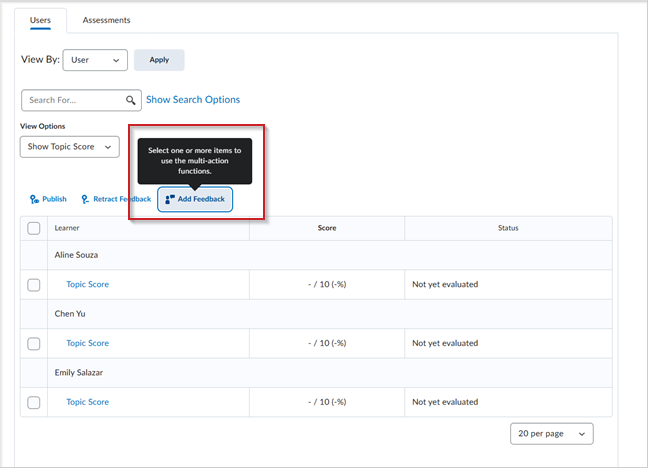
Assignments and Discussion – Bulk Feedback

Instructors can now provide bulk feedback to all students who submitted assignments or discussions.

Assignments
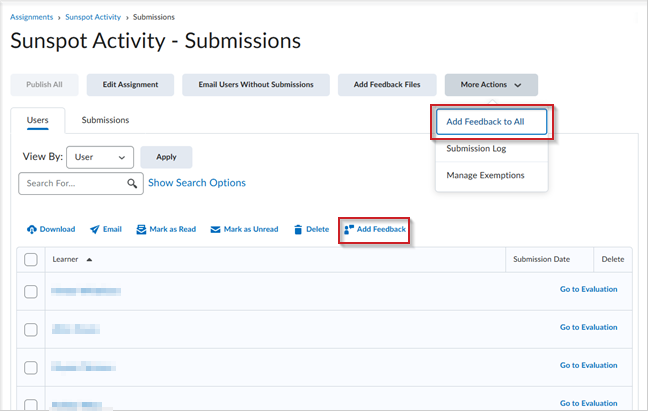
Submissions box with Feedback drop down box

Discussions

the selection button that allows feedback

March, 2025

Quizzes

 New questions types were added within quizzes to include:

  • Arithmetic
  • Matching
  • Ordering
  • Multi Short Answer
  • Significant Figures

September 2024

Quizzes and Rubrics

Rubrics can now be added to written response questions in Quizzes.
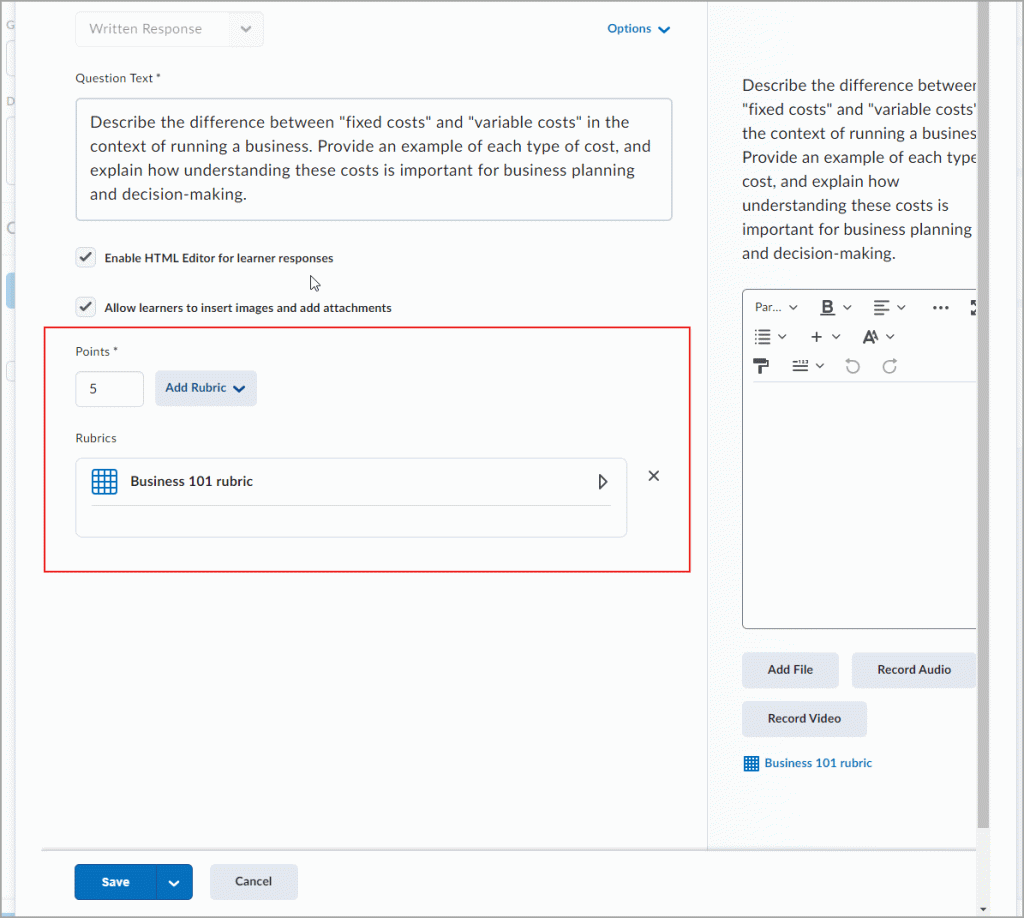
Adding a rubric option

May, 2024

Grading

Feedback files are now available in Grades for Assignments, Quizzes and Discussions.
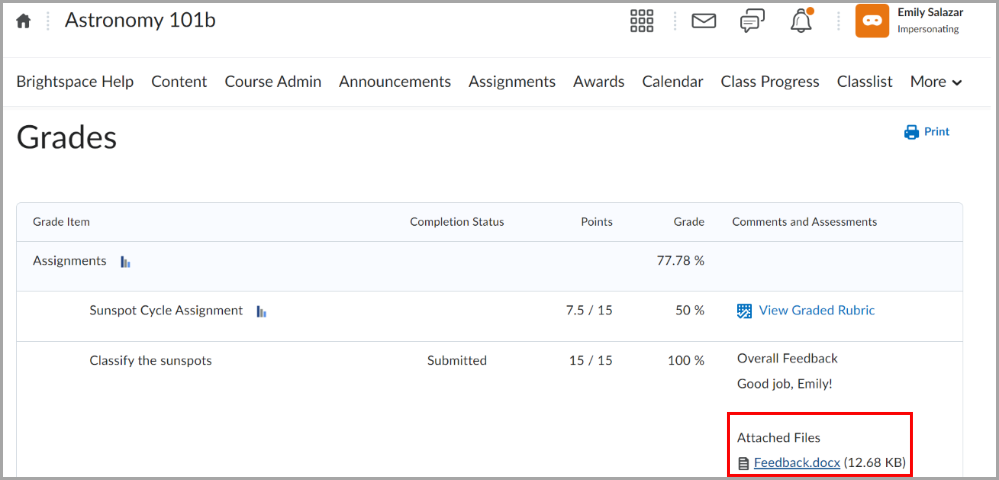
Submitting the feedback attached files

April, 2024

Discussions

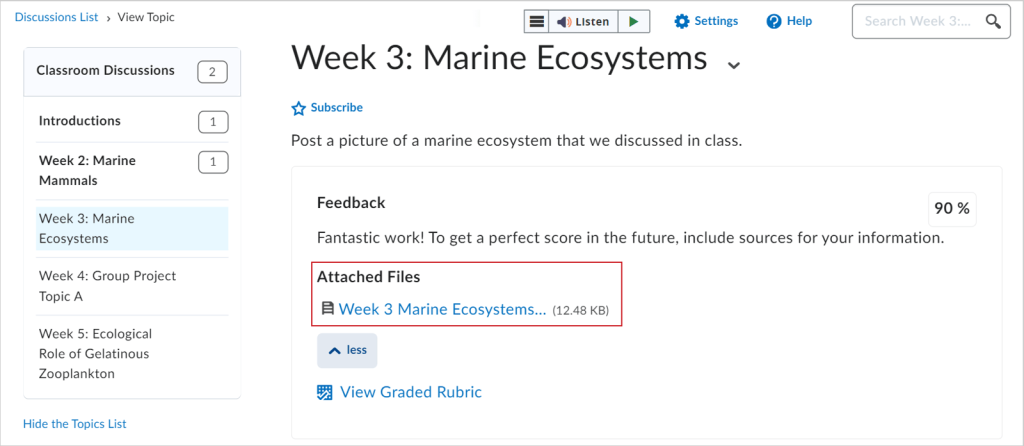
Instructors’ attached files now appear in the Attached Files section for each learner’s discussion evaluation. Learners can view attached file feedback when viewing their evaluated discussion topic.
November, 2023

Announcements

D2L implemented the ability to copy announcements to other courses.
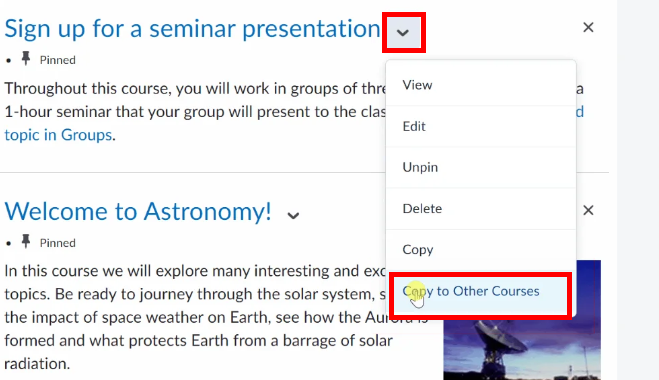
Copy Announcements in D2L to other courses.

September, 2023

Synchronous Quiz

Instructors can facilitate quizzes where learners take their attempts simultaneously, which is convenient for in-class sessions.

When setting up the D2L Quiz, under Timing and Display, select Time Limits, then Synchronous.

Students will take their quizzes in-class, either in a computer lab or using their laptops. When students begin taking the quiz, they will all receive a pop up message telling them when the quiz will begin.
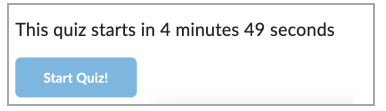
Synchronous Pop Up Quiz

Virtual Assistant Introduced

A contextual help tool is now integrated into D2L. Students and instructors can ask help questions anywhere in D2L.
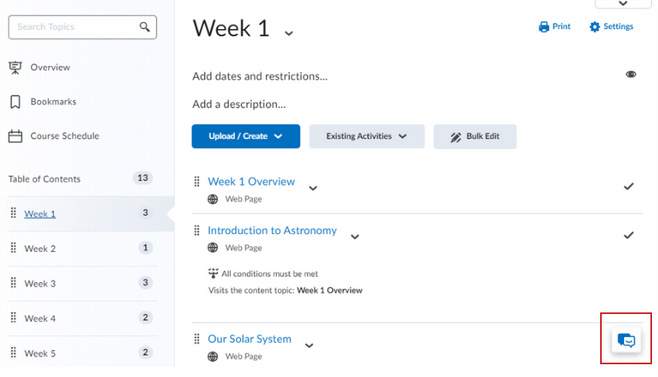
D2L Virtual Assistant

August, 2023

Announcements

When an instructor creates an announcement in their D2L course, that they want to stay at the top of their announcement list, there is now an option to “pin it to the top”.
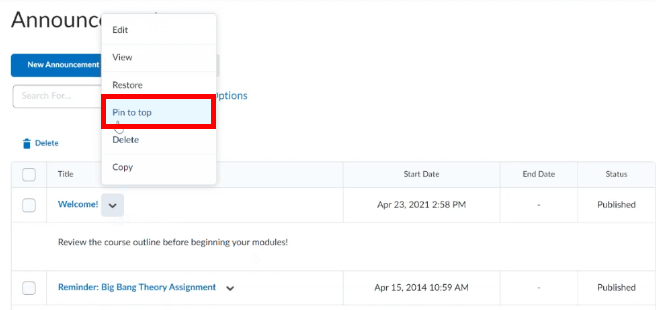
D2L announcement and pinning it to the top.

July, 2023

Quizzes

  • Students:
    • Students can elect to Hide the Timer when taking a quiz. This may reduce anxiety during quiz taking.
    • Warning are displayed at certain times to support awareness of time left.
      • 1 minute remaining on quiz.
      • 5 minutes remaining on quiz (only on quizzes with 10 minutes or longer time limit)
      • Half of the elapsed time (only on quizzes with 20 minutes or longer quiz time limit)
    • Submission View has been changed to Quiz Results Page. After students submits a quiz, they will see the Quiz Results Page.
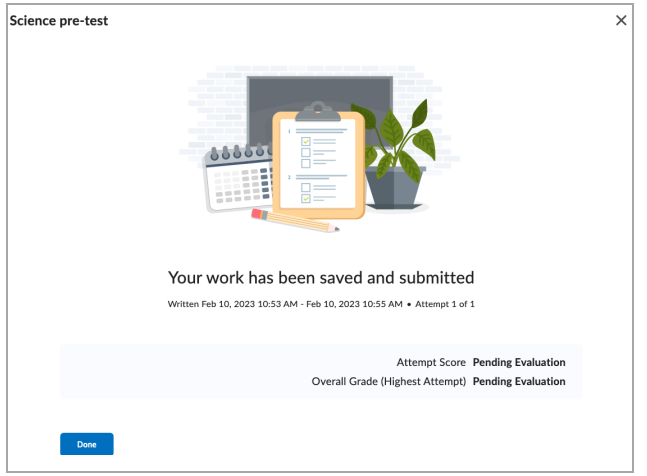
The Quiz Results page shows learners the status of their quiz and their score.
  • Students can now see information about the quiz, while they are taking the quiz.
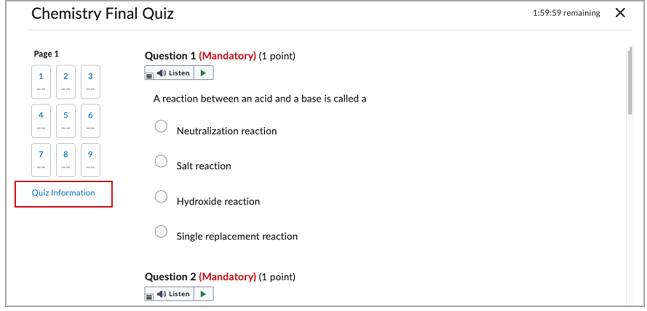
Quiz Information option on the quiz page to view instructions and other information. This does not leave the quiz.

April, 2023

Discussions

  • Discussions have been improved to look similar to Assignments and Quizzes.
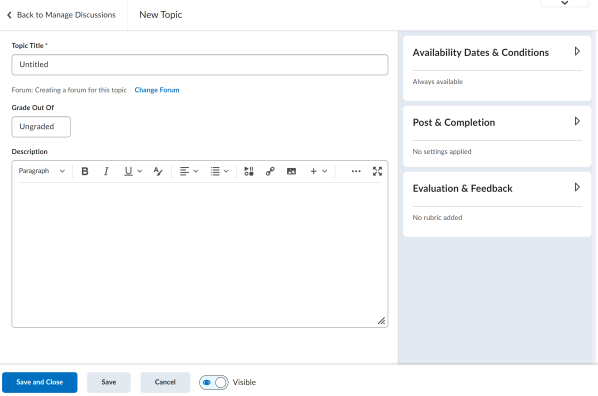
Example of New Discussion Look and Feel

Quizzes

  • Previously, when a student accidentally exited a quiz, there was not a dialog or warning.
  • Students are now shown a context-based confirmation dialog message.
  • Students now see one of the following:
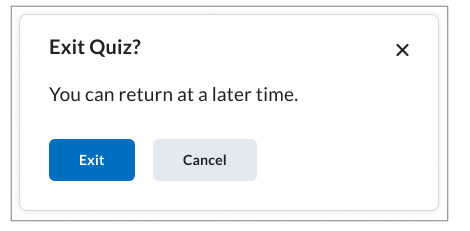
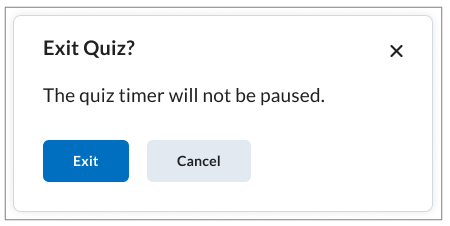
The Exit Quiz confirmation dialog for quizzes with no time limit, no end date, or a time limit that expires before the end date.
The Exit Quiz confirmation dialog for quizzes with a time limit and no end date.
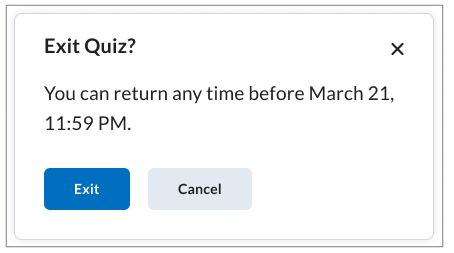
The Exit Quiz confirmation dialog for quizzes with an end date, no time limit, or an end date that will arrive before the time limit expires.
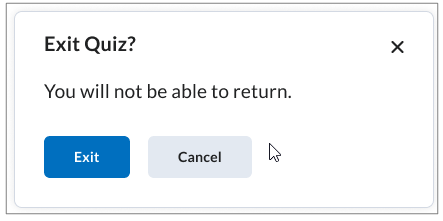
The Exit Quiz confirmation dialog for quizzes that have an end date in the past.

February, 2023

Quizzes

  • Instructors can now add quiz availability dates to the Calendar tool in the Availability Dates & Conditions menu in the new quiz creation experience.
  • Instructors can select the Add availability dates to Calendar checkbox when creating a quiz to add quiz availability dates to their Calendar.
  • Previously, only the Due Date was automatically added to the D2L Calendar.
  • Instructor have more options now on how many questions are presented to students; all questions displayed together, 1 question per page, 5 questions per page, 10 questions per page, or add page break after each section of questions.

January, 2023

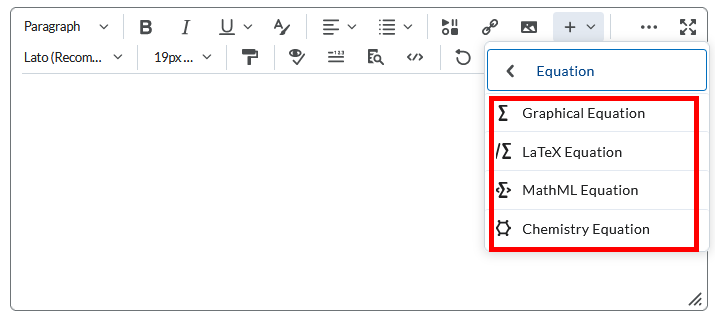
Equation Editor

  • The Equation Editor has been improved with better rendering features.
  • When creating assignments, discussions and quiz questions, within any textbox, instructors can insert equations.
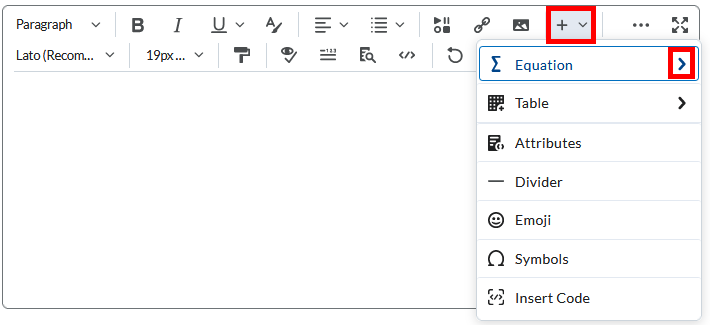
Example of inserting an equation into D2L

December, 2022

Assignments

  • Under Available Dates and Restrictions, Instructors can choose what students see of the assignment before submission using the visible with access restriction feature. See it in Action

November, 2022

Media Library Update

  • The new Media Library (assess is wheel icon next to profile name in D2L) now has a record video/audio option.
  • Videos uploaded to the Media Library or video/audio recorded by instructors can be used in multiple courses.
  • An example would be a welcome video recorded by an instructor and easily placed in various courses.

October, 2022

Pulse Mobile App

  • To help improve the flexibility of push notification, users will be able to choose which push notifications they receive. Previously, it was not possible to limit or control push notifications.

September, 2022

Assignments

  • Instructors who teach multiple courses can now copy assignments to other courses. To copy assignments, select the down arrow next to the assignment name and select “Copy to Other Courses”.

Quizzes

  • “No Time Limit” is now a quiz timing option and has become the default time setting (previously default was 120 minutes). If a time limit is desired, instructors must manually select the desired time.

August, 2022

Display Personal Pronouns

Grading

  • When evaluating student assignments using D2L’s annotation feature, instructor can now use the new undo/redo button. Previously, the only way to remove the annotation was to use the eraser tool.

Media Library Updates

  • Early updates shown below provide information on the new streaming Media Library.
  • Under Insert Stuff, the Media Library is now an option. This allows instructors to upload video in multiple places in D2L.

Quizzes

  • Instructors now have the ability to restore a quiz they may have deleted in error.
  • Under Quizzes > More Actions > There is now a restore option.

May, 2022

Video/Audio and the New Media Library

  • Under the advanced editing option on any video uploaded to D2L, there is now an optimize for streaming button.
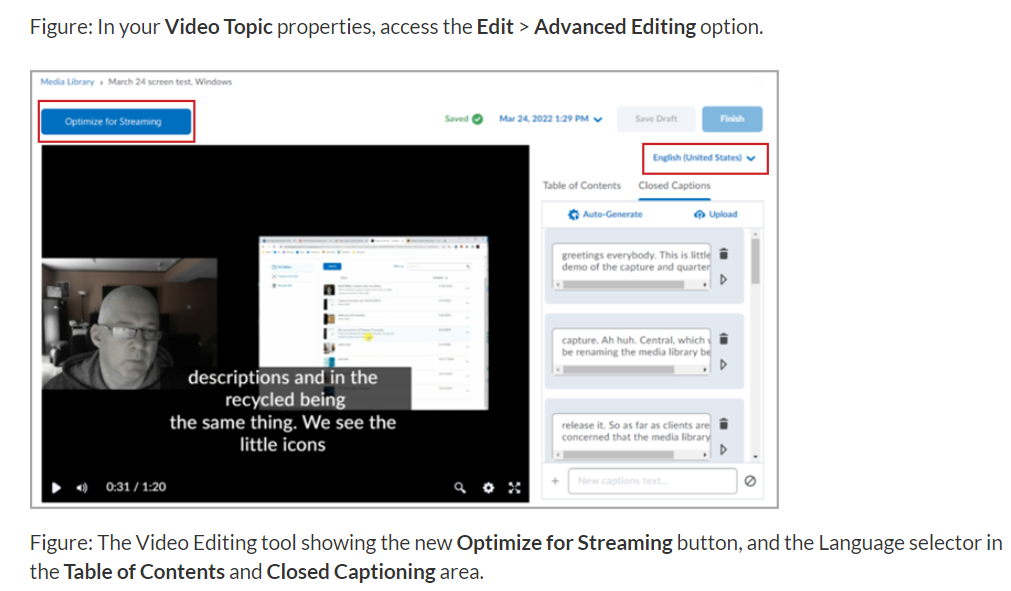
D2L Streaming Media

Pulse Mobile App

  • Brightspace Pulse users can now use @mention push notifications. Originally, @mentions came through the LMS but were only visible if the user opened Pulse and viewed their Subscriptions tab under Notifications. Now, the new functionality sends a push notification to the user when they are @mentioned.
  • Updates and subscriptions in the Pulse App are now aligned to show the same items as the Alert Bell in D2L.

April, 2022

Intelligent Agents

  • The Create Agent page has a new modernized user interface.
  • Subject line of intelligent agent emails now supports 128 characters.

March, 2022

Announcements

  • Course announcements now have a copy feature.

New Media Library

  • A streaming media library is now available for D2L courses. New videos posted to a D2L course will be placed in this streaming media library. Videos previous uploaded to D2L will not be automatically transferred to this new media library, so instructors will have to manually transfer.

Workflow improvements for Media

  • When creating new video and audio, instructors no longer must wait for the uploaded media file to process. While the media file remains unavailable during processing, instructors can navigate away to work on other tasks. When processing is complete, instructor will be notified.

February, 2022

Content – Print and Download Buttons

  • The Print and Download buttons are now better positioned when viewing content within a module.
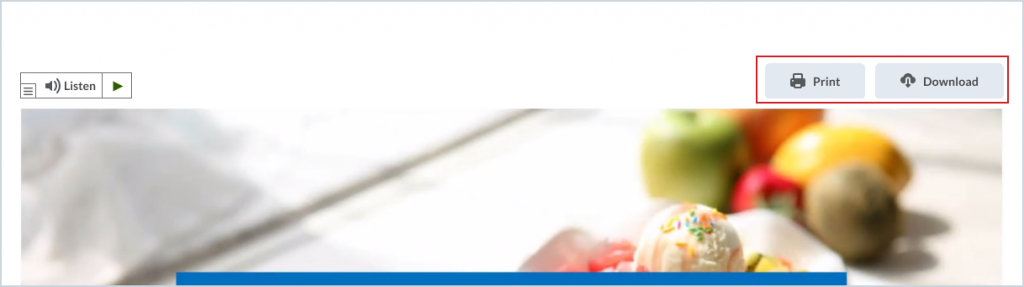
Print and Download
Print and Download

January, 2022

Video/Audio and New Media Library

What improved?

  • Table of Contents: Instructors can apply meaningful segments to larger videos.
  • Audio Generated Closed Caption: Instructors can select language, with the ability to edit.
  • Video Editing: Minor video editing is available – Seek, Mark and Cut.

How to implement?

  • Within a module in your course, select Upload/Create, then Video and Audio.
  • Video will take a few minutes to process after uploading.
  • Select Advance Settings after the video uploads to gain access to these new features.
  • See Full Directions (SSC uses Classic Content).
SSC Employee Help Desk Guide

Steps to entering a Help Desk ticket on CAMPUS

  • Click on the MyHelpdesk icon on the desktop or enter in https://myhelpdesk.ssc.edu
My help desk Icon
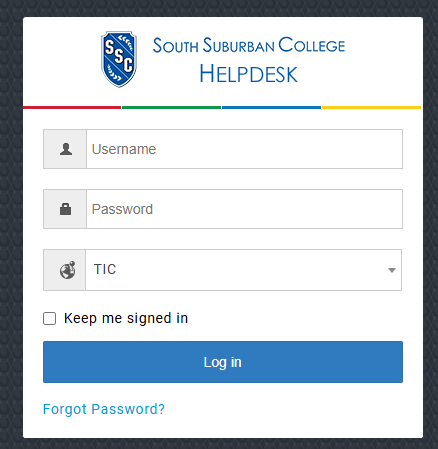
  • You may be asked to log into the Help Desk, if so, please use your Windows login credentials
This is a picture of help desk ticket system log in information
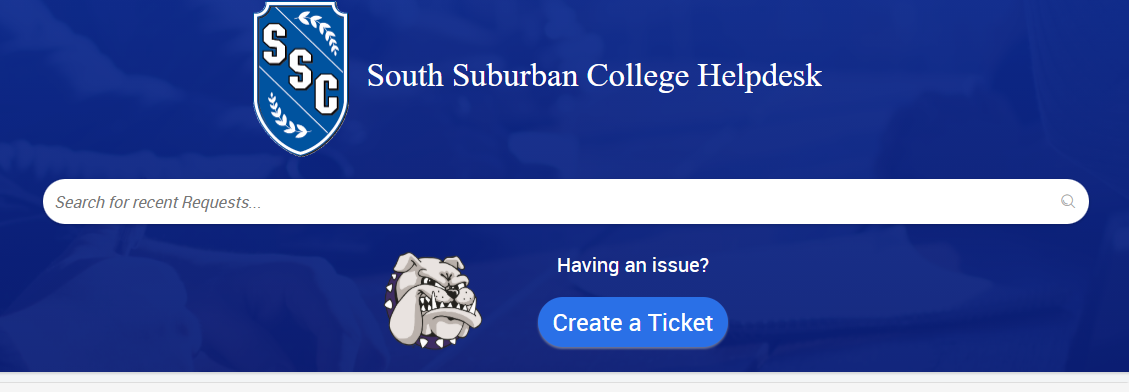
  • Select “Create a Ticket”
South Suburban College Helpdesk create ticket
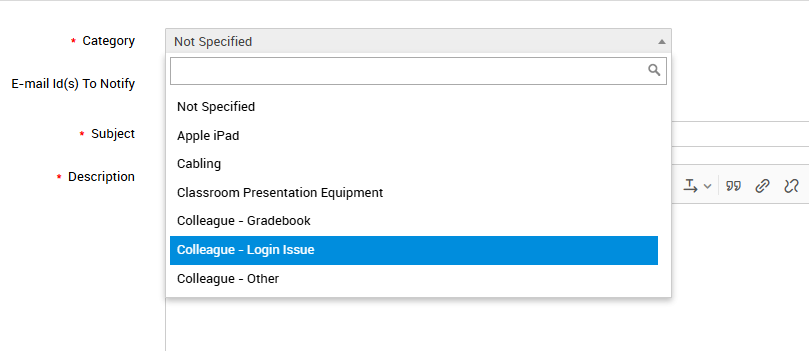
  • Select a “Category” from the dropdown menu
this is a picture of selection menu
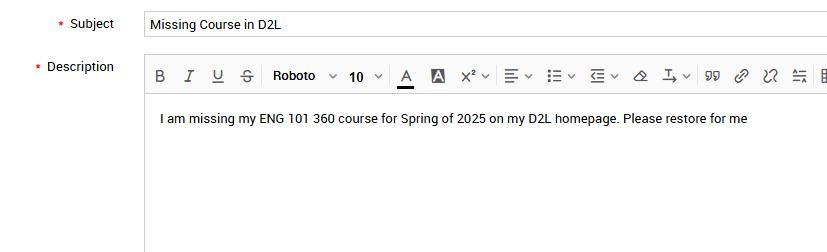
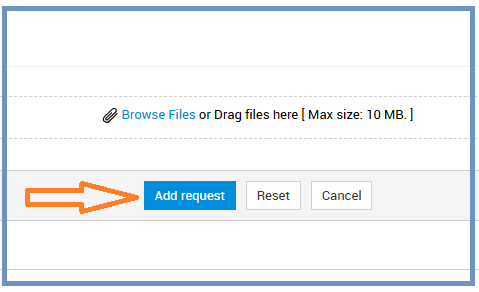
  • Enter in a detailed description of the issue and hit “Add Request”
this is a picture of description box
EX: Description box for helpdesk ticket.
This is a picture of ADD Request option

Contacting the Help Desk by Phone

The Help Desk is available by dialing 5890 from any on-campus phone, or 708 225 5825 from a cellphone or outside line.

Please choose from the following options:

  • Option 1: Assistance with computers, printers, phones, email, or network-related issues
  • Option 2: Support for online classes or D2L
  • Option 3: Help with classroom presentation equipment
  • Option 4: Assistance in the computer labs

Submit Grade Data to Ellucian Colleague Gradebook

Timely data submission allows students to understand their performance and make informed decisions about their academic progress. Missing data impacts things like academic standing, graduation, transfer plans, and financial aid eligibility. Delays in grade data submissions can create bottlenecks in these processes, impacting both the student and the college.

The due dates for each data submission are posted within D2L Brightspace, sent by email, and available from your department. It is crucial that each deadline is met. Additionally, the Illinois Community College Board will fine the college for late report submissions.

Remember we are here to help you with the process. Do not hesitate to contact the Teaching and Learning Center with questions at ssconline@ssc.edu or call 708-225-5890 opt. 2.


STEP ONE

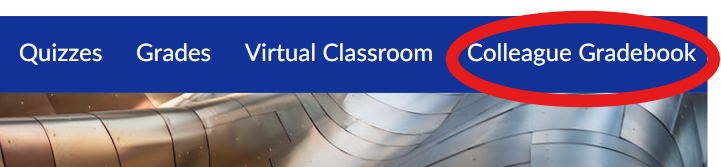
Locate the COLLEAGUE GRADEBOOK link on the blue navigation bar within your D2L Brightspace course shell.

Image of Colleague Gradebook selection highlighted in red circle

STEP TWO

PLEASE NOTE IT MAY TAKE A FEW SECONDS FOR THE NEXT PAGE TO LOAD

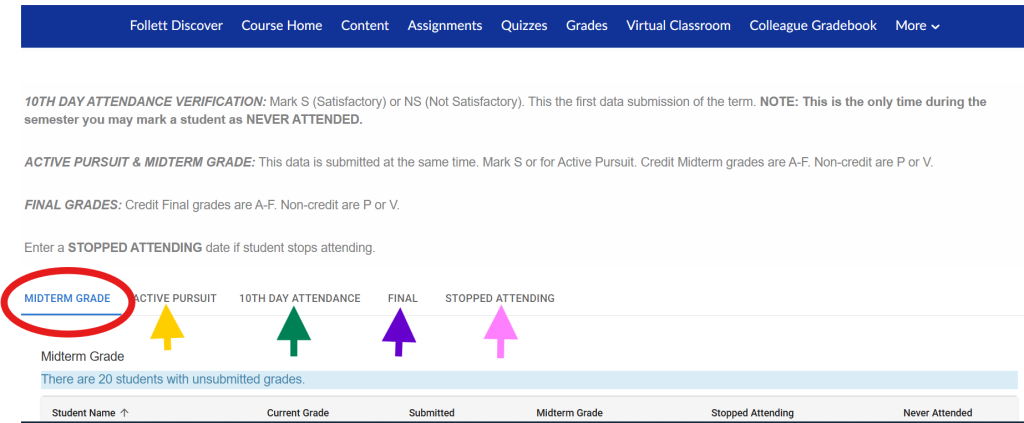
Please locate the appropriate tab for your data submission: 10th Day Attendance Verification, Active Pursuit, Midterm Grade, and Final Grade.

First Entry for the Term (Green Arrow Below)
10TH DAY ATTENDANCE VERIFICATION: Mark S (Satisfactory) or NS (Not Satisfactory). This is the first data submission of the term. 

NOTE: This is the only time during the semester you may mark a student as NEVER ATTENDED. Marking a student as NEVER ATTENDED later in the term has a negative impact on a student’s Financial Aid. There is a simple process to readmit a student if appropriate at a later date.

Second Entries for the Term (Gold Arrow and Red Circle Below)
ACTIVE PURSUIT & MIDTERM GRADE: This data is entered and submitted at the simultaneously. Mark S or for Active Pursuit. Credit Midterm grades are A-F. Non-credit are P or V.

Third Entries for the Term (Purple and Pink Arrows Below)
FINAL GRADES : Credit Final grades are A-F. Non-credit are P or V.

Enter a STOPPED ATTENDING date if a student stops attending.

Image of the Colleague Gradebook with arrows pointing at the selections.

STEP THREE

Be sure to enter your submission data in field beneath the column that’s name matches the data you are submitting.

Image of Midterm Grade selection highlighted with red circle

STEP FOUR

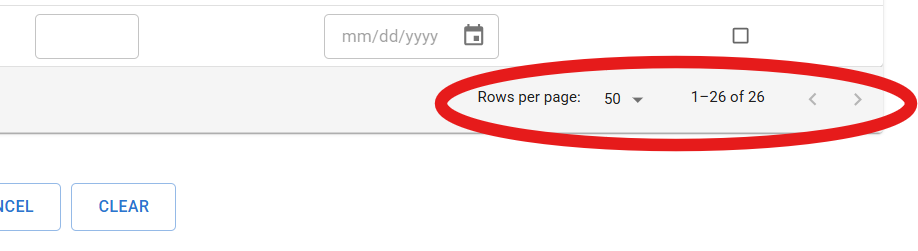
Be sure to enter data for each student on your class list. Be sure to check that all of your students are being displayed on your screen by adjusting the number of rows that appear at one time in the lower right-hand corner of the class list.

Image of Rows per page option, circled in red

STEP FIVE

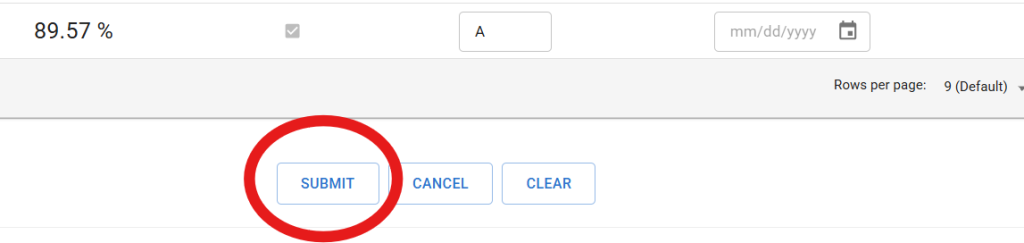
Select the “SUBMIT” button located at the bottom of the page to submit your data to Ellucian Colleague (our student management system).

Image of Submit option inside of red circle

STEP SIX

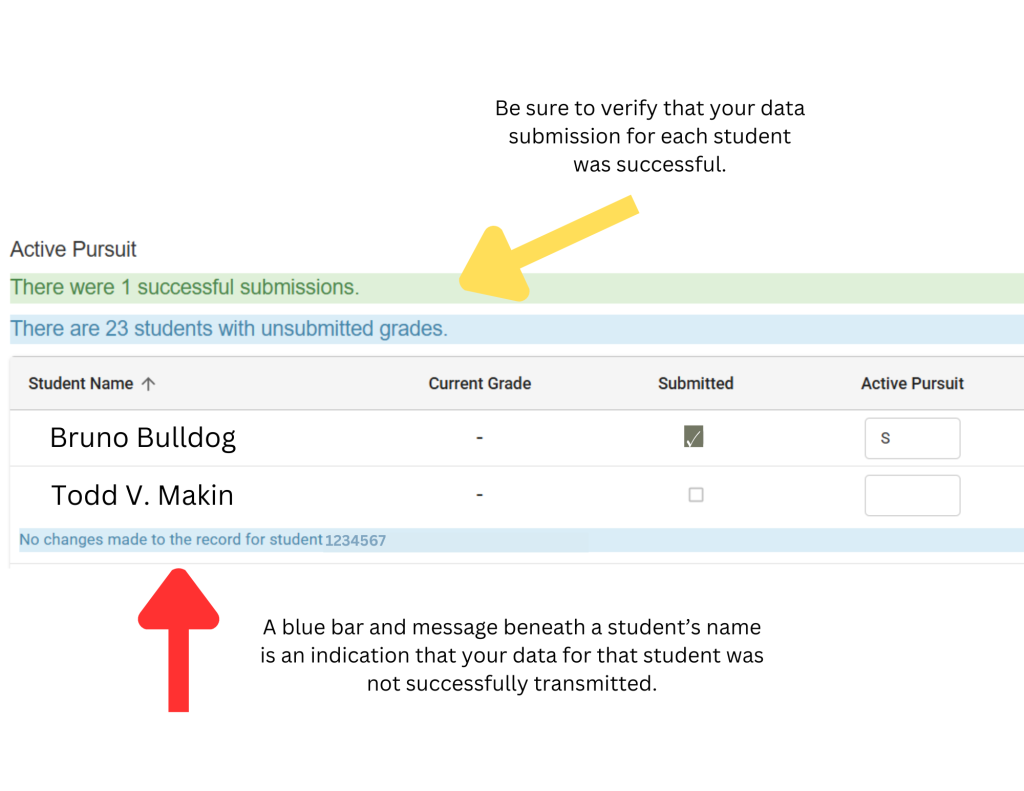
Once your submission is complete, verify that there is a checkmark in the “SUBMITTED” column for each student.

Image of example grades that were successfully submitted with check mark in box

STEP SEVEN

If a student does not have a checkmark in the “SUBMITTED” column, a blue bar will appear after your submission indicating why the data was not transmitted. If you are unable to resolve the issue, please contact ssconline@ssc.edu or call 708-225-5890 opt. 2 for assistance.

Be sure to verify that your data submission was successful before navigating away from this page or the current tab.

image of succesful submissions pointed out by yellow arrow and unsuccesful submissions pointed out by red arrow when entering grade data in Colleague Gradebook

Still need help? Email ssconline@ssc.edu or call 708-225-5890 opt. 2.

Join Bongo Virtual Classroom using an iPad or iPhone

Student’s may receive an error when trying to join their Bongo Virtual Classroom using an iPad or iPhone.  However, this can be rectified by following these four simple steps:

Step 1: Make Certain your iPad or iPhone’s operating system is up to date

  • On your iPad or iPhone open Settings App > General > Software Update

Step 2: Update your Safari Settings

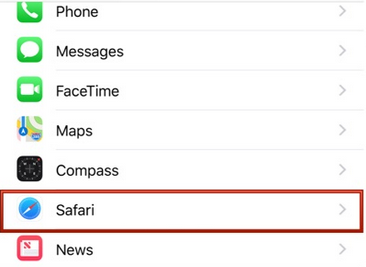
  • On your iPad or iPhone open Settings App > Safari
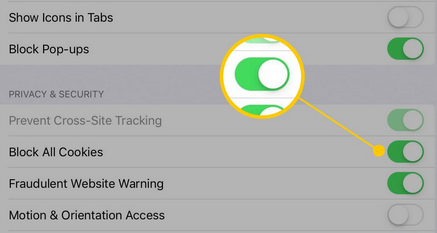
Ipad Safari Settings
  • Make sure all of the following are toggled OFF:
    • Block All Cookies
    • Prevent cross-site tracking
ipad security settings for Safari

Step 3: Visit SSC D2L directly through your Browser (not the D2L Pulse app)

  • Visit: d2l.ssc.edu
  • Login and navigate to your D2L course

Step 4:  Find the Virtual Classroom in your D2L course

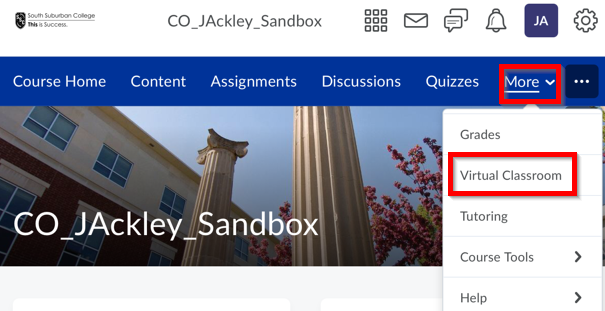
  • Within your D2L course menu (along the top) > select Virtual Classroom
  • This can also sometimes fall under More in the course navigation > Select Virtual Classroom
BrightSpace Pulse More Virtual Classroom
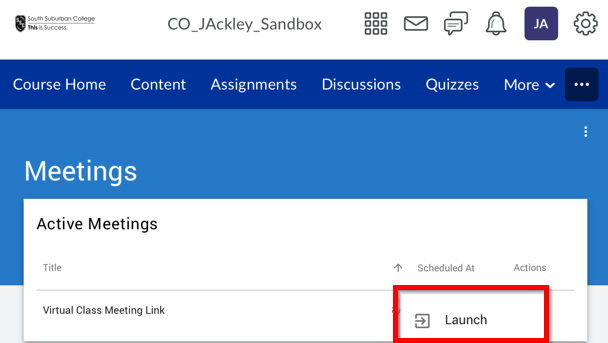
  • Under Action column of scheduled Virtual Classroom session > select Launch
D2L Launch Virtual Classroom
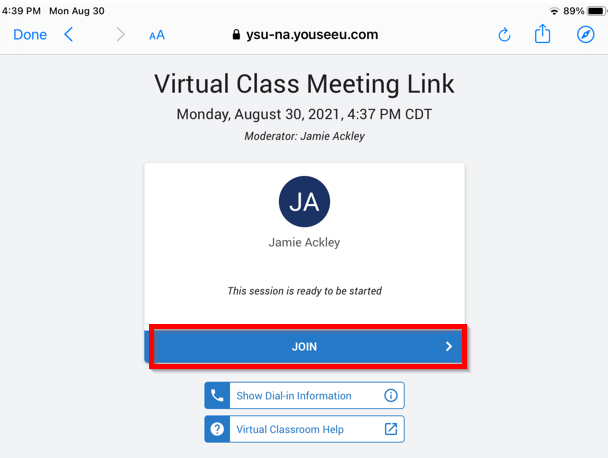
  • Select Join
Bongo Join
  • Select to allow Microphone
  • To turn on your webcam, select Camera and allow

Kahoot! for Assessment (SSC Online Workshop)

Watch Workshop Video (39:22)

Above is a recording of this SSC Online Workshop presented by math instructor, Jennifer Medlen.

Original Workshop description:

See how a math instructor at SSC easily aligned the online scoring of a Kahoot! quiz to the SSC Critical Thinking Rubric for general education assessment. Ideas will be discussed for creating a similar type of alignment with other College rubrics. 

Questions: please email ssconline@ssc.edu.

Creating a Breakout Room on Teams

Microsoft Teams allows the user to create breakout rooms within the meeting. Follow these simple steps below to create the breakout room:

  • Enter the Teams Meeting that you have set up and Select Rooms
Selection of Teams Rooms
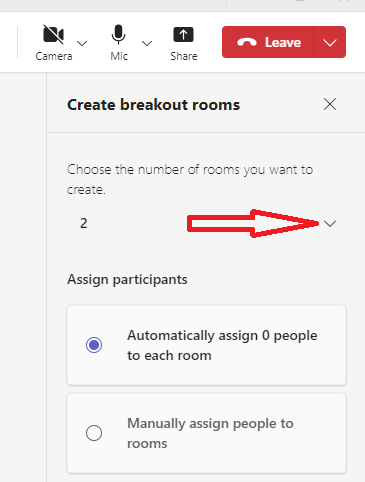
  • Choose the number of rooms you want to create drop down: this example is 2
Breakout Rooms Picture
  • Then under the Assign Participants option box:
  • Select Automatically assign people to each room for random groups
  • Select Manually assign people to room for familiarity
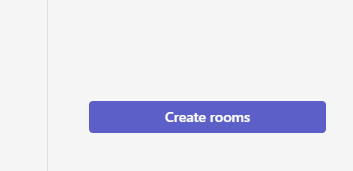
  • Click on the ‘Create Rooms’ tab and the breakout rooms are all set
Create Room option button
Click on Create Rooms for Breakout Rooms in Meeting

Using Microsoft Bookings to Schedule Virtual and On-Campus Office Hours

Online appointment scheduling is here! You can now allow students to schedule office hours with you with just a click of a link. All meetings will appear on your Outlook calendar. If you choose to meet with students virtually, a Microsoft Teams meeting link will be created and sent automatically to the student on your behalf.


STEP 1

Login at Office.com using your SSC username, and network password.


STEP 2

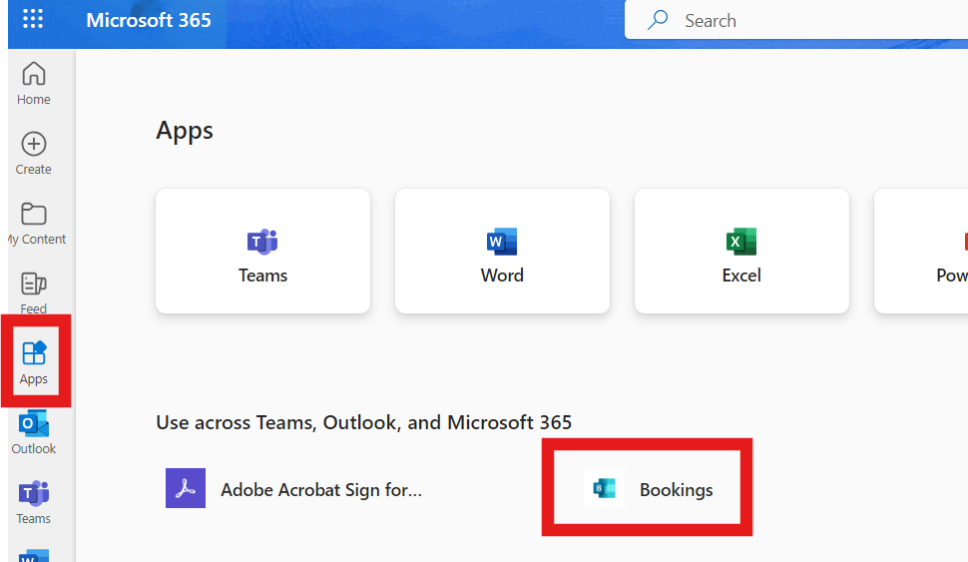
Select the “Apps” icon from the navigation bar on the left. If “Bookings” is listed on your Microsoft 365 Apps page, click to open and proceed to STEP 5 of this guide.

Bookings listed on Microsoft 365 App Screen

STEP 3

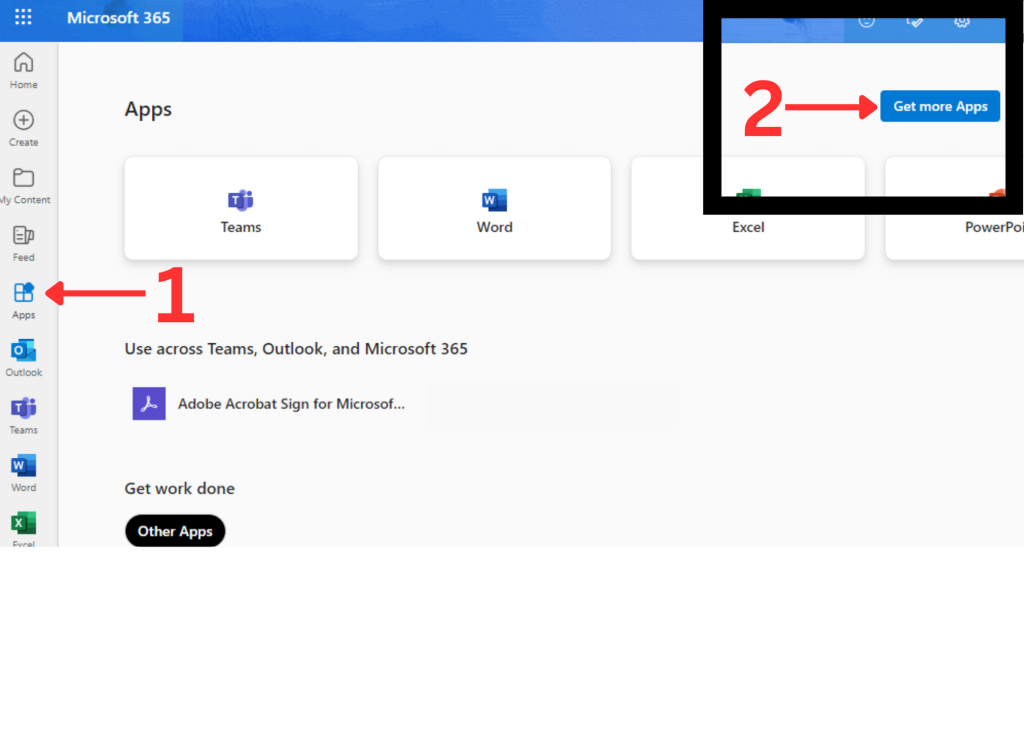
Click on the Apps link from the left menu, and navigate to the “Get More Apps” in the upper right-hand corner of your browser window on a desktop or laptop.

Image of Apps selection and get more apps option button highlighted by number 2 and red arrow

STEP 4

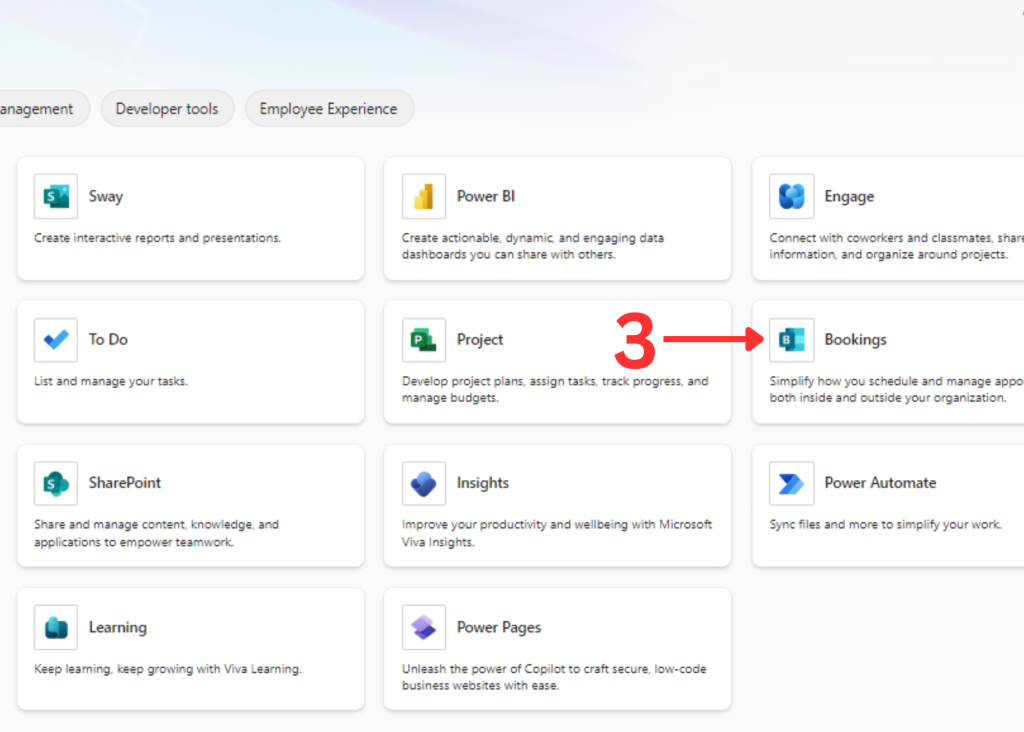
On the next screen, click on the “Bookings” app to add it to Office 365.

Picture of office 365 apps with selection arrow pointing towards Bookings app

STEP 5

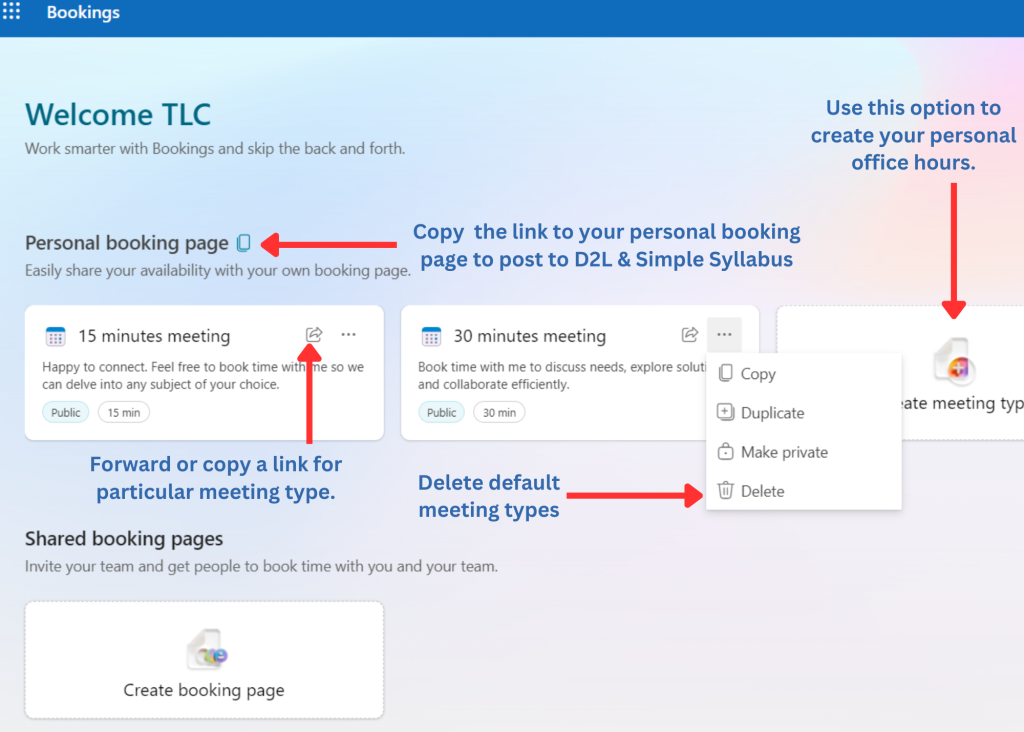
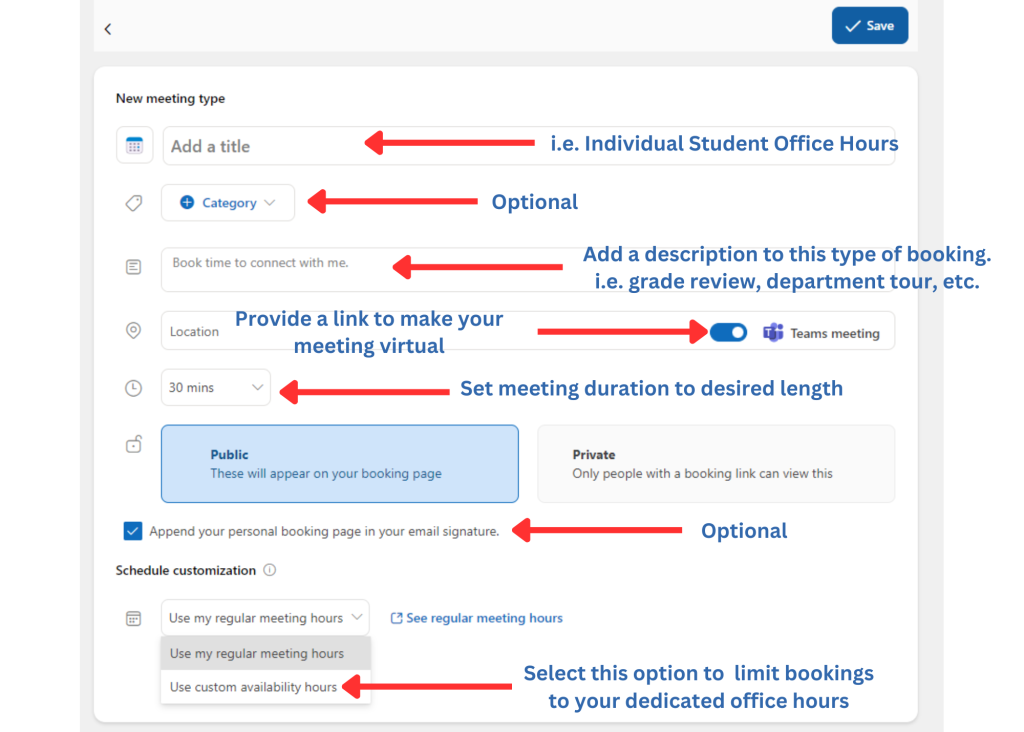
Follow the prompts on the images below to create a new meeting type.

Be sure to copy the link to your “Personal Booking Page” or the unique meeting you created especially for your students and add it to your D2L course shells and Simple Syllabus so that they can easily book virtual office hours with you online.

Image of booking app page with instructions, red arrows pointing to each instruction

STEP 6

You can restrict the ability of your schedule to just your posted office hours by setting “custom availability hours” for the meeting type you wish to share.

Image with Instructions on bookings app set up

Need help more help? Email us at ssconline@ssc.edu.

Open Education Resources (OER) at SSC

OER stands for “Open Education Resources” and is linked to an educational movement that began about 20 years ago and has become a global educational movement.  Instructors who use OER course material in their courses are using freely available, high-quality educational resources in order to bring textbook costs down for students.  OER, in essence, are freely available, openly licensed resources such as textbooks, media, videos, articles and more – that are useful for teaching, learning and accessing as well as for research purposes.

Interested in trying out Open Education Resources in your course?  Follow these easy steps to begin:

Step 1: Understanding the Benefits of Open  Education Resources

Using Open Education Resources in your course provides many benefits, but here are just a few to consider:

  • Equity to Students: Students will have access to quality learning materials that can be accessed repeatedly without any access roadblocks.
  • Saves Money: Students may save on the purchase of textbooks or course materials.
  • Scalability: Instructors can easily adopt OER material that can be distributed widely with little or no cost.
  • Enhancement of regular course content: multimedia, images and other resources allow for students to receive content in different formats that match with their learning styles.

Step 2:  Become Familiar with OER Licensing

Before finding OER material for your course, step two is becoming familiar with OER licensing and terminology, as faculty will have to cite the OER material and license used in their courses.  The person who creates OER content decides how the content they created can be used by other educators.  For example, they decide the following:

  • Content can only be Adopted = the OER resource can only be used “as-is”
  • Content can be Adapted = the OER resource can be revised, updated, and converted as long as the original source is cited.
Want to share your content with other educators? Faculty can create their own OER material and share with other educators.  In doing so, they would select how they wish to license their OER content (Adopted or Adapted).  Instructors can contact the Teaching and Learning Center or the SSC library to obtain a list of free OER platforms to publish shareable content. 

When selecting an OER resource: Faculty must make sure the license for that content also allows for the use, modifications, and distribution. These are commonly known as the 5Rs – Retain, Reuse, Revise, Remix, and Redistribute. 

  • Retain – allows instructors to make, own, and control a copy of the OER resource (e.g., download and keep your own copy)
  • Revise – allows instructors to edit, adapt, and modify a copy of the OER resource (e.g., translate into another language)
  • Remix – allows instructors to combine OER content (include their own creation) to create something new (e.g., make a mashup)
  • Reuse – allows instructors to use original, revised, or remixed copy of the resource publicly (e.g., on a website, in a presentation, in a class)
  • Redistribute – allows instructors to share copies of original, revised, or remixed copy of the OER resource with others (e.g., post a copy online or give one to a friend)

Watch a short video explaining:

“OER Bootcamp 0: What OER’s are and why they are important” video by Sarah Morehead on YouTube  and licensed under CC BY 4.0 .

Step 3: Find a free OER resource to use in your course

There are a variety of OER repositories, collections, and directories and the list is endless.  Often the trouble lies with locating content that fits precisely with what the instructor is seeking.

Below are just a few resources to get instructor’s started.

Watch a short video explaining:

“OER Search” video by Amy Hofer at Open Oregon on YouTube and licensed under CC BY 4.0.

Need help citing the OER source you plan to use? If instructors use OER resources, make sure to properly cite your source.  Visit the free Attribution Builder – enter the source and license to generate an OER cite to post with your course material.  

Step 4: Calculate cost savings to your students?

If you are an instructor at SSC and plan to use Open Education Resources in your course, let the Teaching and Learning Center and SSC Library know by completing this short 4-question form.   Completing this form will allow us to calculate cost savings to students.

Need more assistance in getting started? Make an appointment with the Teaching and Learning Center and SSC Library by emailing ssconlne@ssc.edu.

Introduction to Simple Syllabus 

Download training session PowerPoint slides (which acts as a step-by-step handout) 

Watch a Training Video (19:25)

What is Simple Syllabus? 

Simple Syllabus helps instructors save time and eliminate redundant tasks associated with syllabus creation in Brightspace D2L. The template-driven architecture of Simple Syllabus automatically ensures compliance with accreditation and regulatory standards while still giving faculty the autonomy to personalize curriculum content for their classroom directly within D2L. 

Announcement: Starting in the Spring 2024 term, all instructors should begin using Simple Syllabus in D2L instead of uploading a syllabus in word format.  

How to Login and Access: 

  • Visit: d2l.ssc.edu 
  • Use the same Username and Password you normally use for Email and other services at SSC. 
  • Under the My Courses module, click on your D2L course shell. 
  • Click on More within your D2L Course, then My Syllabus. 

Content in your Syllabus: 

Simple Syllabus turns your syllabus into an electronic format.  That means you will need to review and complete fields after clicking on the My Syllabus link.  The good news is that each time you teach your courses, the syllabus from the last time you taught will automatically be imported into the D2L course for the new term.  This will save you even more time, as you won’t have to re-enter data, except updating your assignments, due dates, etc.  

There are three types of data fields in Simple Syllabus.  Prepopulated fields (nothing required of the instructor), required content that the instructor must complete, and then optional fields that if left blank, will not appear on the electronic syllabus.  

Prepopulated content:  

Many fields in the electronic syllabus are pre-populated with data that comes directly from Colleague, our student information system.  That means it is always accurate and you do not need to worry about updating.  The pre-populated fields include course details, course description, textbook information, learning outcomes, explanation of attendance verification, academic integrity, student services and policies, and last date to withdraw. 

Fields instructors must complete:  

There are some fields that instructors must complete.  These fields include instructor information, additional course materials (if any), your course attendance policy and how it might affect student’s grades, your grading schema, your academic integrity policy (cheating/plagiarism), and course calendar of assignments, due dates and points.  

Optional fields: 

There are many optional fields instructors can complete.  But if they are left blank, they won’t appear on the electronic syllabus.  These optional fields include method of presentation, classroom etiquette, and late work and make-up assignments. 

Add Custom Content 

You can add your own custom content to the electronic syllabus as well.  This preserves your academic freedom.  

Optional: If using D2L for your assignments, Simple Syllabus has a sync option that will list all your assignments, due dates, point values, etc., automatically in the Syllabus.  

Publish your Syllabus 

When all required fields are completed, you have to opportunity to preview the syllabus and then submit it.  Submitting the syllabus allows students to see it.   

Where do students see the syllabus?  They click on My Syllabus in the D2L course menu. 

Training and Information 

Support 

  • For issues accessing your Syllabus, please contact the Teaching and Learning Center at ssconline@ssc.edu.  
  • For additional help, access the Simple Syllabus Technical Support Center. 
  • Within the Simple Syllabus tool, click on the question mark icon on the top left of the syllabus. 
  • Fill out the Submit a Request form for immediate help or visit the Knowledge Base. 
  • If you are asked to login, select Continue with SSO.  

Office 365 – Outlook and Teams

MISSED OUR LIVE TRAINING SESSION?

WATCH A REPLAY (SSC Username and Network Password Required)

How to Login and Access:

  • Visit: https://office.com
  • Username: Type in your complete SSC email address
  • Password is your same single sign-on (same as you use for D2L, etc.)
    • Multi-factor authentication is required (if you haven’t set this up already, view setup)

Outlook (email and calendar)

Teams

Need Help?

  • Email the Teaching and Learning Center at ssconline@ssc.edu
« Older posts Newer posts »