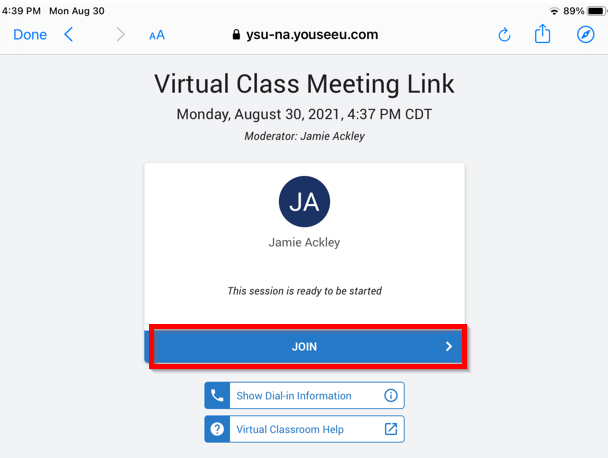
Student’s may receive an error when trying to join their Bongo Virtual Classroom using an iPad or iPhone. However, this can be rectified by following these four simple steps:
Step 1: Make Certain your iPad or iPhone’s operating system is up to date
On your iPad or iPhone open Settings App > General > Software Update
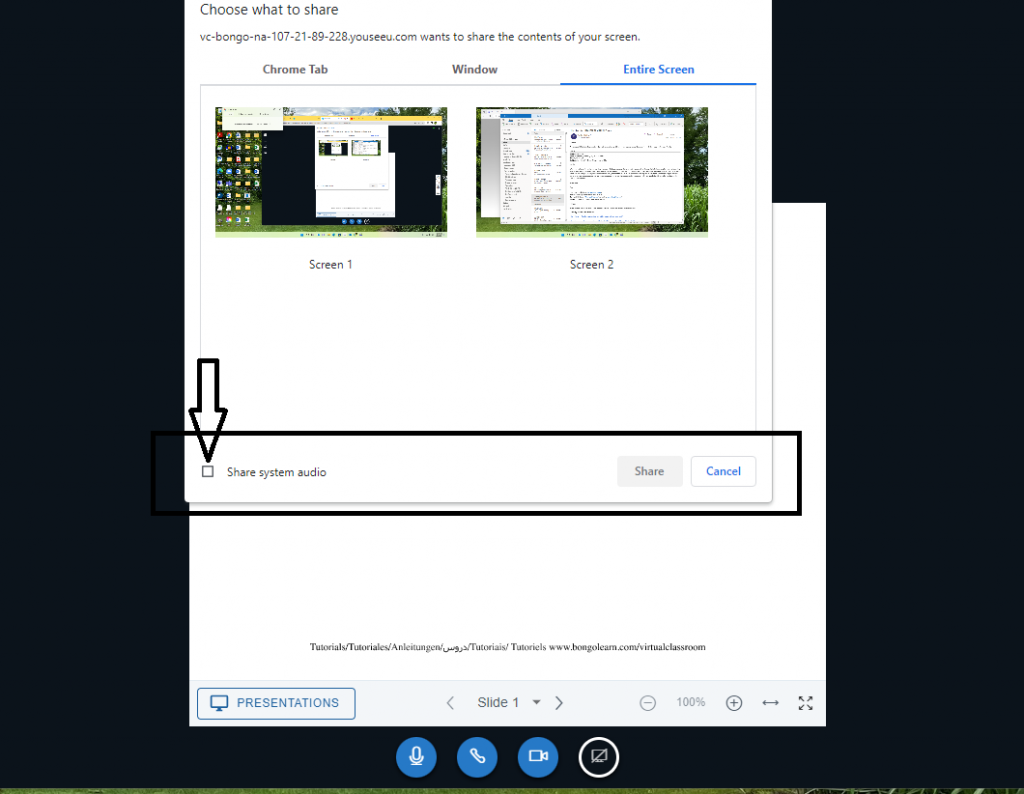
It has come to our attention that sometimes students in the virtual classroom Bongo meeting sessions cannot hear the audio when an instructor is sharing a video in the screen share feature. Examples of these videos being shared are YouTube videos, or possibly web sites with videos that deal with particular instruction from a course. Below is a picture of the box an instructor must check in order for the virtual students to hear the audio with the matching video, when screen sharing presentations.
EX: Screen Share page in Bongo Virtual Classroom
By checking this box, the instructor has now shared the corresponding Audio with Video being played in the Screen Share feature.
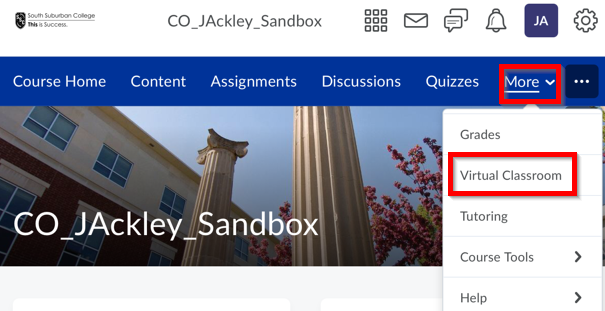
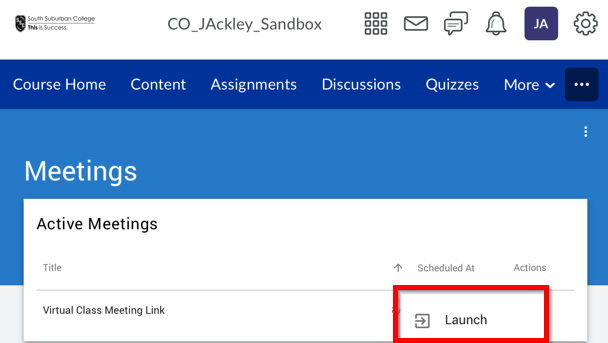
Virtual Classroom and Video Assignments are two Bongo integrations directly accessed through your D2L course.
Virtual Classroom is used to schedule meetings with your students, with the option of recording and automatically saving the recording in your D2L course so students can re-watch. Virtual Classroom has similar features to Zoom, such as sharing screen, polling and breakout rooms.
Video Assignments provide an additional resource to increase student engagement by allowing students to record class presentations remotely, answer text questions with a timed video answer, and/or answer questions that overlay upon an instructor’s pre-recorded mini-lecture or video. Video Assignments allow for grading with scores passed directly to your D2L gradebook.
Below is an archived recording of this online webinar from the Teaching and Learning Center:
Welcome to the Dual Delivery Student Engagement Strategy and Examples blog. The Teaching and Learning staff at South Suburban College will provide strategies and examples to assist faculty in teaching in a dual delivery format. Check back often for updates as we plan to add creative and innovative strategies throughout the term.
What is Dual Delivery at South Suburban College?
A dual delivery class provides for both limited in-person seating and virtual students attending via D2L virtual classroom. Students must choose their preferred delivery mode section when registering. Virtual students are expected to be available at the scheduled class and lab times.
What do the Virtual Students Experience?
Remember, the virtual student can only see a small portion of the physical classroom, usually the instructor and white board. The instructor can also share their screen as they showcase a PowerPoint presentation, website, or a variety of course content. But if in-class students are talking and participating in the class discussion, the virtual students may only be able to hear audio (unless the instructor moves the camera). These are considerations to keep in mind when designing your course in D2L or guiding in-class discussions.
Strategy and Example #1 – Incorporate Weekly Online Discussion Forums
The Set-up
To encourage student engagement with your virtual students, create an online discussion forum with a topic you plan to discuss in-class. This allows your virtual students to feel like they have another option to participate and be heard.
To encourage building community with both in-class and virtual students, make it a requirement that both sets of students respond to the weekly online discussion forum.
Name each weekly discussion forum Week 1, Week 2, Week 3, etc., so that the discussion forums can be easily identified.
To encourage participation, provide feedback and grading by giving the weekly online discussion forum a point value, i.e., make it worth their time.
Let students know that their online discussion forum post may be brought up during class time.
Prior to your in-class time, read the online discussion forums and take note of interesting comments by both in-class and virtual students.
During your class time, call on two students who had interesting comments in the online discussion forums or that you would like to clarify specifics of their posts.
When students respond during class time, have them mentioned their name first. This allows the virtual students to make a connection to the in-class student. The virtual student may not see those in-class students, but they may have read their online discussion forum posts.
See it In Action – Examples
“ I use the out-of-class posts to guide in-class discussions”. Dr. Jay Howard, reprint from the Teaching Professor Newsletter (December 2016)
Dr. Jay Howard is a professor of sociology and dean of the College of Liberal Arts and Sciences at Butler University and author of the book Discussion in the College Classroom – Getting your Students Engaged and Participating in Person and Online.
Dr. Howard uses this strategy for his traditional face-to-face courses.
According to a Reprint from the Teaching Professor Newsletter, Dr. Howard has found advantages to this strategy:
Encourages class-wide participation.
Students who might experience anxiety of being called upon in-class, may feel better organizing their thoughts in an online discussion forum first, then clarifying their thoughts in-class.
Since students know their online discussion forum posts may be brought up in-class, this encourages them to provide reflective posts.
Motivates students to complete readings required that week. Students can be assigned to provide a quote from a reading in the online discussion forum or post something that raises a question.
Since Dr. Howard is reading the online discussion forums prior to class, he can determine where students may be struggling and if more in-class discussion is required.
On that same note, he can also determine if students are on track and he can now focus on other areas of discussion.
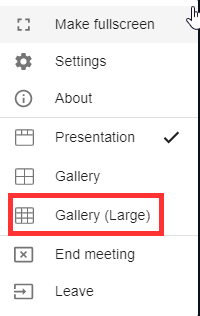
Bongo recently introduced a new feature in their virtual classroom platform that increases the number of student cameras that can be displayed at one time. The Large Gallery view can be found under settings and can be utilized by both the instructor and student to customize their individual view. Presentation view is on by default, but users can toggle between Presentation view and Large Gallery view.
Bongo Virtual Classroom Large Gallery View
Toggle Between Presentation view and Large Gallery view
While in the virtual classroom, select the Settings options (three dots in the upper right corner)
Select Large Gallery view
Repeat steps to return to Presentation view
Important Note – In order to use Large Gallery view, at least one camera must be turned on, otherwise this option will be greyed out. Large Gallery view is not available on mobile devices.
Classrooms upgraded for simulcast delivery include a webcam, a second Epson projector, and a projection screen. The second projector and screen (located in the back of the room) can be used to view your virtual classroom students. Virtual classroom students will be able to view your webcam, anything you screen share and communicate with you through chat or audio.
Before Your Class Begins
Log on to the Teacher’s Workstation with your SSC Network Credentials
Turn on the Front Projector, and then the Rear Projector
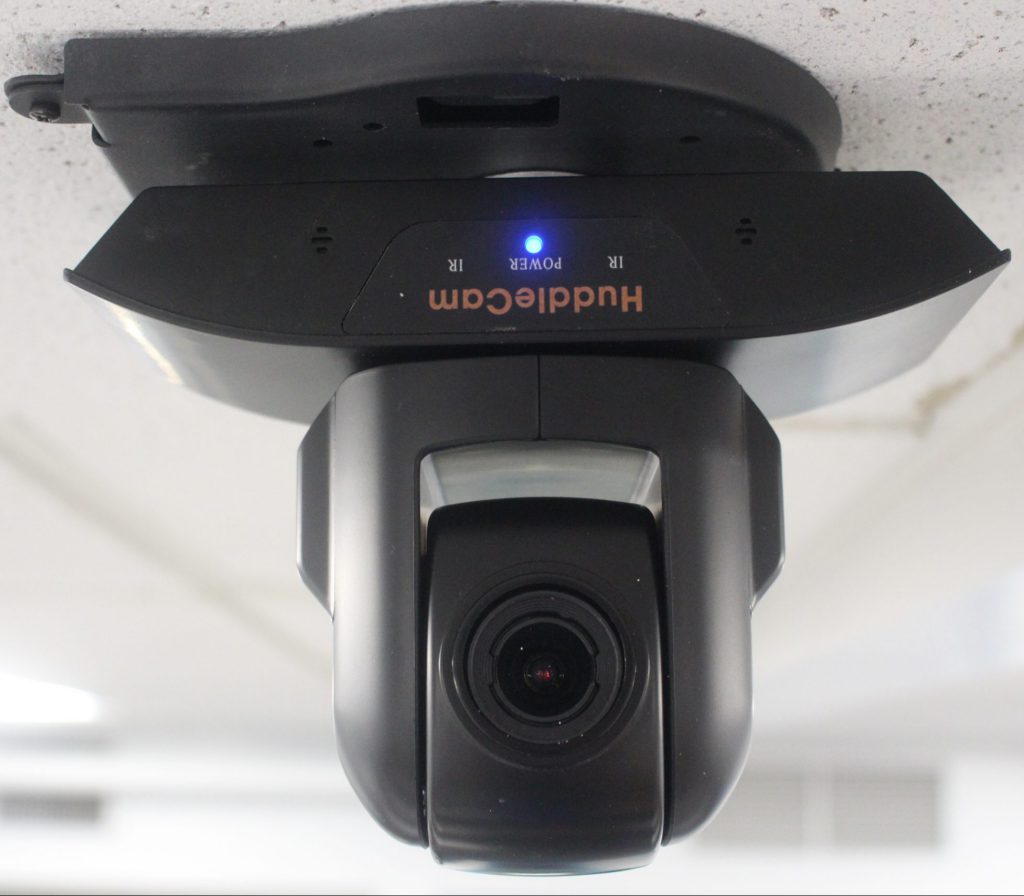
A webcam has been installed to allow remote learners a view of the classroom. It is positioned so that it can capture not just the instructor, but also any information presented on the dry-erase board in the front of the classroom. The Webcam is on if the blue light is visible as in the photo above. If there are no lights visible on the camera, press the power button on the webcam remote as pictured below.
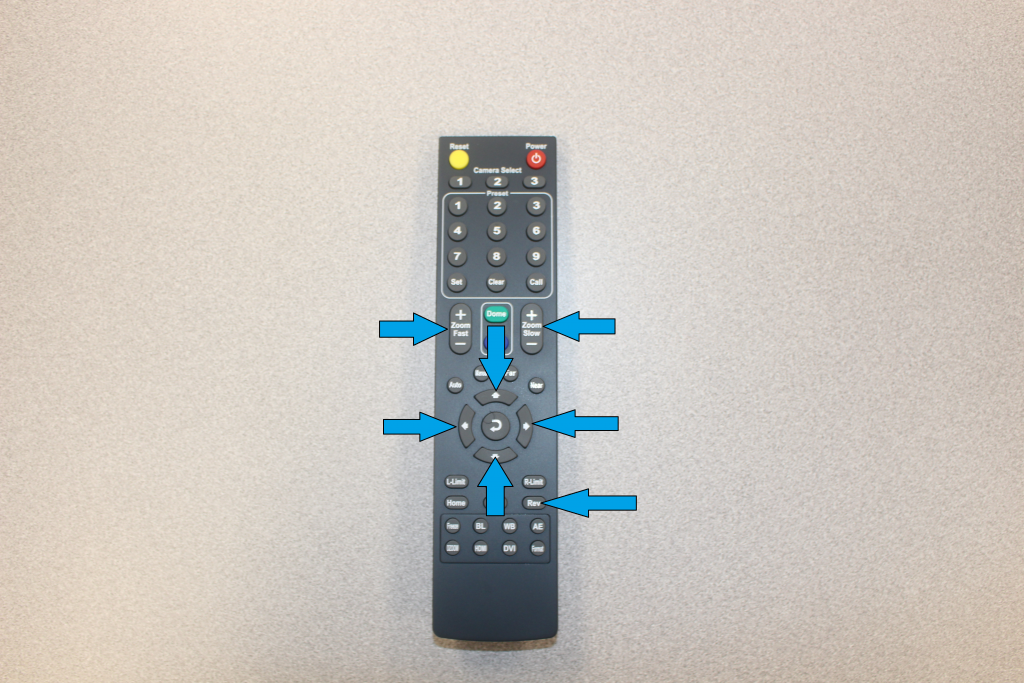
WEBCAM REMOTE CONTROL
Using the Webcam Remote Control
The left/right arrows move the webcam left and right
The up/down arrows tilt the webcam
The zoom fast/slow buttons control the webcam zoom feature
The auto button can be used to automatically focus the webcam
If by chance the image displayed by the webcam is upside down, press the ‘REV’ button, this will right your image.
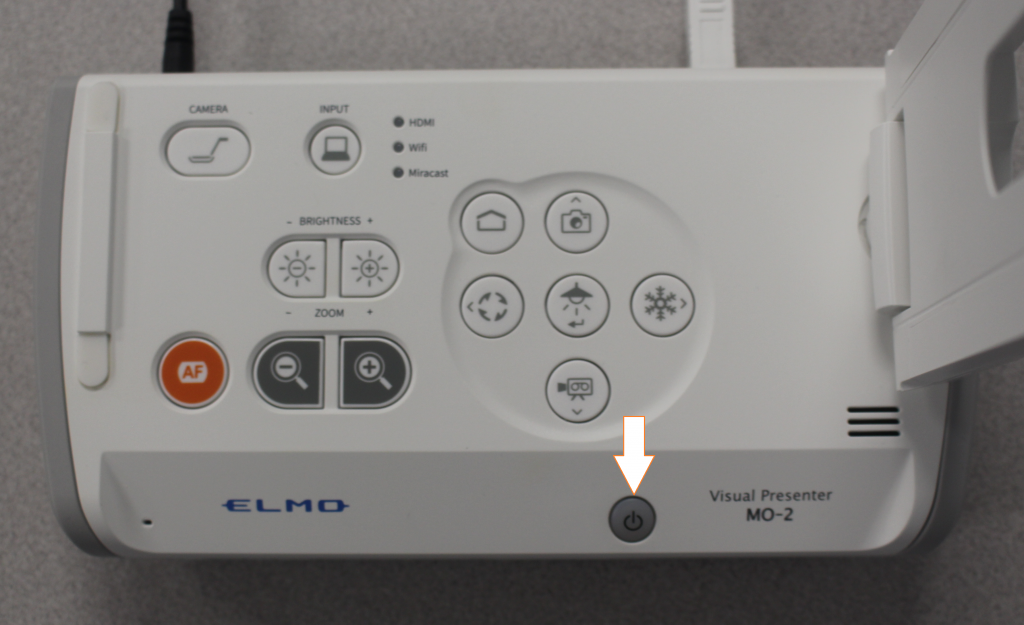
Step 1: Turn on (Blue Light Comes On) the Elmo Document Camera Power
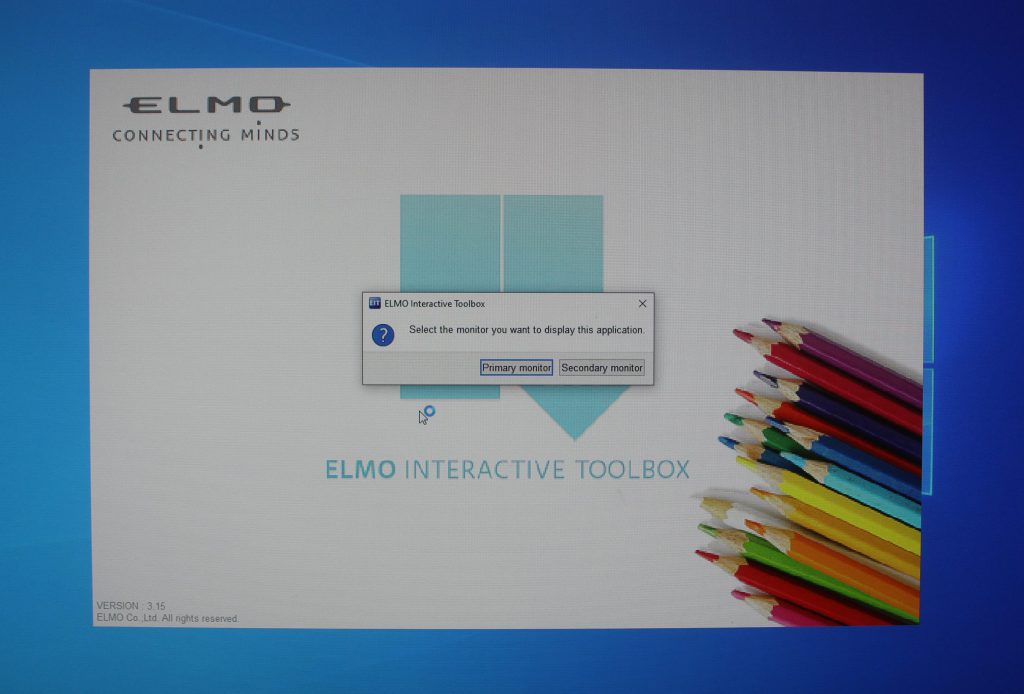
Step 2: Select ‘EIT ICON’ Shortcut on Teachers Workstation.
Step 3: Select ‘Primary Display’ to display the image on Teachers Workstation or Select ‘Secondary Display’ to display the image on Projector Display Screen.
Step 4: Users can use the ‘Pen Feature’ within the EIT Program to mark or edit what is being displayed.
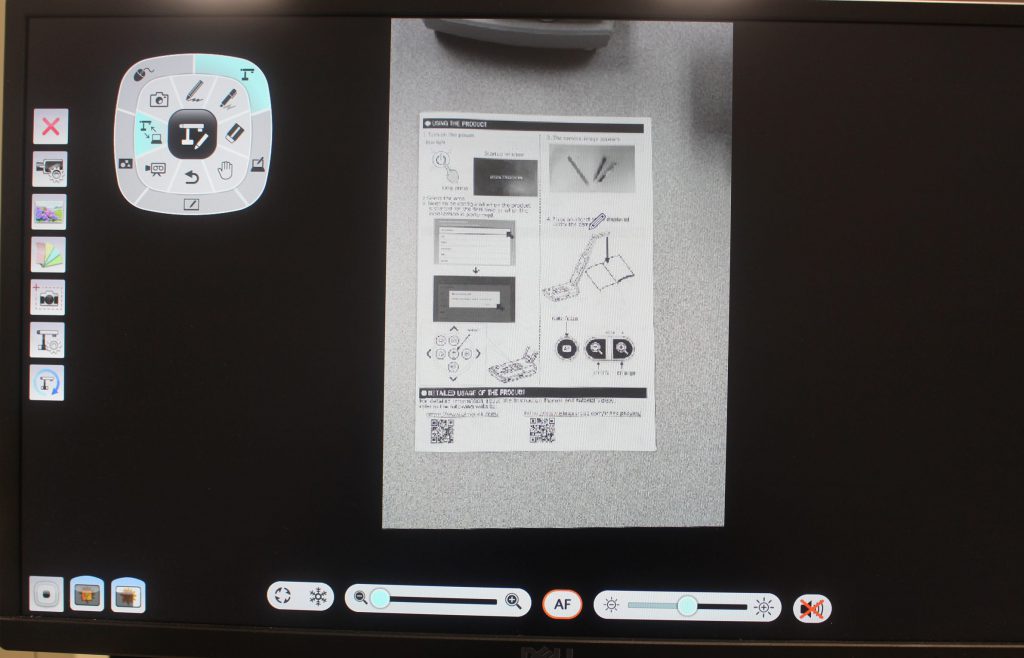
THIS IS AN EXAMPLE OF FULL-SCREEN OPTIONS WHEN USING THE EIT PROGRAM INCLUDING SAMPLE IMAGE DISPLAYED THROUGH DOCUMENT CAMERA.
Step 5: Once you are finished with the unit, make sure you turn the document camera off. (NO Lights on the unit)