
This document is a brief summary of some of the starting steps you might consider when developing your first D2L courses.
Category: Training Modules (Page 8 of 8)
Our D2L Subscription training provides you unlimited access to on-demand and live D2L sessions. It allows convenient access anytime, anywhere.
How to Register
- Create a Brightspace Community account at https://community.d2l.com/brightspace. Be sure to use your SSC email address as a part of the account creation process. Please choose the password recovery option to reset the password.
- Check your inbox for an email from Brightspace Community and follow the directions to complete your account setup (check your spam or junk folder if you did not receive an email).
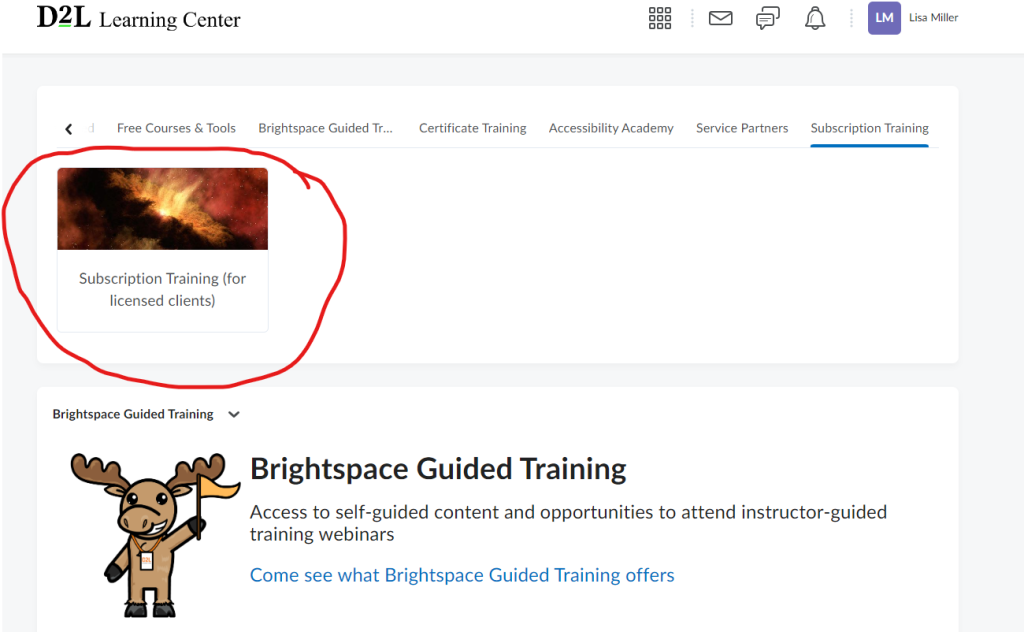
- Log into the Brightspace Community at https://community.brightspace.com/s/.
- Click on Subscription Training in the navigation bar.

Then click Subscription Training (for licensed clients)
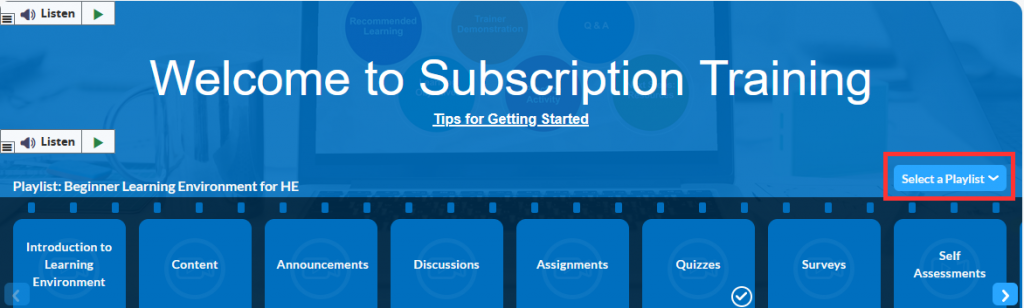
- From the playlist drop-down in the upper right hand corner, select “Beginner Learning Environment for HE”. Click on the first module in the blue film strip (Introduction to Learning Environment) to begin.
Feel free to register for other advanced D2L courses after completing the Beginner course.
- Setup your Content Modules
- How do you want to organize content for students?
- How will students find course materials, assignments, quizzes?
- Add materials to your Content Modules
- Upload/Create OR Existing Activities
- Build one module to get a feel for the process
- Setup Virtual Classroom Sessions
Pairing Pearson MyLab, Mastering or Revel with D2L Brightspace provides a seamless experience for students. With a few clicks you are able to integrate your grade books and assignments like a pro.
SSC Migrated from LTI 1.1 to LTI 1.3 on August 2, 2023. This changed the Pearson Pairing Process below.
Set up Access Pearson D2L Brightspace
Training and Support for MyLab and Modified Mastering
Training and Support for Revel
Additional Training Resources from Pearson
For additional training and recorded webinars that are course and product specific, please visit Pearson Just-In-Time Training.
Technical Support
- Most student issues can be resolved by clearing cache. Click here for more information
- Contact Pearson Support @ https://support.pearson.com/getsupport/s/educators
Need additional help? Contact William Cagnassola, our Pearson Sales Representative, at (317) 306-6820 or email customersuccess@pearson.com.
Updated: August 7, 2023
This data is entered incorrectly more than any other required data. DO NOT ENTER ATTENDANCE VERIFICATION DATA IN FINAL GRADES TAB. If you enter data into the Final Grade Tab by mistake you maybe required to submit a paper Change of Grade form for each individual student. This creates a lot of extra work for you, your Dean, and the Registration team.
As an instructor, it is important that you enter data for each of your students in each of your courses. This information must be submitted to Ellucian Colleague through D2L Brightspace. Data is due on different dates and it MUST BE SUBMITTED ON TIME. Failure to do so impacts South Suburban College financially. If you are uncertain about a deadline for a particular course, please contact your department secretary or Dean. It is your responsibility to know the calendar for your course.
Submitting Attendance Verification
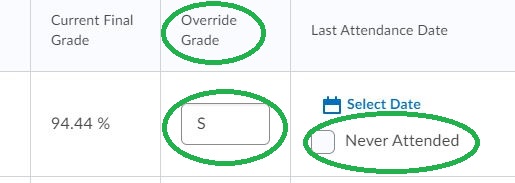
While it isn’t necessary for you to submit daily attendance to the College for your course, it is necessary that you submit an Attendance Verification for each student. Attendance Verification simply lets us know that a student has attended class within the first few meetings of the course and helps set the student up for a successful semester. An “S” (satisfactory) or “NS” (not satisfactory) is to be entered into the “Override Grade” field on the Midterm Grade 3 screen. If a student has not attended your course by the data deadline, that student should be issued an “NS” and the “Never Attended” box should be checked on the Midterm Grade 3 screen. Waiting to check the “Never Attended” box until a later time can have negative consequences on a student’s financial aid.
When the “Never Attended” box is check, students receive a notice that they have 3 days to contact the instructor or Registration to notify them that an error has been made. At the end of the three day period, the student will be dropped from the course. Do not wait until MIDTERM to mark a student as NEVER ATTENDED. It hurts the student in the long run. It is always possible to re-admit a student if they were dropped in error or in working with your dean an exception needs to be made.
STEPS TO ENTERING ATTENDANCE VERIFICATION
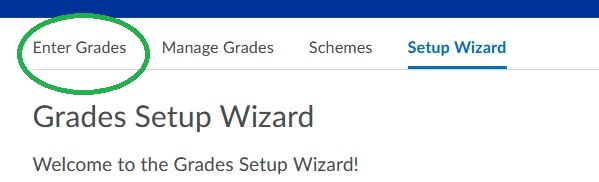
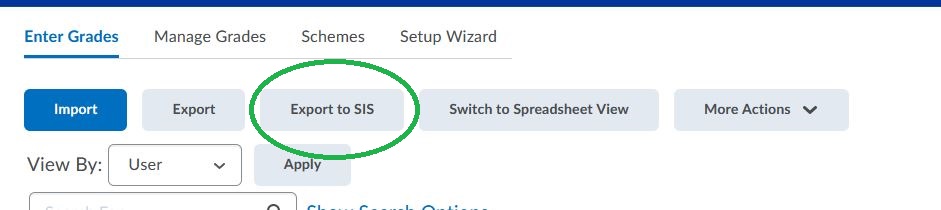
- Choose GRADES from the D2L NAV BAR.

2. If you are not using the grade book in D2L choose ENTER GRADES to access the EXPORT TO SIS option. If are using the D2L grade book you will immediately see the EXPORT TO SIS option here.
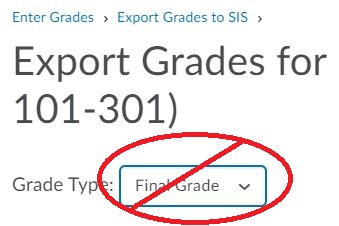
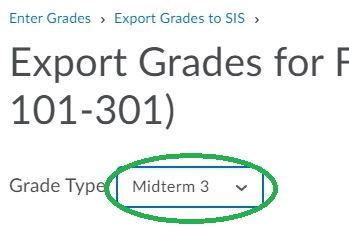
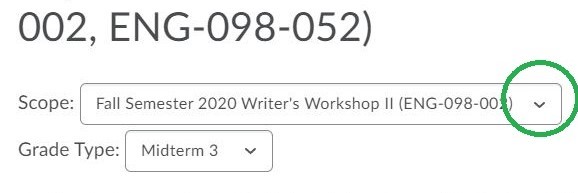
3. Choose MIDTERM 3 from the grade type drop-down menu. By default, the menu is set to FINAL GRADES.
NOTE: This data is entered incorrectly more than any other required data. DO NOT ENTER ATTENDANCE VERIFICATION DATA IN FINAL GRADES TAB. If you enter data into the Final Grade Tab by mistake you will be required to submit a paper Change of Grade form for each student individually. This creates a lot of extra work for you, your dean and the Registration team. Be sure to use only CAPITAL LETTERS.
4. Enter either a capital S or NS into the OVERRIDE GRADE field for each student enrolled.
5. If you are issuing an NS for a student for ATTENDANCE VERIFICATION you should also be checking the “NEVER ATTENDED” box for that student.
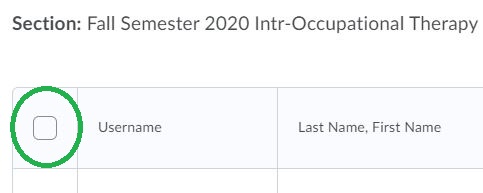
6. Be sure to verify there is a CHECK MARK in the box to the left of every student’s name you wish to export. Failure to check the box will result in that student being excluded from the export to ELLUCIAN COLLEAGUE and your data will not be transmitted.
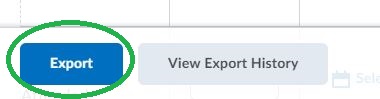
7. Click EXPORT on the bottom left-hand side of the screen.
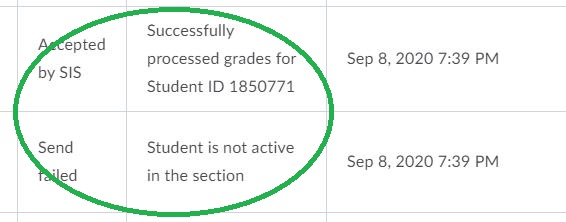
8. Review the export results of the submissions for each student by scrolling to the right If you receive an error other than STUDENT IS NOT ACTIVE IN THE SECTION, try submitting the data a second time. Don’t forget to add a CHECK-MARK next to the student’s name you wish to export again. If the process fails a second time, please email ssconline@ssc.edu. An error of STUDENT IS NOT ACTIVE IN THE SECTION requires no further action and is an indication that the student has dropped the course. It is okay to skip this student in the future.
9. If your course is cross-listed, change the section using the drop-down listing the other courses and repeat the steps for each cross-listed section.
NOTE: Students will be able to see the information you submit through the EXPORT TO SIS in SSC Self-Service.
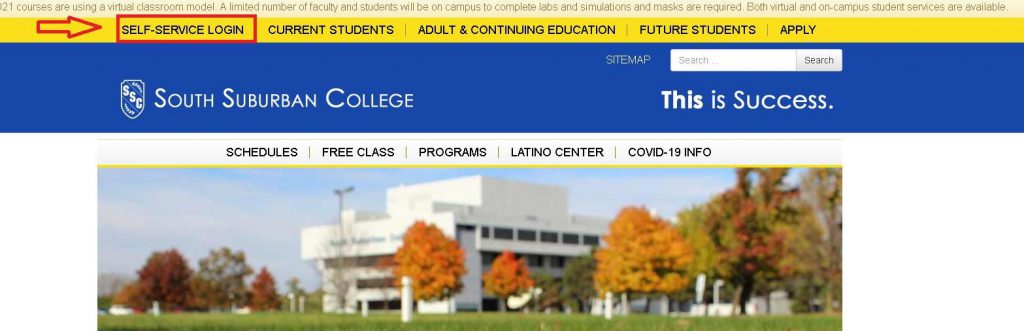
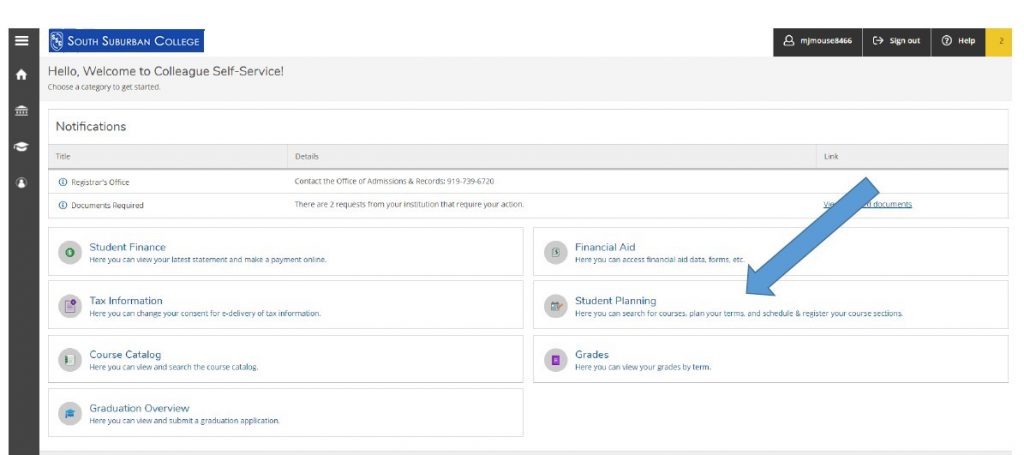
Step 1: Go to https://www.ssc.edu and click on the SELF-SERVICE LOGIN or go directly to https://selfservice.ssc.edu then enter your username and password
Step 2: Once in Self-Service, you have several options. Click “Student Planning”
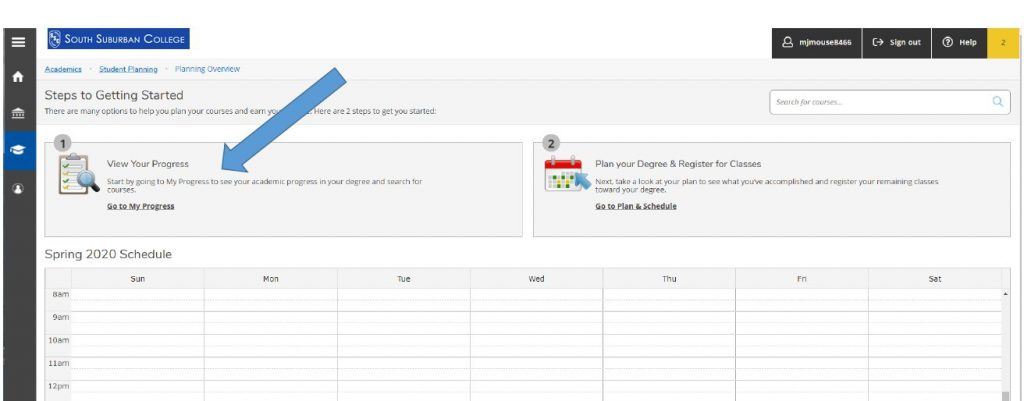
Step 3: Click option 1, “Go to My Progress” to view your academic progress in your degree, determine which courses are still remaining, and search for courses.
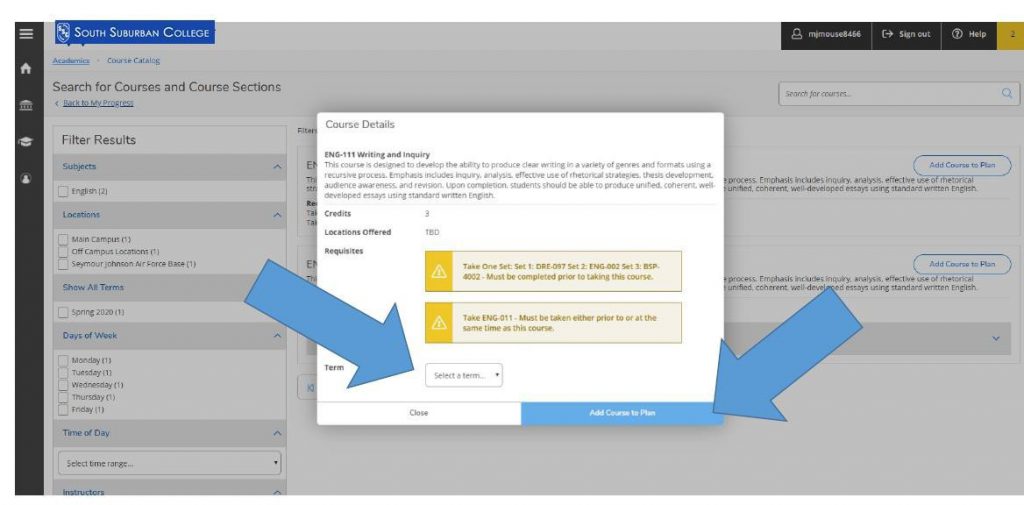
Step 4: View of program progress and requirements page. Click on each course that you would like to plan.
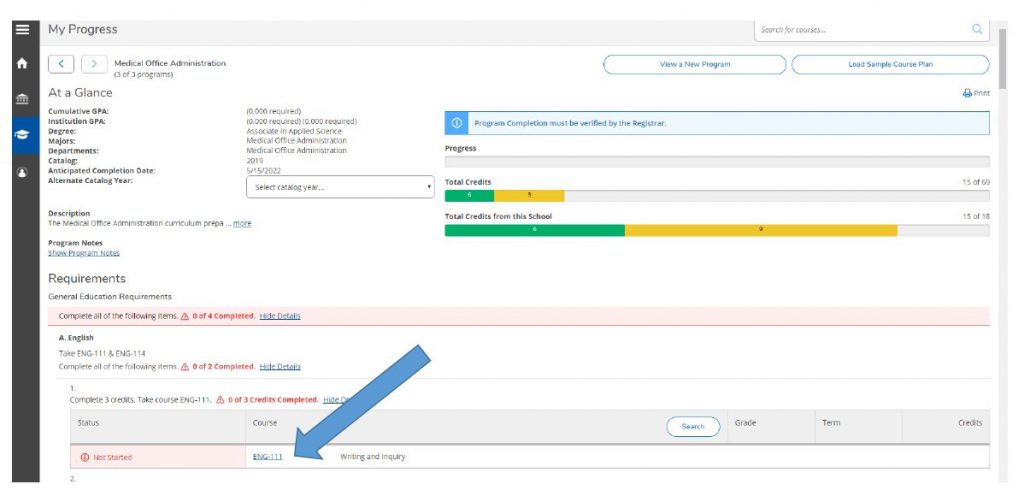
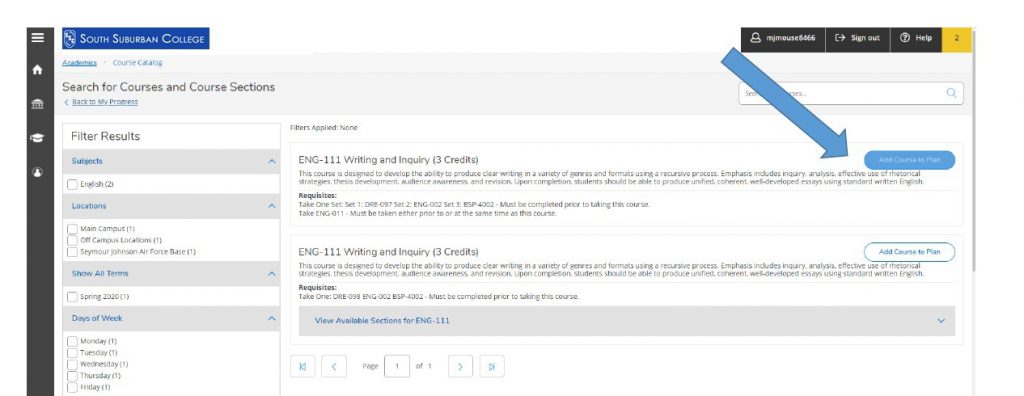
Step 5: Once a course is selected click “Add Course to Plan”
Step 6 & 7: You must “Select a term” that you intend to take the selected course. Then hit “Add Course to Plan.” This will add the course to your timeline.
Step 8: Repeat steps 4-7 until all remaining required courses have been added to your plan.
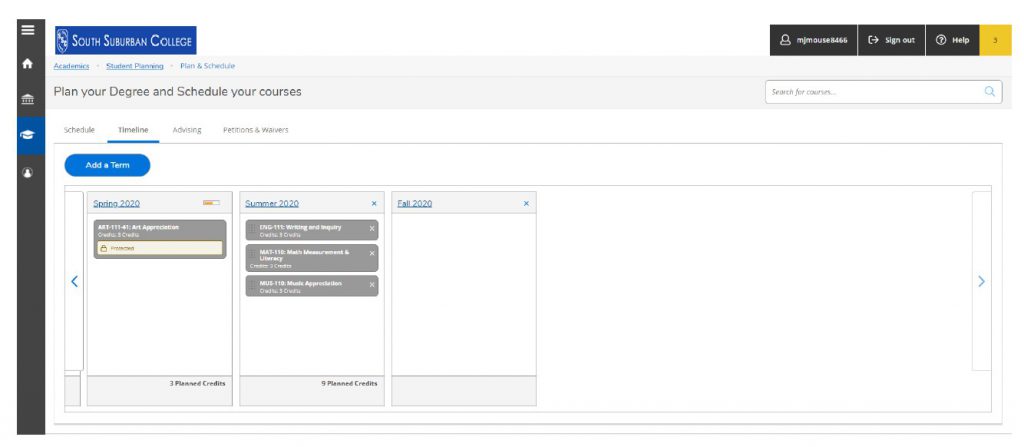
Step 9: Proceed to “Timeline” to review your courses.
Step 10: Your timeline can be viewed by selecting “Student Planning,” then “Plan and Schedule,” then “Timeline”.
Step 11: When your degree plan planned courses) is ready for review by the counselor, send an email to counselingcenterquestions@ssc.edu and place “Degree Audit” in the subject line, or contact SSC’s Counseling center at (708) 596-2000 Ext. 5724 and let them know that you are ready for the counselor to review your plan or Degree Audit.
NOTE: This does not mean that you are registered for classes.
Please proceed to the next steps to determine how to plan a specific section of a course and register.
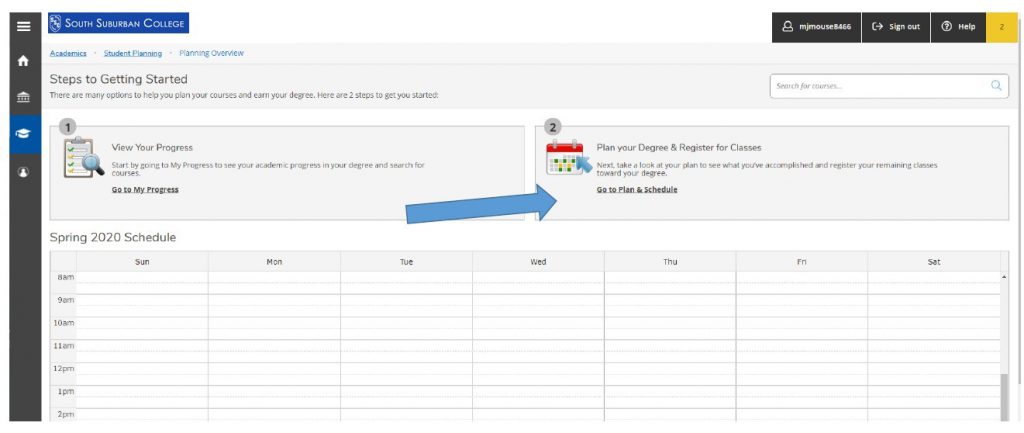
Step 12: From the Student Planning overview screen, select option 2: “Plan and schedule.”
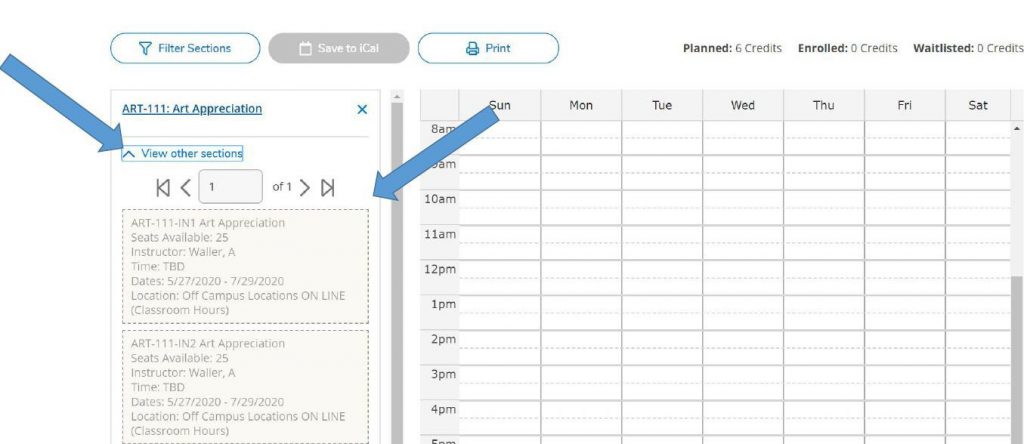
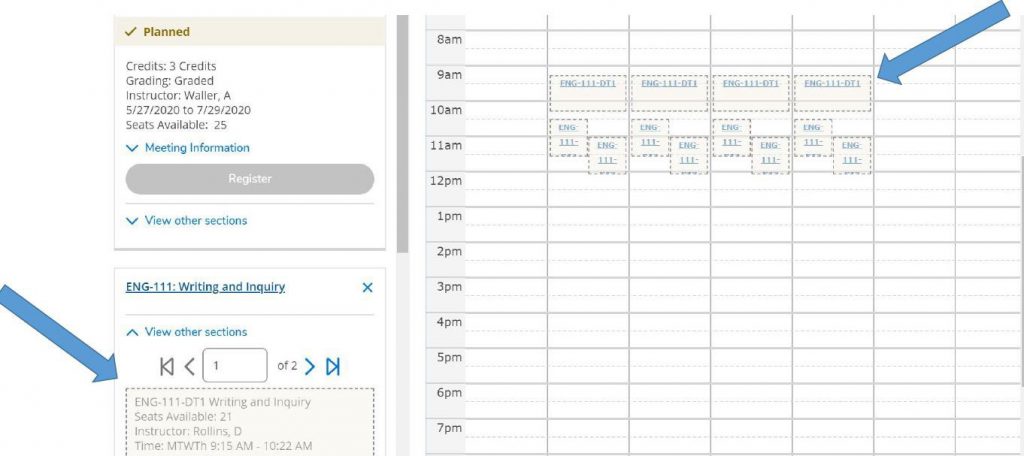
Step 13: View available course sections by clicking “View other sections.” Use the arrows under that link to see more options. Each section block lists the course date and time, available seats, and the instructor.
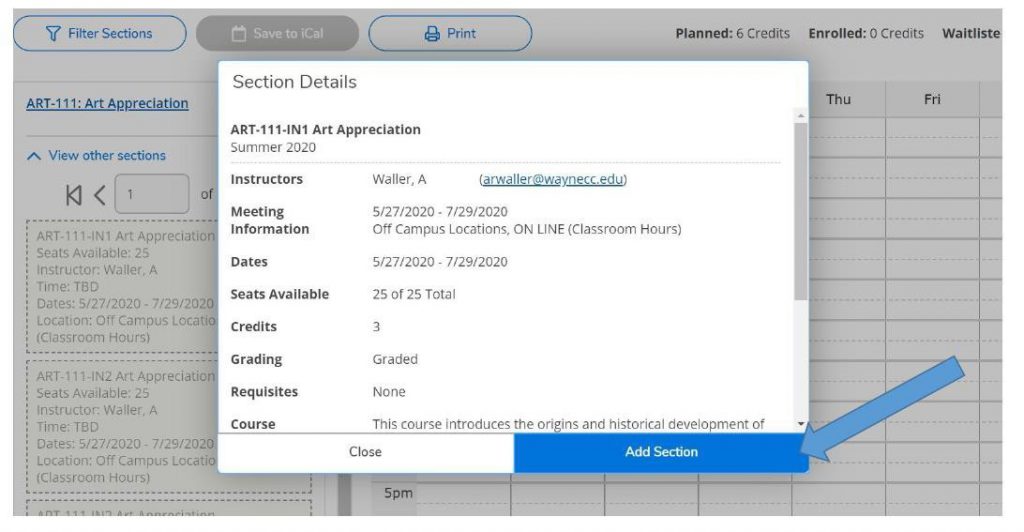
Step 14: Once you find the section you wish to register for, you can click either the box in the section list (left side), or the calendar planner (right side).
Once you select the section, a pop-up box will open. Click “Add Section”
Step 15: Once you add the section, that course will stay on your weekly calendar so you can continue to build your schedule. The planned/selected section will show up in YELLOW.
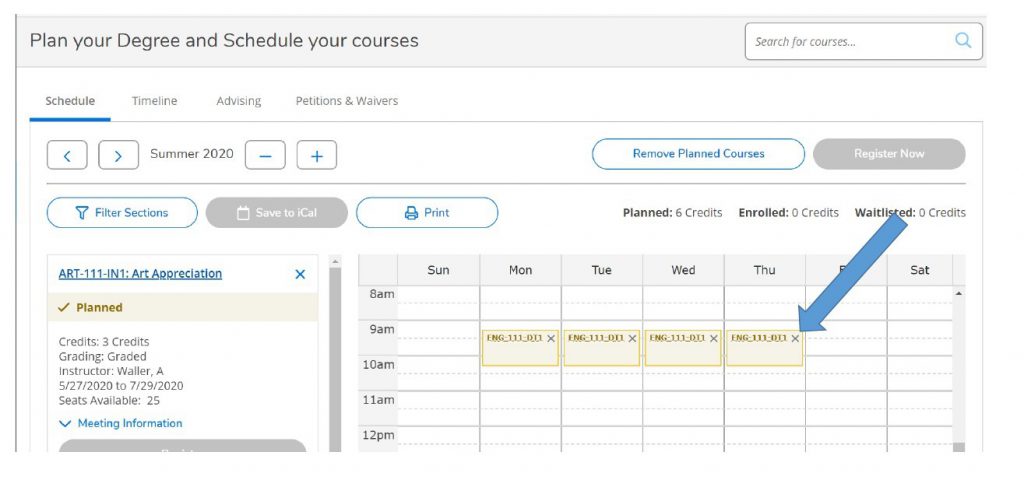
Step 16: Repeat steps 13-15 until you have a complete schedule. Choose the schedule that best fits your needs. You are almost finished, but you are not registered, yet!
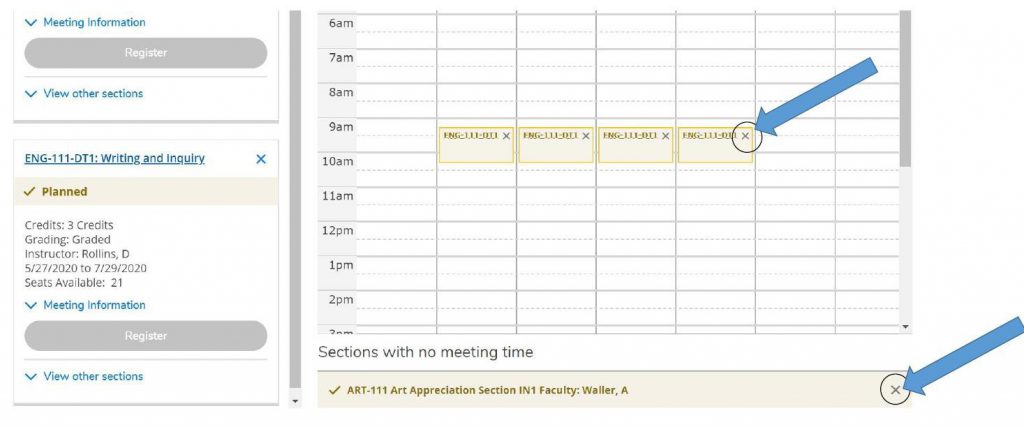
Step 17: Once you have chosen a section for each class, review your schedule one last time. Online classes will be listed at the bottom. You can remove sections by clicking the circled X in each section box.
Step 18: When your schedule is complete, click the “Register Now” button in the top right corner. This box will turn BLUE and you will be able to click when registration is open.
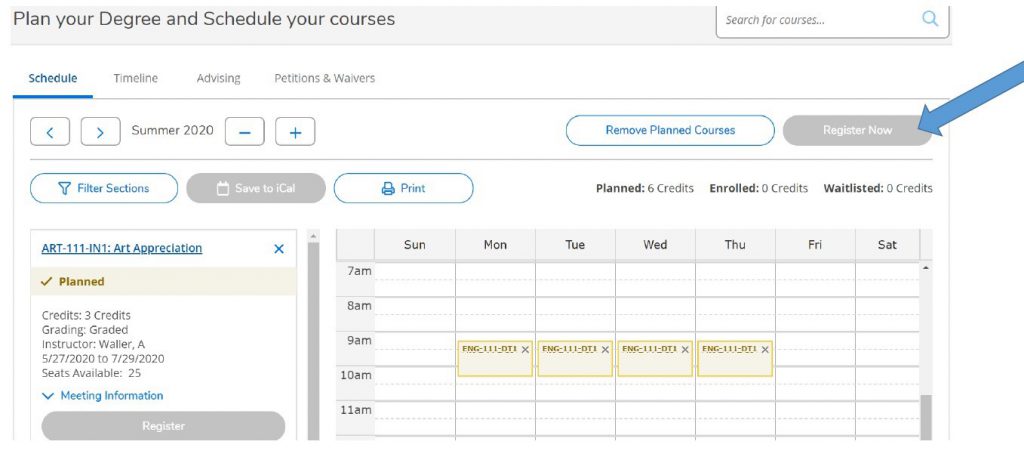
The yellow boxes will turn green when you have registered.
FINAL STEPS:
- If any of the sections remain yellow or have a red outline (meaning there are no seats available), you will need to click the circled X in that box and find another section. Make sure each section you try to register for has available seats and is not full.
- Any notifications about registration holds, business office holds, parking fines, or prerequisite issues will pop up in the top right corner of the screen. If this happens, you will need to contact your advisor.
https://training.smarttech.com/
This website offers training tips as well as standardized ways to use SMART Boards and Projectors in the class room. Please email ssconline@ssc.edu or call 708-225-5825 option 2 to arrange for in-person training with a member of our team.
Here are a few helpful tips on how to use Epson Brightlink interactive projector.
1. How to Use the Easy Interactive Tools in Interactive Mode
2. How to Use the Easy Interactive Tools in Whiteboard Mode
3. Epson BrightLink Projectors | How to Use the Interactive Pens
Please note our systems only have one pen.
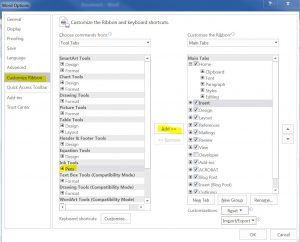
4. Instructions For Microsoft Ink With Word Documents
To use the Ink Pen tool on a word document
- Open a Microsoft Word document.
- Select File > scroll to ‘Options’ >
- On the left-hand side of the Word ‘Options’ box select ‘Customize Ribbon’
- Under ‘Choose Commands’ there is a drop-down box, (the first selection is says ‘Popular Commands’)> open that box and select ‘Tool Tabs’.
- In that tab highlight ‘Pens’
- Select ‘Add’ and hit ‘OK’
- Now in your Word document, the top menu bar should have a ‘Pens’ tab. Clicking on that will allow you to use the Ink Pen tool at your discretion on the document
5. How to Calibrate the Interactive Pens