
Learn more about our new Follett Bookstore by visiting www.sscbookstore.com.
For more help contact Kevin Sandstrom.
Learn more about our new Follett Bookstore by visiting www.sscbookstore.com.
For more help contact Kevin Sandstrom.
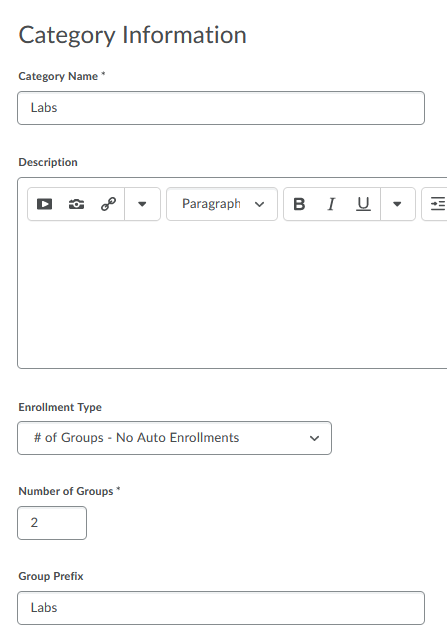
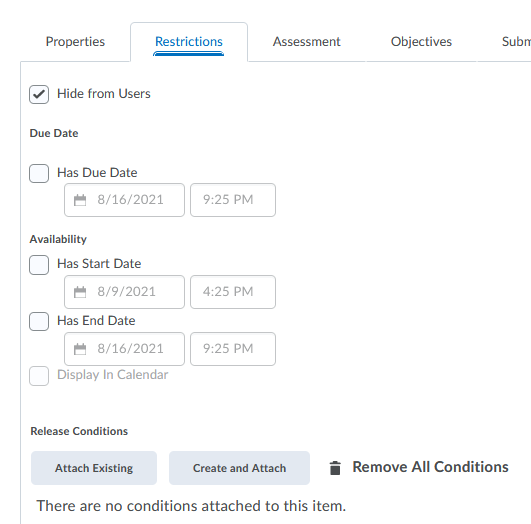
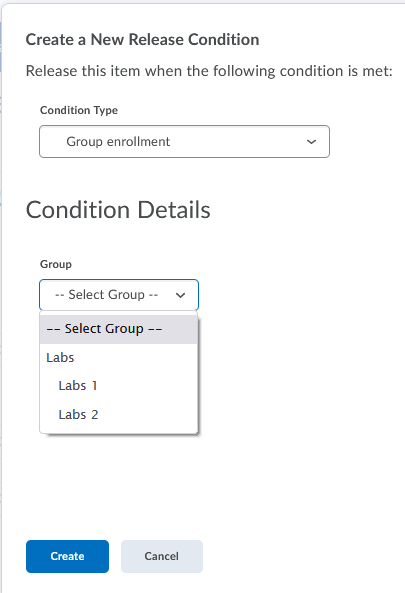
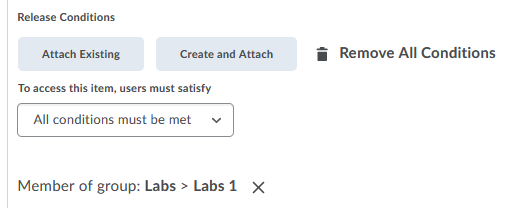
There may be times when an instructor would like to release a quiz to a particular group of students. For example, an instructor may have a group project as part of an assignment and would like to release an assignment or quiz to just that particular group.
The first step is creating student groups and enrolling students into that group. The next step includes adding restrictions to a quiz or assignment based on the group.
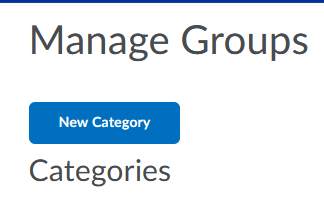
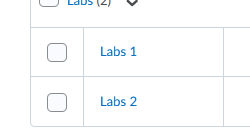
Step 1: Create Groups in child shell course (combined section)
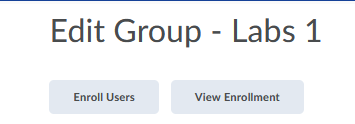
Step 2: Manually Enroll Students into each Group
Step 3: Create a Restriction for the Quiz based on Groups
Updated: August 4, 2021
Classrooms upgraded for simulcast delivery include a webcam, a second Epson projector, and a projection screen. The second projector and screen (located in the back of the room) can be used to view your virtual classroom students. Virtual classroom students will be able to view your webcam, anything you screen share and communicate with you through chat or audio.
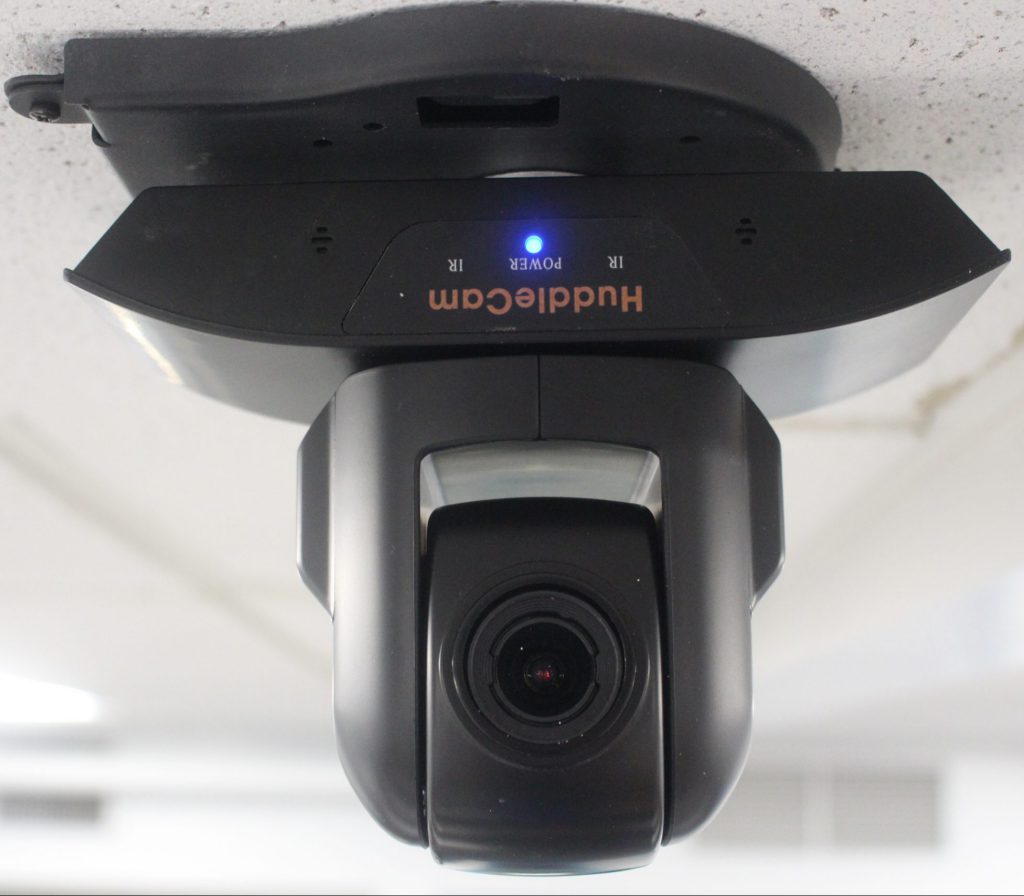
A webcam has been installed to allow remote learners a view of the classroom. It is positioned so that it can capture not just the instructor, but also any information presented on the dry-erase board in the front of the classroom. The Webcam is on if the blue light is visible as in the photo above. If there are no lights visible on the camera, press the power button on the webcam remote as pictured below.
__________________________________________________________________________________________
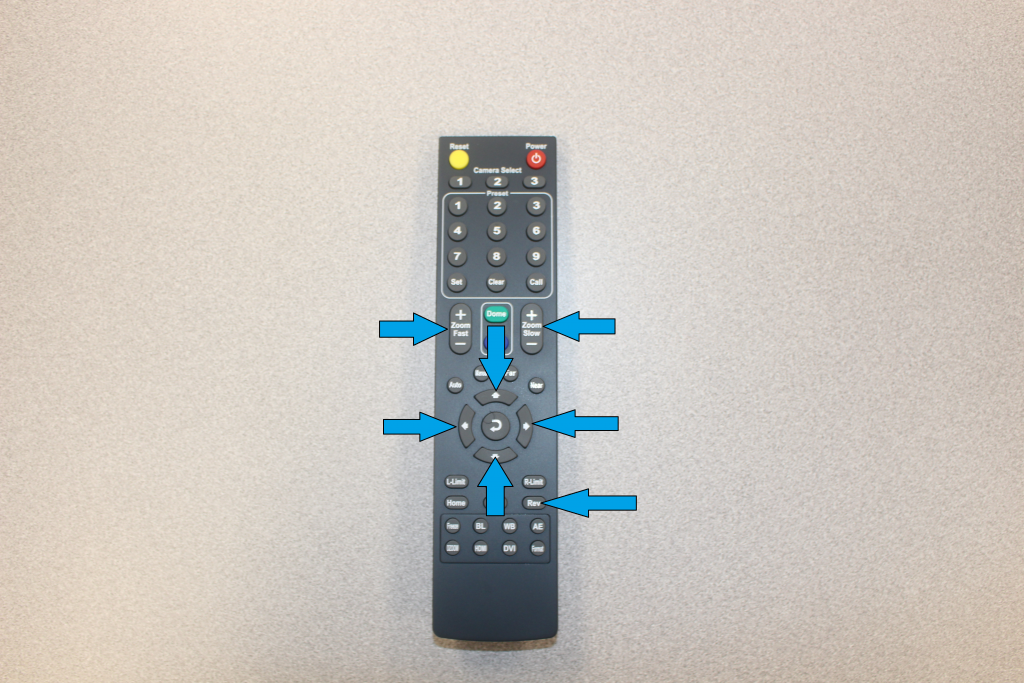
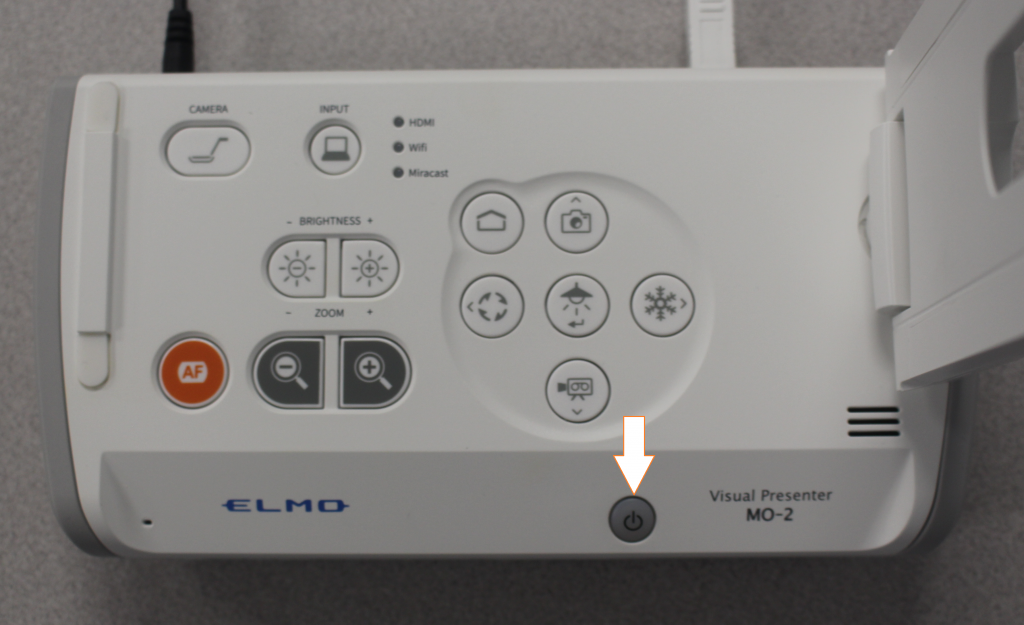
Step 1: Turn on (Blue Light Comes On) the Elmo Document Camera Power
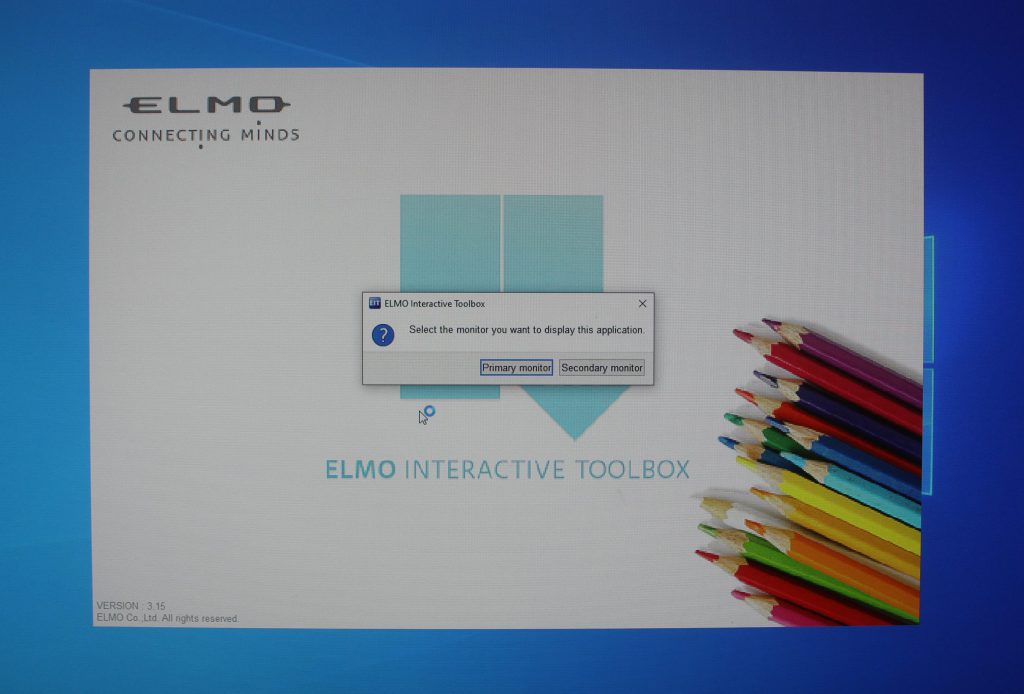
Step 2: Select ‘EIT ICON’ Shortcut on Teachers Workstation.
Step 3: Select ‘Primary Display’ to display the image on Teachers Workstation or Select ‘Secondary Display’ to display the image on Projector Display Screen.
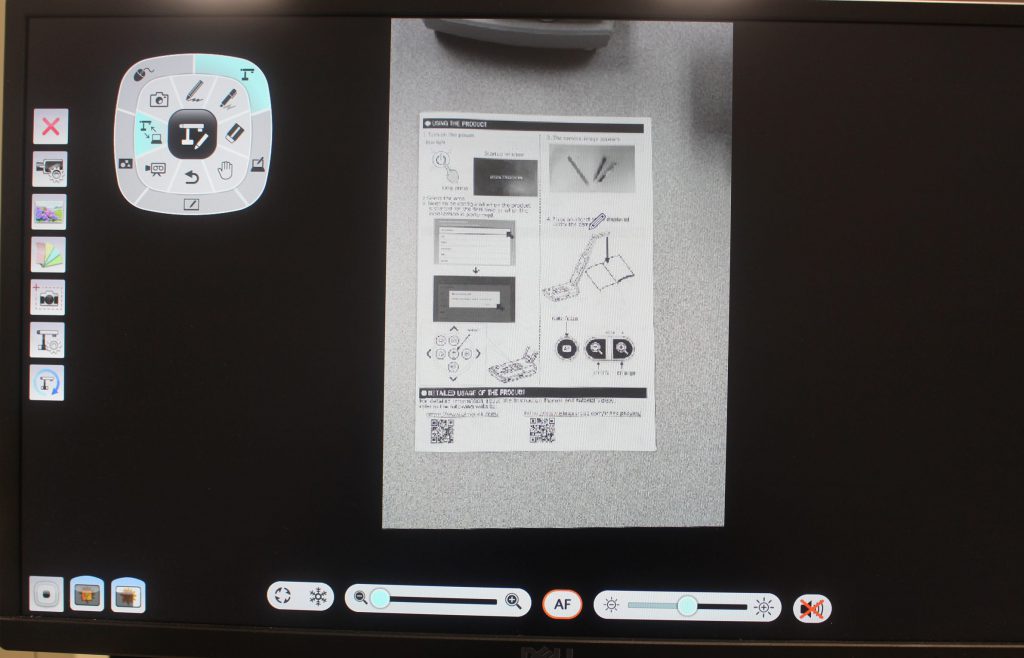
Step 4: Users can use the ‘Pen Feature’ within the EIT Program to mark or edit what is being displayed.
Step 5: Once you are finished with the unit, make sure you turn the document camera off. (NO Lights on the unit)
Updated: August 4, 2021
Need help getting to know your new Promethean Titanium ActivPanel? Here are some great resources and tips!
Visit https://learn.prometheanworld.com/us/ for more instructor training directly from Promethean!
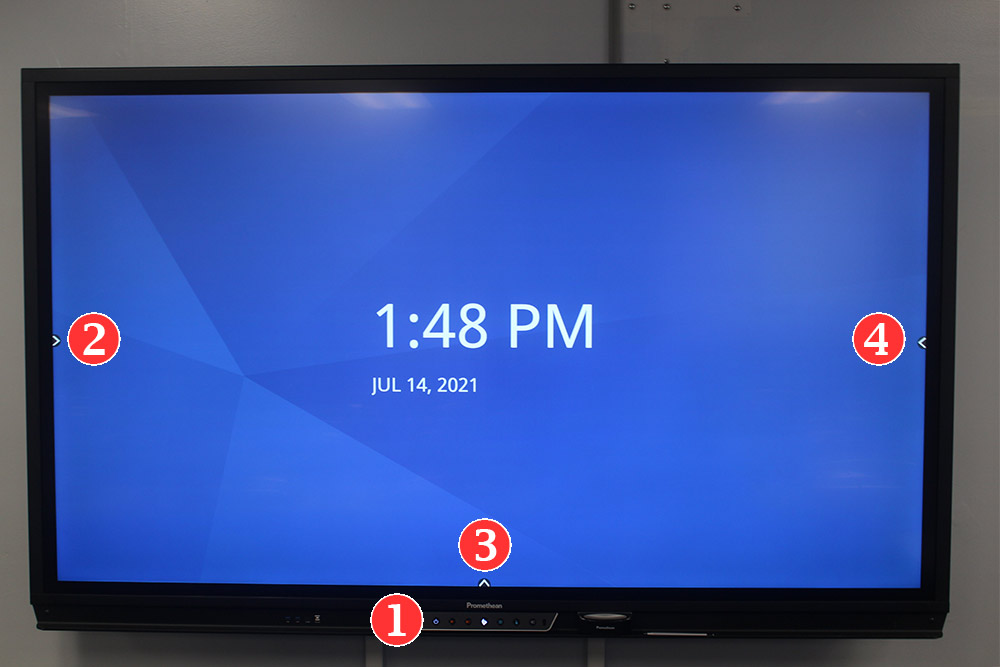
Red Circle 1: Although the Promethean ActivPanel should come on automatically as you approach, there is a ‘POWER BUTTON’ on the bottom of the frame to turn the unit on/off.
Red Circle 2, 3 & 4: These arrows provide access to your ActivPanel ‘MENU’ page.
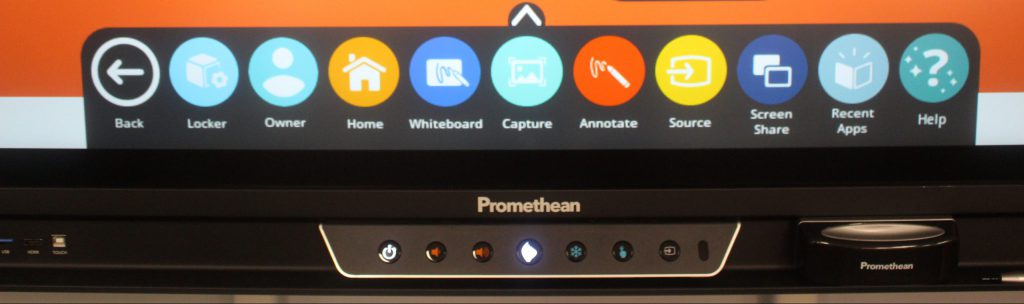
Pictured above is the ‘LOCKER’ options menu with the Apps and Settings. Promethean ‘LOCKER’ allows access to commonly used Apps such as:
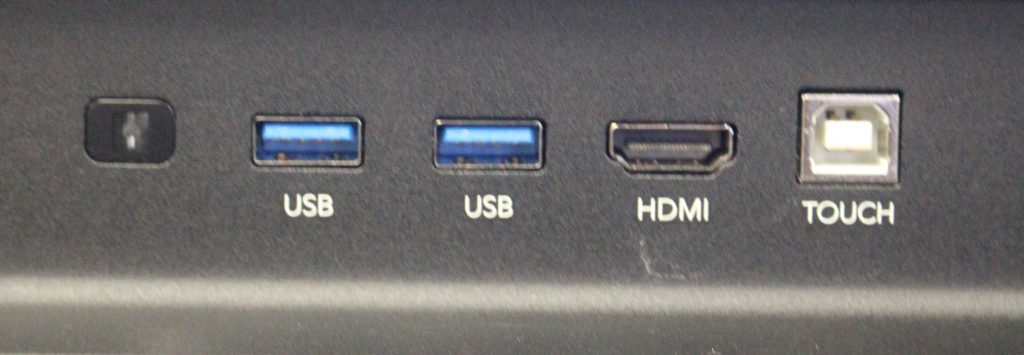
The Promethean ActivPanel has additional USB and HDMI ports for accessing external media located at the bottom front of the frame.
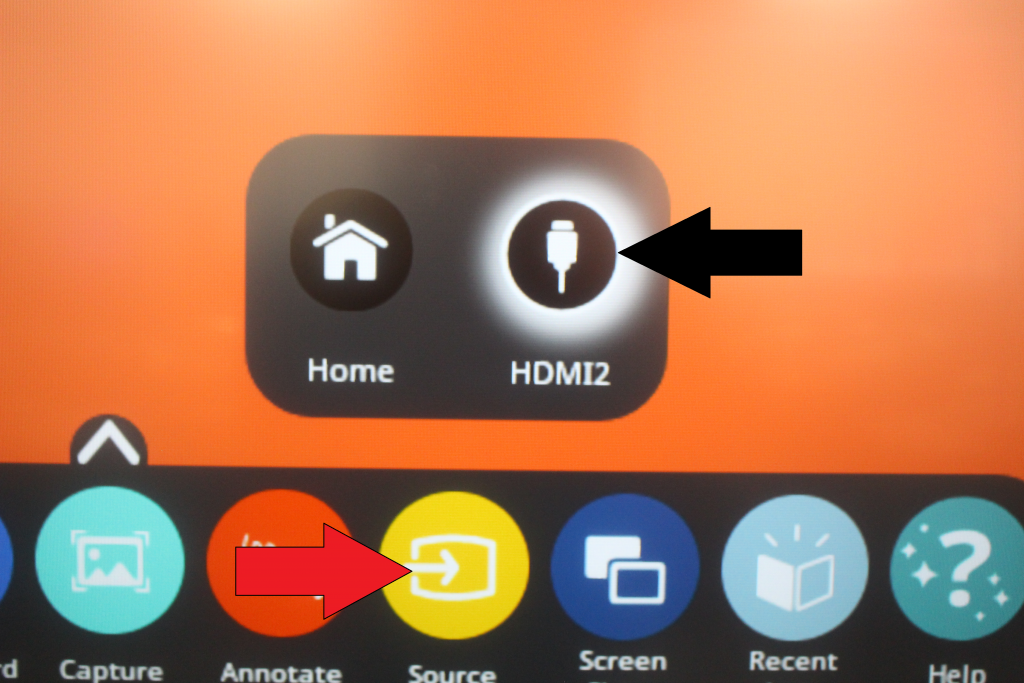
The Promethean ActivPanel has an option to mirror what is on the Teacher’s Workstation in the classroom. On the home screen select one of the arrows to bring up the menu block. Click on ‘SOURCE’ and select ‘HDMI 2’. The display on the Promethean ActivPanel will now mirror the Teacher’s Workstation. The Promethean ActivPanel is a touch-screen and can now be used to control the Teacher’s Workstation.
You can also change the input by pressing the ‘Source’ button on the bottom of the ActivPanel frame.
Please note that the Promethean ActivPanel is touch-sensitive. It is important to not PRESS TOO HARD which can cause DAMAGE to the screen. The ActivPanel comes with a ‘PEN’ for those who want to use it as an option to the touch-screen function.
__________________________________________________________________________________________
Instructors can use their personal lap top computer to replace the Teacher’s Workstation in the classroom.
NOTE: By using your personal laptop you will not be able to use the interactive features of the Epson Integrated Projector or the Promethean ActivPanel.
Step 1: Connect the USB and HDMI cables into the corresponding laptop ports as shown below.
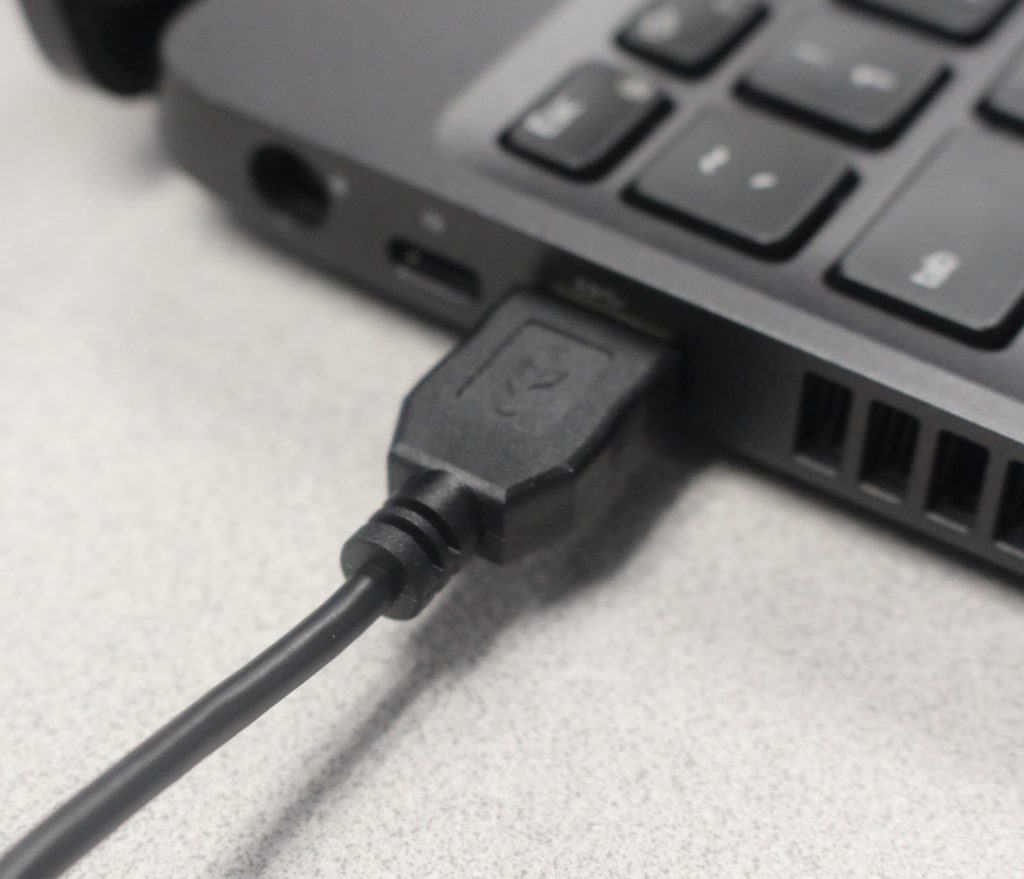
USB Connection
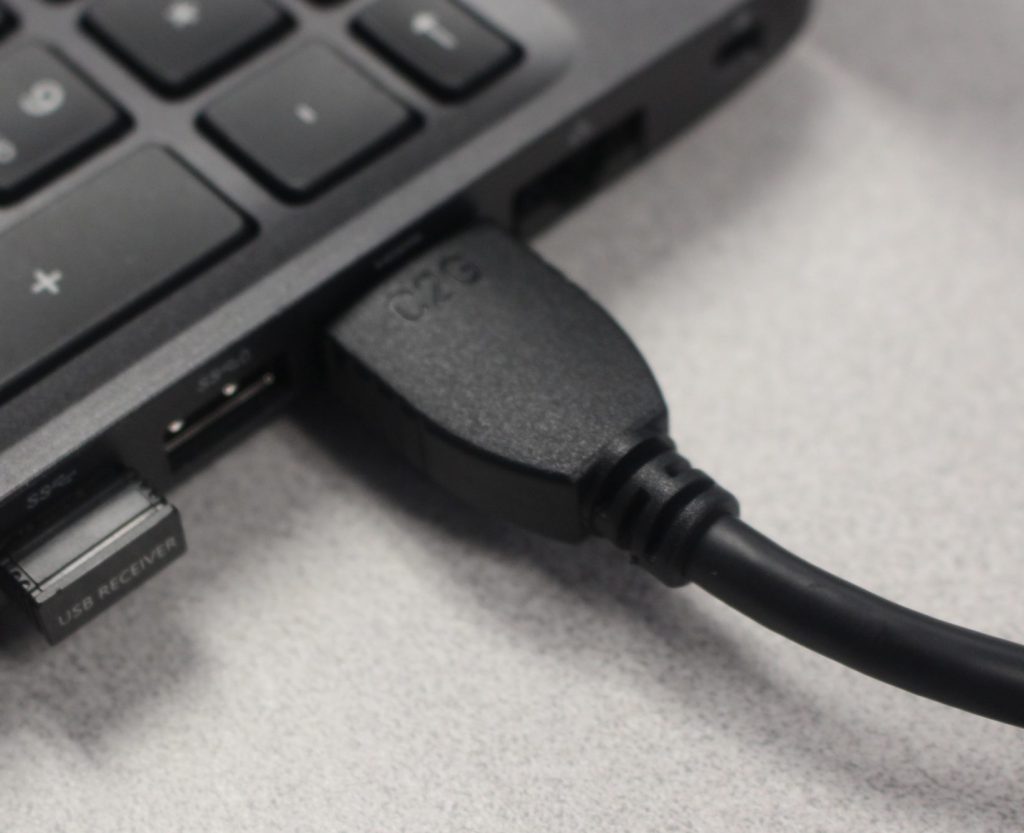
HDMI Connection
Step 2: Press the black button so the green light changes from input 1/A to input 2/B on the HDMI video switch. This connects the laptop to the projection system.
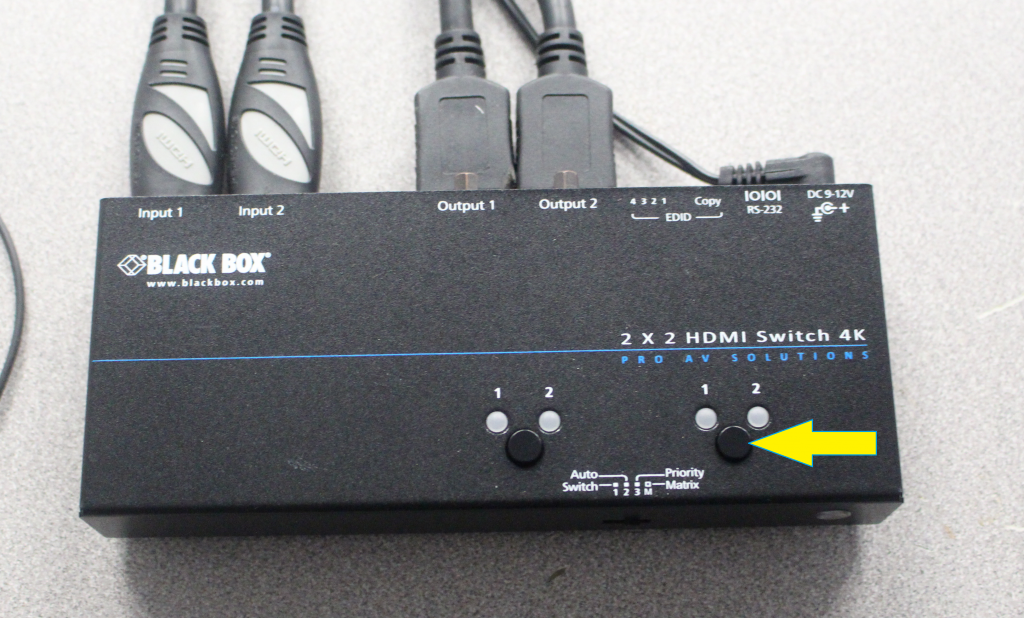
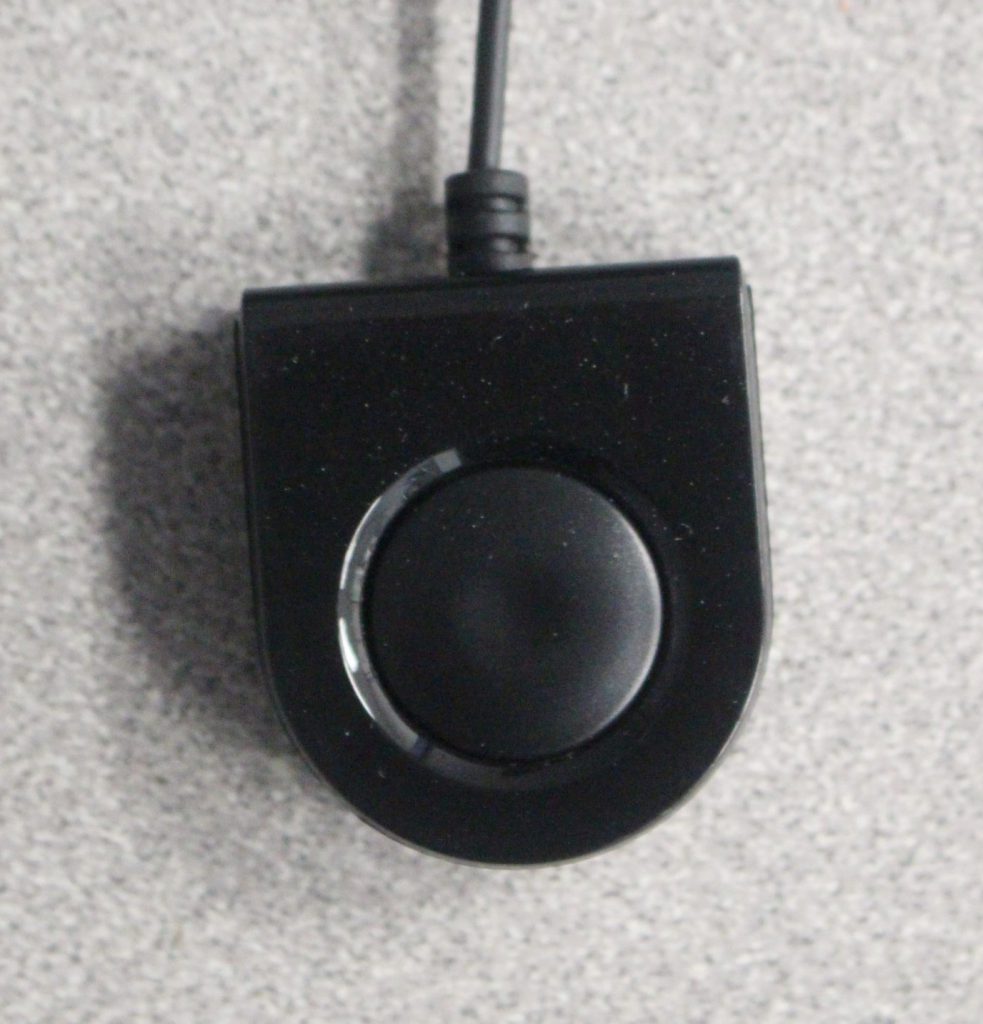
Step 3: Press the circular Webcam controller button to switch the Webcam connection from the Instructor Workstation to the Laptop.
__________________________________________________________________________________________
Step 1: Turn on (Blue Light Comes On) the Elmo Document Camera Power
Step 2: Select ‘EIT ICON’ Shortcut on Teachers Workstation.
Step 3: Select ‘Primary Display’ to display image on Teachers Workstation or Select ‘Secondary Display’ to display image on Projector Display Screen.
Step 4: Users can use the ‘Pen Feature’ within the EIT Program to mark or edit what is being displayed.
Step 5: Once you are finished with the unit, make sure you turn the document camera off. (NO Lights on the unit).
If your students report that they cannot see their total points in the gradebook in D2L, this usually means that their final calculated grade has not been released. There are two ways to fix this issue and release their grades. See the following document for a step by step guide to releasing the final calculated grade in your D2L courses.
Faculty Roundtable: Communicating with Students – March 18, 2021
Learn more not just about what you are required to post in your course, but best practices for getting started with content in D2L.
TLC Workshop – March 16, 2021
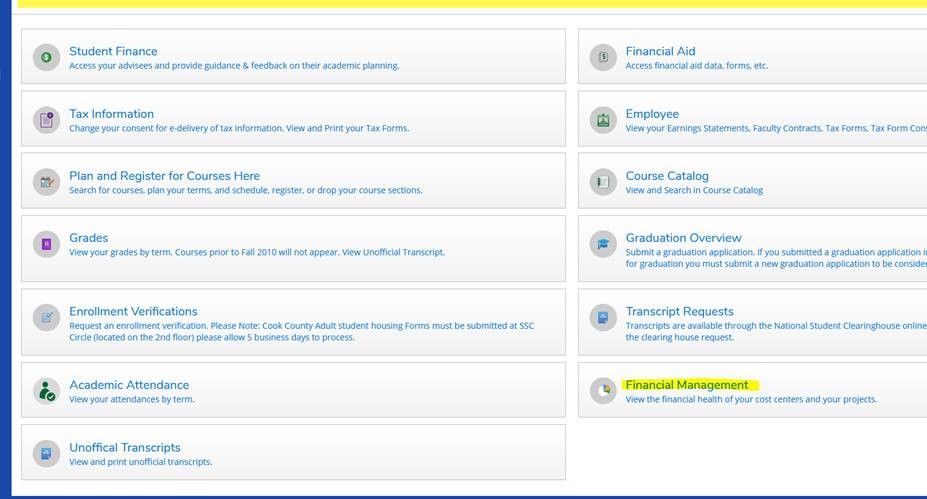
STEP ONE: Login to SSC Self-Service. Select “Financial Management” from the main menu.
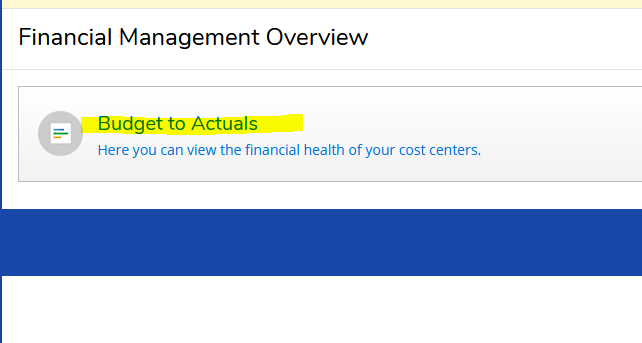
STEP TWO: Select “Budget to Actuals”
STEP THREE: Choose either “Bar Graph” or “List” view and the “Year” you would like to display across the top of the page.

STEP FOUR: Select “Apply Filter” on the lower left side of the page to display all of your available accounts.
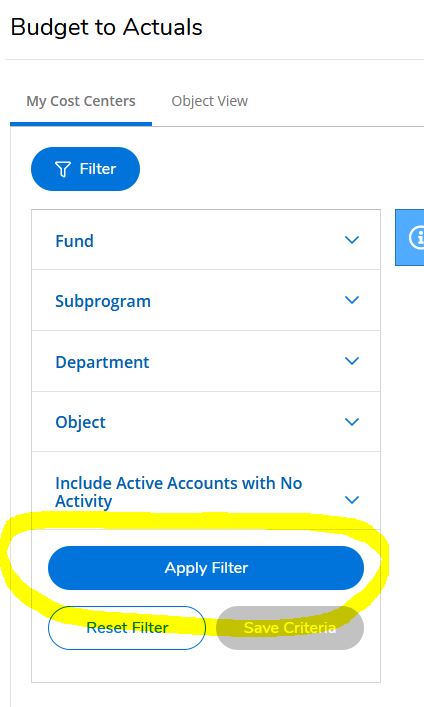
STEP FIVE (OPTIONAL): Enter Your Cost Center number in the “Department” field on the left side of the page to look at only one account and select “Apply Filter”.
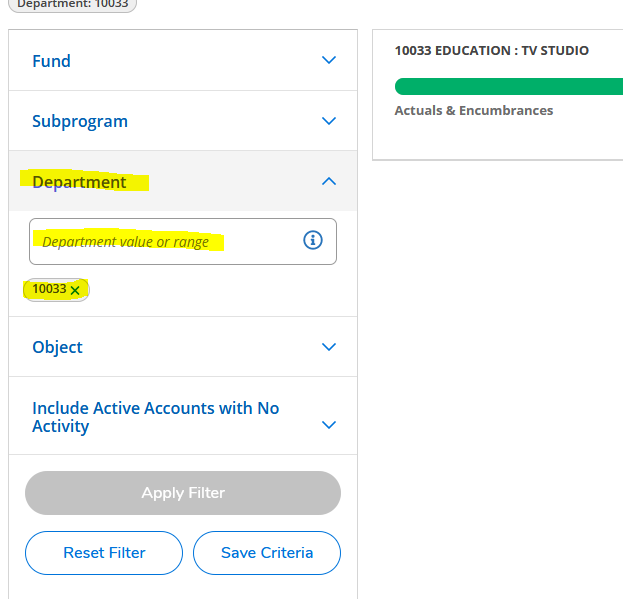
STEP SIX: Select the account you would like to view for transactions.

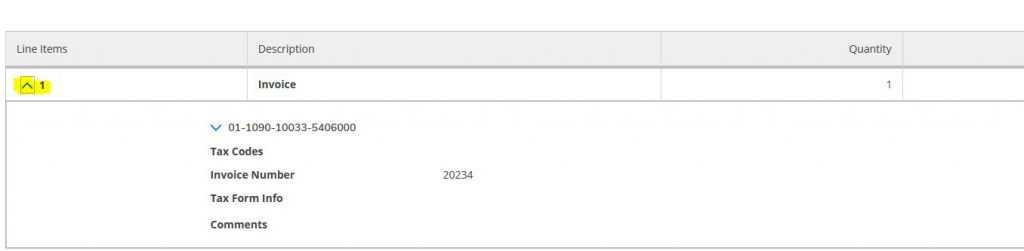
STEP SEVEN: Select “Document” ID to view the details of the transaction.

STEP EIGHT: Select the “Line Item” you would like to view in detail by selecting the arrow.
Please contact Lisa Santoro in the IT Department at ext. 2274 for further information.
The following link will take you to the Brightspace Help section that details how to create grade items in your gradebook. Hopefully you will find this a useful resource when working with your own gradebook.
Are you using a grade scheme other than the traditional 90/80/70% scale commonly used? If so, check out this short tutorial from Brightspace on how to set up your own grading scheme.