The U.S. Department of Justice – Civil Rights Division and U.S. Department of Education Office for Civil Rights have provided notice to colleges and universities across the country about new accessibility requirements that take effect April 2026.
The new accessibility requirements will help both students with and without disabilities, as they follow a universal design approach. If a course is found to not meet the new accessibility requirements, both the institution and instructor can be held liable.
The new DOJ rules makes this a legal requirement, not just a best practice. For more detailed information, review an article from WCET.
As a result, it is important that instructors check their courses to make certain the content they have posted are meeting these standards as soon as possible, to allow time to fix any content before the April 2026 deadline.
What does this mean?
All digital content students use within a D2L course must be accessible to students with disabilities. This includes anything students are expected to read, watch or interact with within their D2L courses, such as videos, PDF’s, PowerPoint Slides, Word documents, online textbooks, links to outside websites, lecture recordings, just to name a few. For example:
Videos must have captions
Images must have alt text
PDF’s must be properly formatted (not just scanned images)
Text must be readable (not tiny fonts or bad color contracts)
All content, including PowerPoint slides, Word documents, etc. must work with screen readers
Tools Available to Help Instructors Meet Accessibility Requirements:
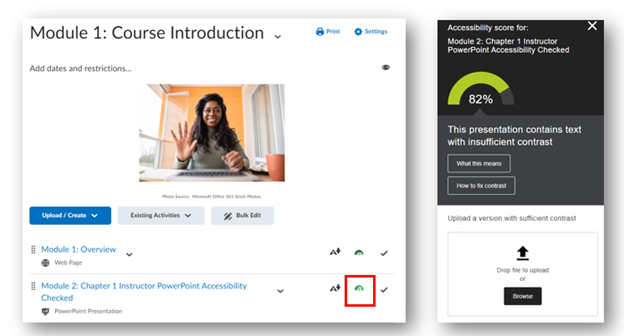
Blackboard Ally:
Blackboard Ally (within D2L) checks all content instructors upload to their D2L course and checks if it meets these accessibility standards. It provides instructors a score for individual content and the course as a whole. If content scores low, Ally provides feedback to instructors on how to fix their content to meet accessibility standards.
It is best practice that all content score 90% or higher.
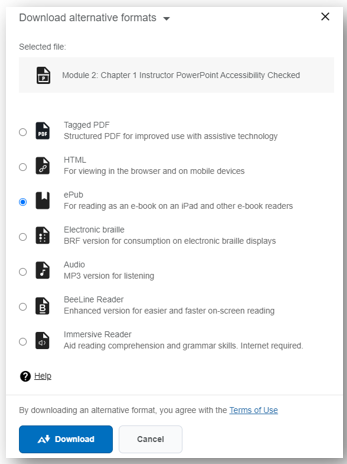
Ally also automatically converts content instructors upload to D2L to different formats. For example, if a student would like a PowerPoint slide to be in audio format, they have that option.
D2L Medial Library:
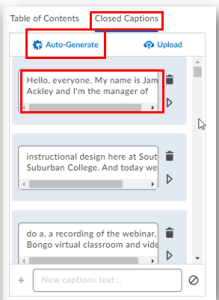
The D2L Medial Library provides for automatic closed caption of videos uploaded by instructors:
Scanning Assistance:
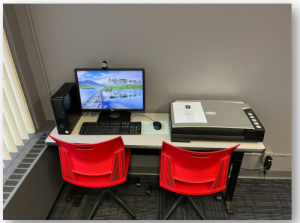
The Teaching and Learning Center has a Book Edge Scanner for faculty to use. This Book Edge Scanner will scan documents (such as pages from a textbook) to meet accessibility standards.
Would you like to learn more about the new accessibility requirements or assistance in fixing course content. Check out the Teaching and Learning Center’s Training Calendar to attend our Design for All workshops or schedule a one-on-one consultation with a member of the TLC staff.
You can create directly in the media library, then place video in a course.
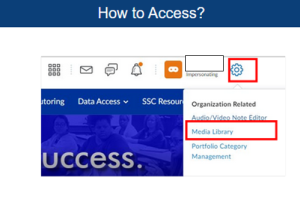
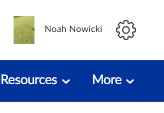
Access your Media Library by:
Click on the settings cog wheel at the top right of your D2L homepage:
Find the Media Library option:
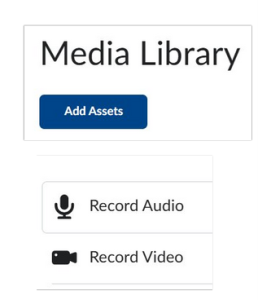
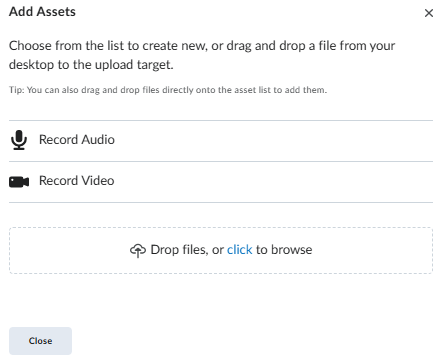
Select the Add Assets option, there you can either record video, record audio, or upload a pre-existing video file that will be placed into the Media Library.
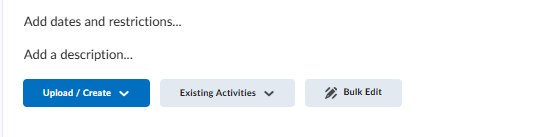
Another way to add video is to add a new module in your course or select an already designed module within your course and add a video note.
Click on the desired module and then click on the Upload/Create: Create a file
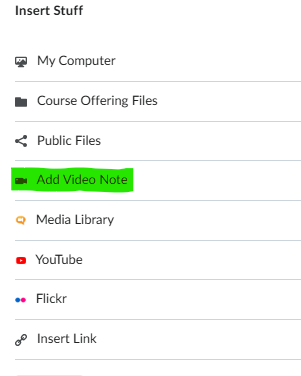
Inside the text box there is an ‘INSERT STUFF’ icon as shown below. By selecting this icon the menu will show a Video Note selection, click on Video Note.
Please note the video recording in this mode has a 30 minute time limit.
Method 2: Use a Teams Meeting to Record Video
Log in to office.com and go to the Teams app
Go to the Calendar and set up a new meeting:
After you fill out the requirements for the meeting it will show up on your Teams Calendar. Double Click on the meeting and select Join the meeting now.
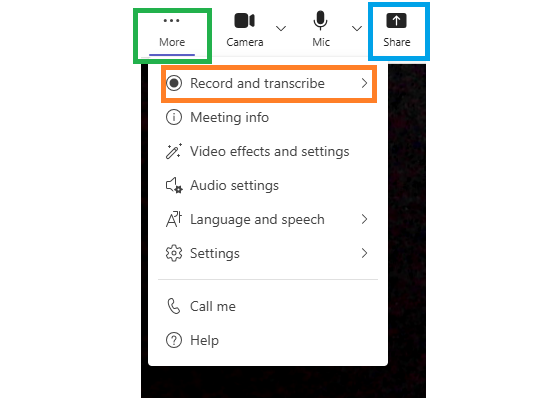
Share your Screen as you talk through your video recording
1- More
2- Record
3- Share
When you are finished stop recording, then just leave the meeting.
Now it is time to find your recorded video, it is only a few small steps.
Log in to office.com
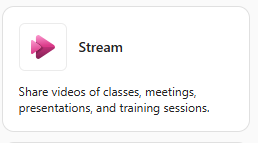
Find where your apps are listed.
Look for the STREAM APP
Your Teams recording will be in this application, in MP4 format.
Select Download
Go into D2L an upload the video file.
Select the module where you want to upload the video.
Select Upload/Create option and select Video or Audio.
Select Upload and browse to the Teams video file.
NOTE: Make sure you know where your video files or any files for that matter go when you save them on your device. [EX: Downloads folder, pictures folder, etc.]
Method 3: Clipchamp
Clipchamp is an advanced video editing tool that is part of Office.com
Take a look at the Clipchamp web site to learn more about online recording tools.
Above is a recording of this SSC Online Workshop presented by math instructor, Jennifer Medlen.
Original Workshop description:
See how a math instructor at SSC easily aligned the online scoring of a Kahoot! quiz to the SSC Critical Thinking Rubric for general education assessment. Ideas will be discussed for creating a similar type of alignment with other College rubrics.
Online appointment scheduling is here! You can now allow students to schedule office hours with you with just a click of a link. All meetings will appear on your Outlook calendar. If you choose to meet with students virtually, a Microsoft Teams meeting link will be created and sent automatically to the student on your behalf.
STEP 1
Login at Office.com using your SSC username, and network password.
STEP 2
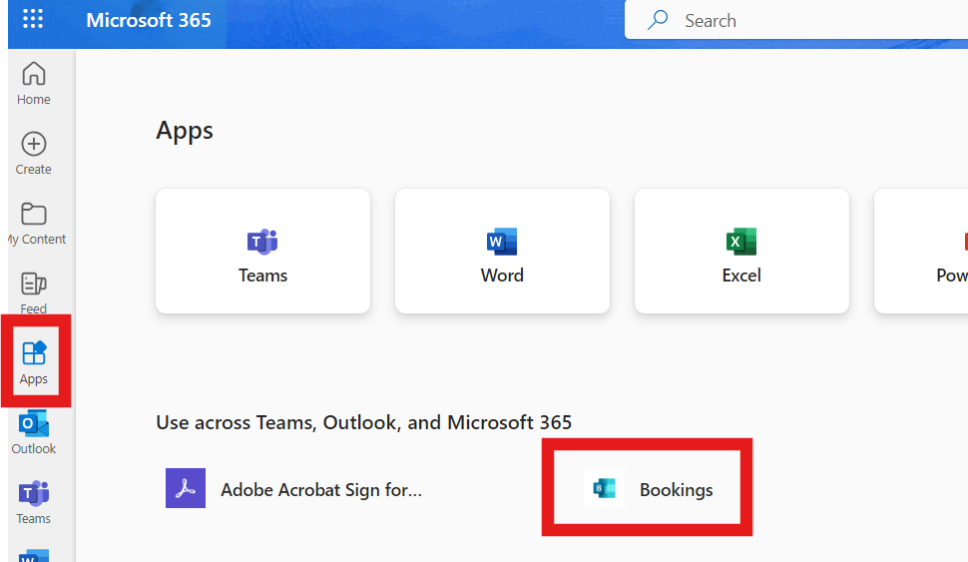
Select the “Apps” icon from the navigation bar on the left. If “Bookings” is listed on your Microsoft 365 Apps page, click to open and proceed to STEP 5 of this guide.
STEP 3
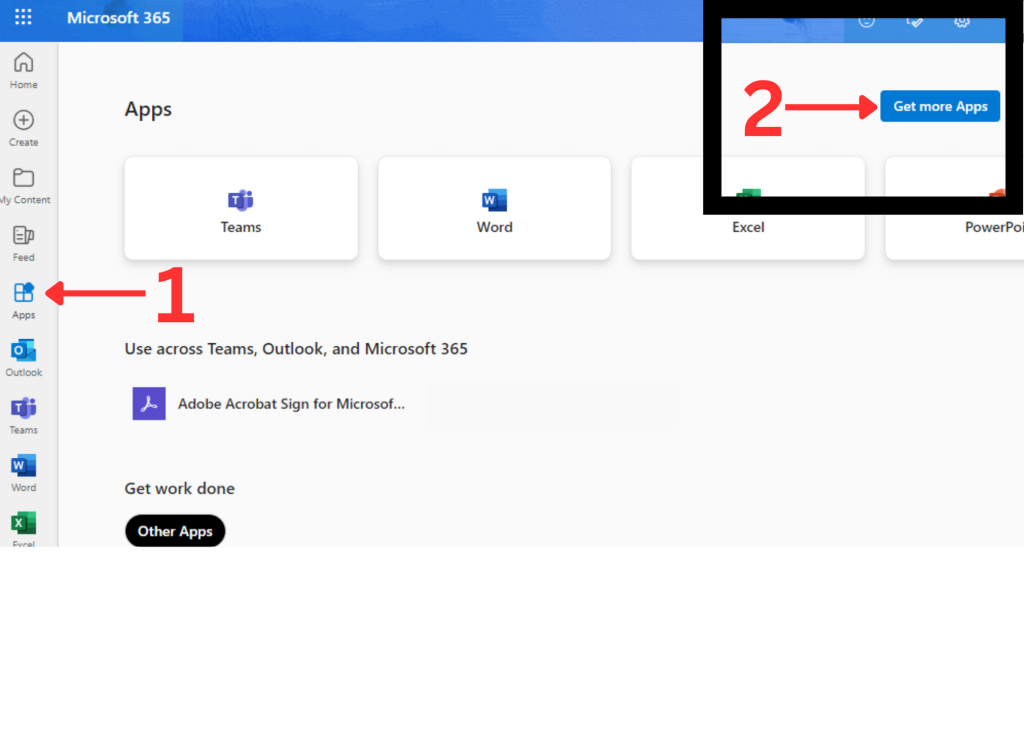
Click on the Apps link from the left menu, and navigate to the “Get More Apps” in the upper right-hand corner of your browser window on a desktop or laptop.
STEP 4
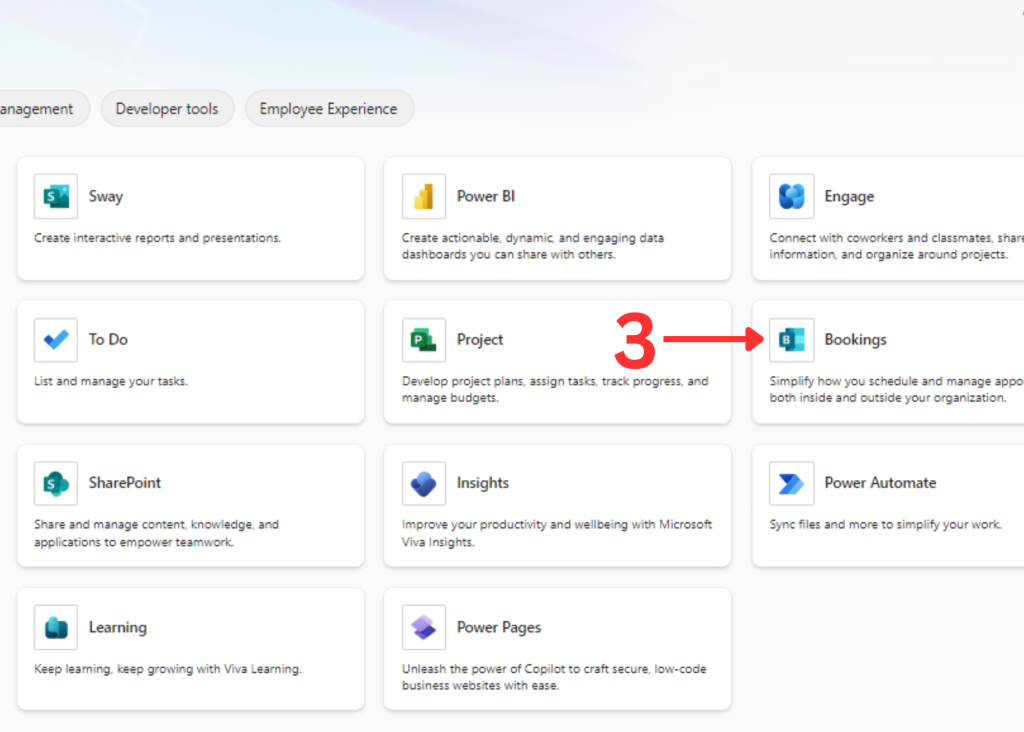
On the next screen, click on the “Bookings” app to add it to Office 365.
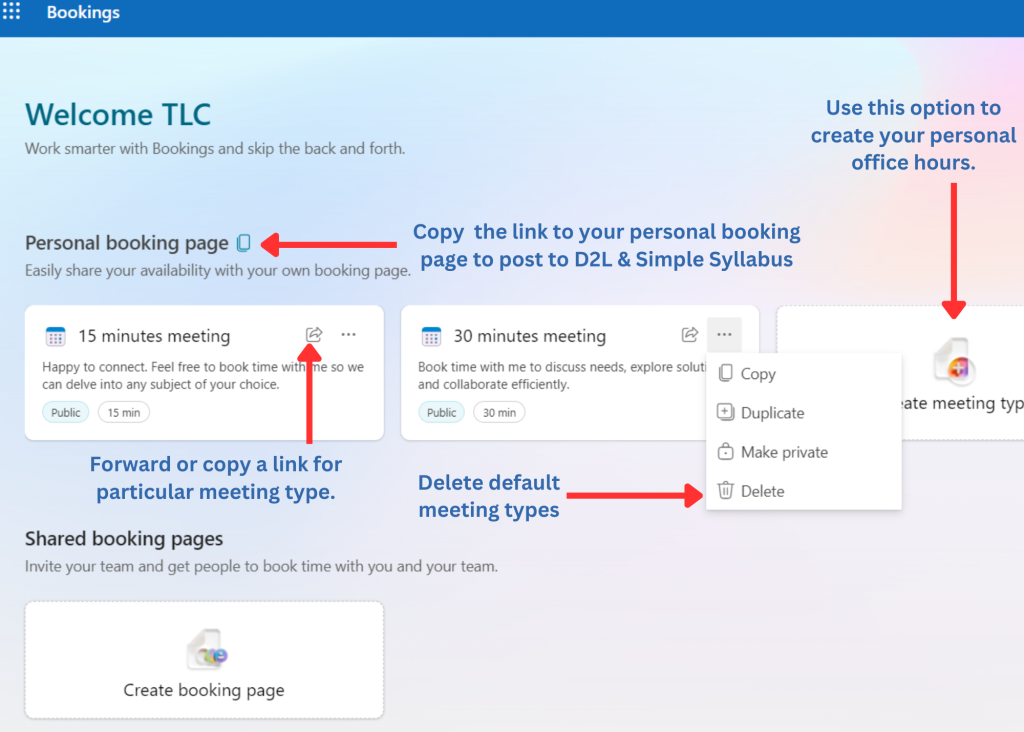
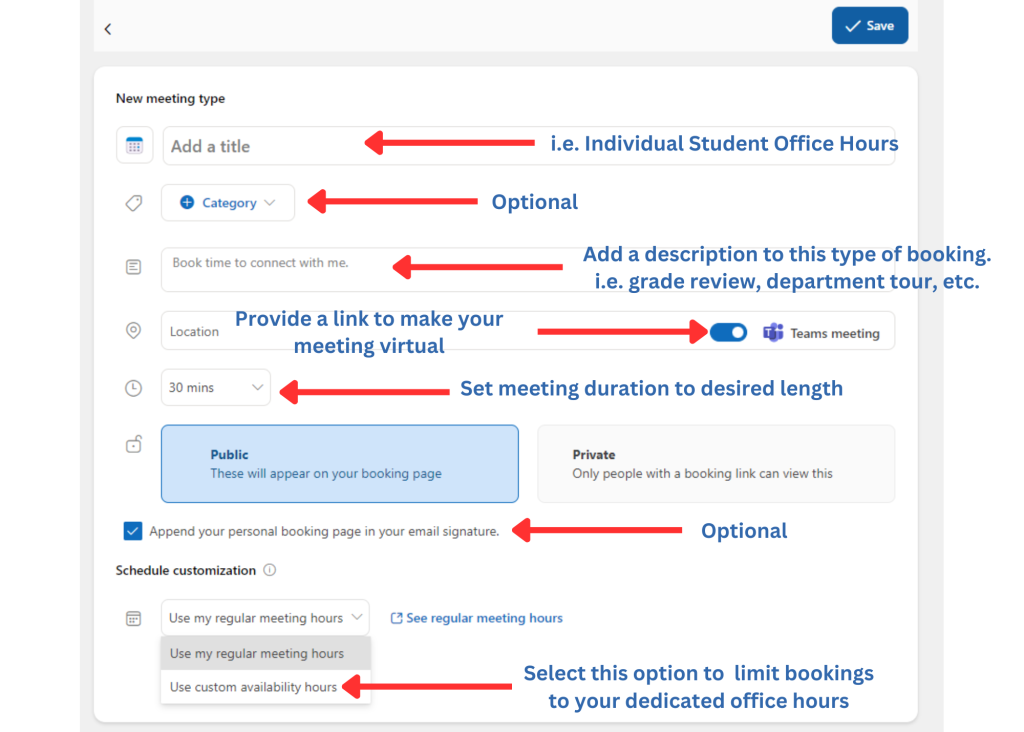
STEP 5
Follow the prompts on the images below to create a new meeting type.
Be sure to copy the link to your “Personal Booking Page” or the unique meeting you created especially for your students and add it to your D2L course shells and Simple Syllabus so that they can easily book virtual office hours with you online.
STEP 6
You can restrict the ability of your schedule to just your posted office hours by setting “custom availability hours” for the meeting type you wish to share.
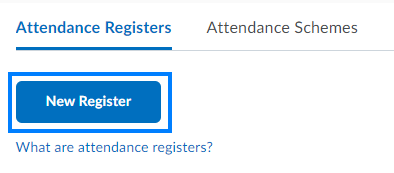
On the blue navigation bar, on the far right click on ‘more’ drop down menu and click on ‘ATTENDANCE’
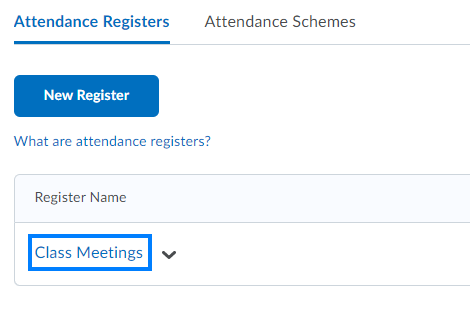
Click New Register
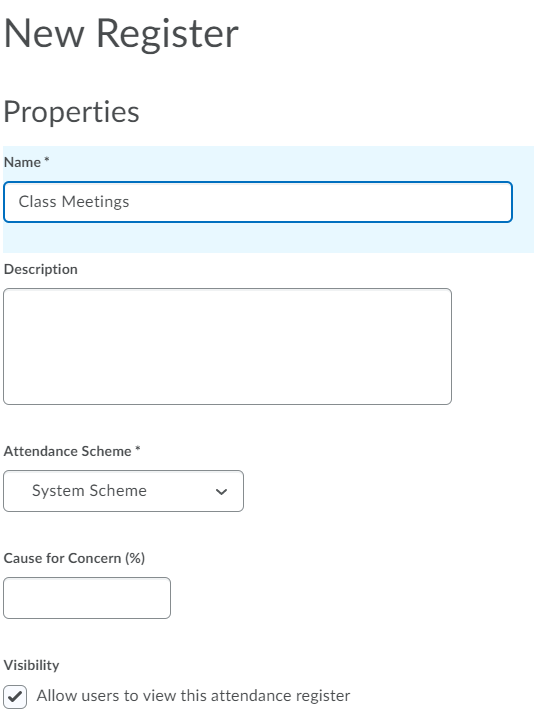
Enter the Name of the attendance register and other optional properties as needed
NOTE: Students are able to see these attendance registers from your course in Brightspace from the Course Tools menu unless the visibility setting is unchecked.
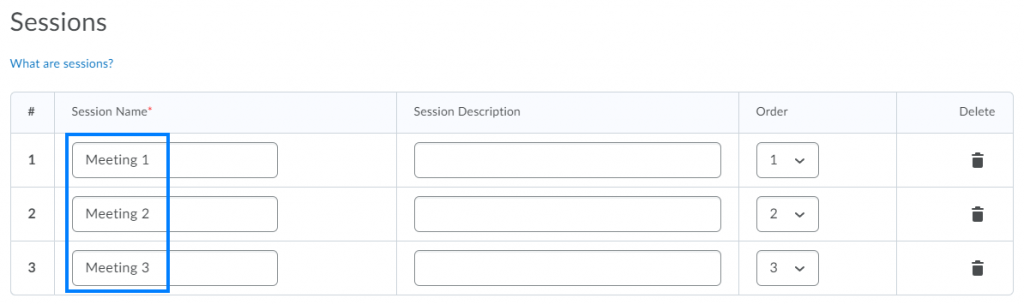
Enter a session name: This example uses attendance for Class Meetings.
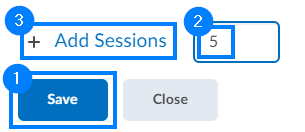
To add additional sessions to the register, click SAVE, enter the number of sessions to be added, and click ADD SESSIONS.
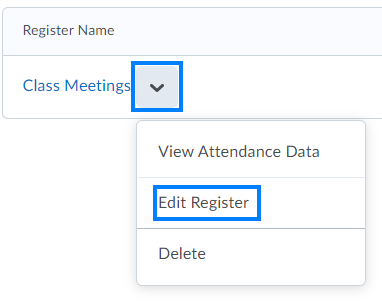
To return and add or remove sessions at a later time, click the drop-down icon to the right of the register and select EDIT REGISTER from the drop-down.
ENTER ATTENDANCE:
From ‘MORE’ on the navigation bar, Click Attendance:
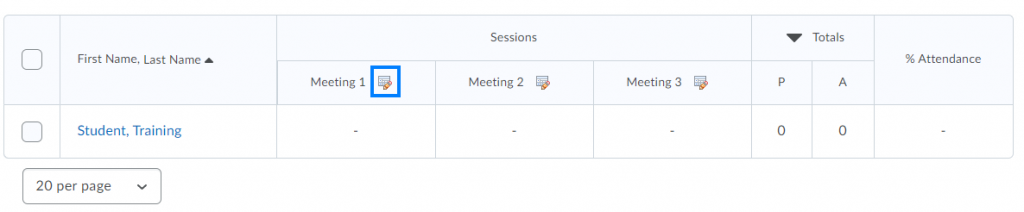
Click the name of register.
Click the Calendar icon beside session to enter the attendance:
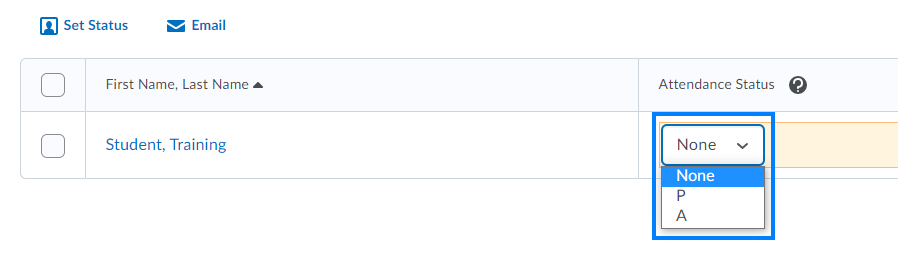
Click the Attendance Status drop-down to set each student’s status:
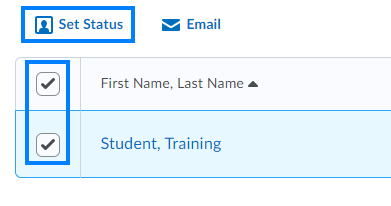
Alternatively, set the Attendance Status for students in bulk by selecting multiple students and clicking ‘SET STATUS’
Quizzes have always been used in College level courses to assess student knowledge of the course information. However, with the way courses are changing to a more online delivery, it has become a concern that students can use internet resources like ChatGPT, to write, answer, and turn in work that may not be original. Respondus Lockdown Browser can help with these concerns.
When a quiz or a prompt for an essay question is accessed from the Learning Management System, LockDown Browser can prevent students from using unauthorized resources.
Here are the simple steps:
1- Create the quiz in the LMS– in our case this would be D2L
EX: For a short essay, create a quiz and use the “ESSAY” question type.
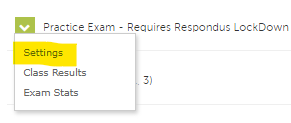
2- From the Lockdown Browser dashboard in D2L {seen below}
Locate the quiz name and select “SETTINGS”
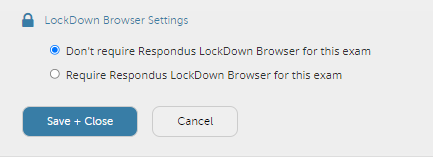
3- Then select “Require Lockdown Browser for this exam” and “Save + Close”
The assessment will now require students to use LockDown Browser.
When students access the quiz from the LMS, LockDown Browser will prevent them from switching applications, capturing screen content, or going elsewhere on the internet (unless the instructor allows it).
Turnitin users the link below may be of interest in helping with checking for AI writing detection capabilities:
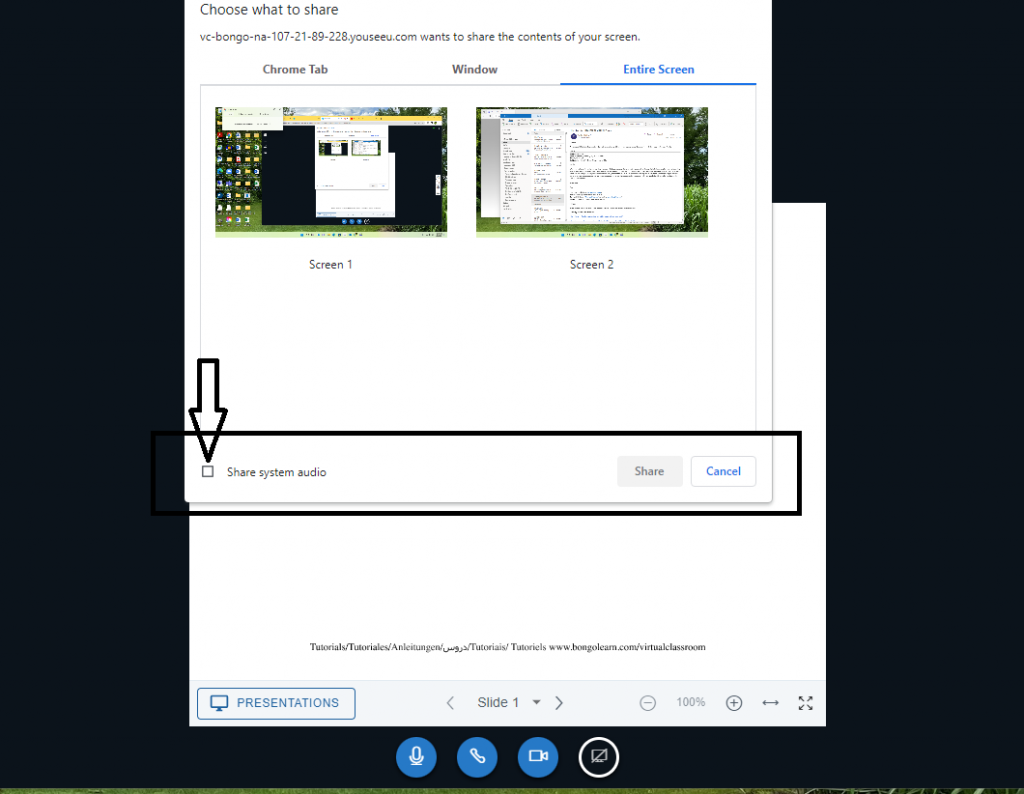
It has come to our attention that sometimes students in the virtual classroom Bongo meeting sessions cannot hear the audio when an instructor is sharing a video in the screen share feature. Examples of these videos being shared are YouTube videos, or possibly web sites with videos that deal with particular instruction from a course. Below is a picture of the box an instructor must check in order for the virtual students to hear the audio with the matching video, when screen sharing presentations.
EX: Screen Share page in Bongo Virtual Classroom
By checking this box, the instructor has now shared the corresponding Audio with Video being played in the Screen Share feature.
Classrooms upgraded for simulcast delivery include a webcam, a second Epson projector, and a projection screen. The second projector and screen (located in the back of the room) can be used to view your virtual classroom students. Virtual classroom students will be able to view your webcam, anything you screen share and communicate with you through chat or audio.
Before Your Class Begins
Log on to the Teacher’s Workstation with your SSC Network Credentials
Turn on the Front Projector, and then the Rear Projector
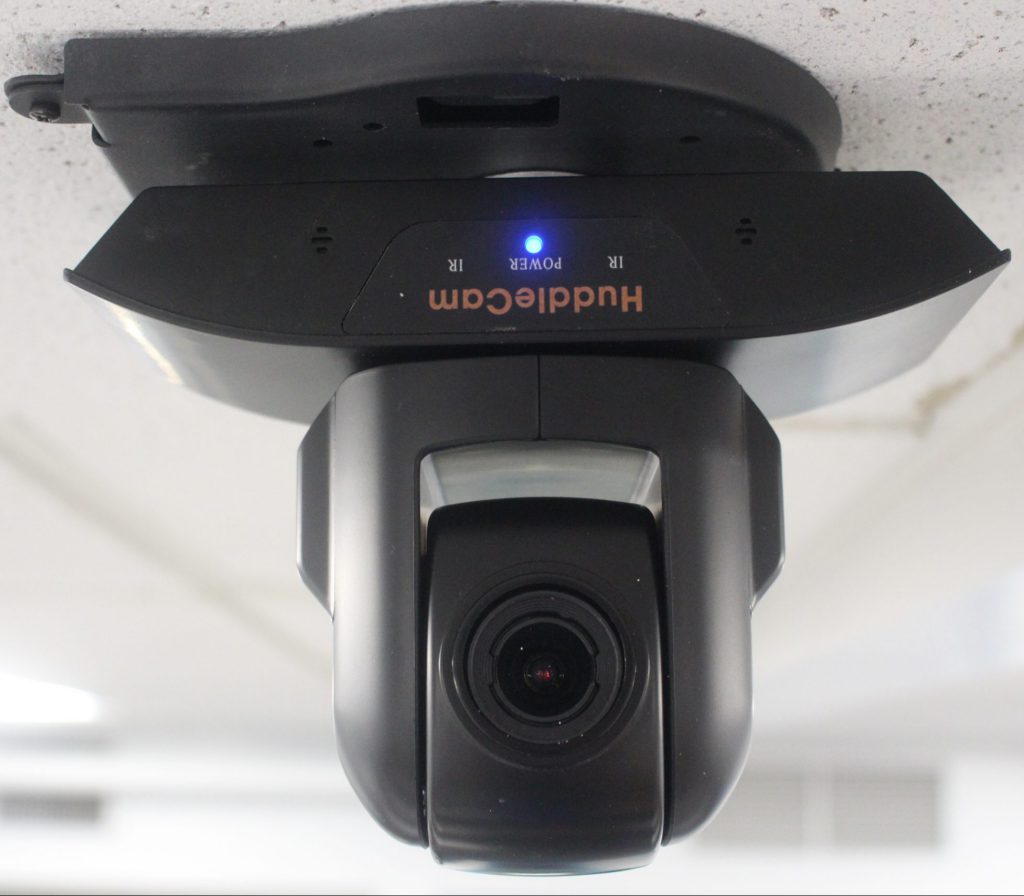
A webcam has been installed to allow remote learners a view of the classroom. It is positioned so that it can capture not just the instructor, but also any information presented on the dry-erase board in the front of the classroom. The Webcam is on if the blue light is visible as in the photo above. If there are no lights visible on the camera, press the power button on the webcam remote as pictured below.
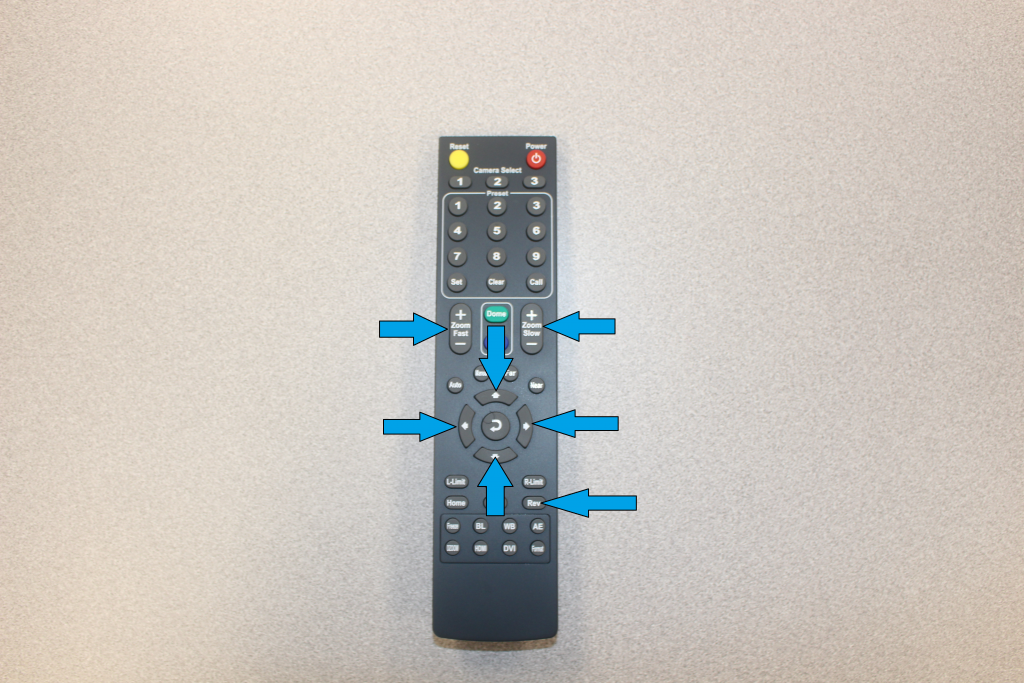
WEBCAM REMOTE CONTROL
Using the Webcam Remote Control
The left/right arrows move the webcam left and right
The up/down arrows tilt the webcam
The zoom fast/slow buttons control the webcam zoom feature
The auto button can be used to automatically focus the webcam
If by chance the image displayed by the webcam is upside down, press the ‘REV’ button, this will right your image.
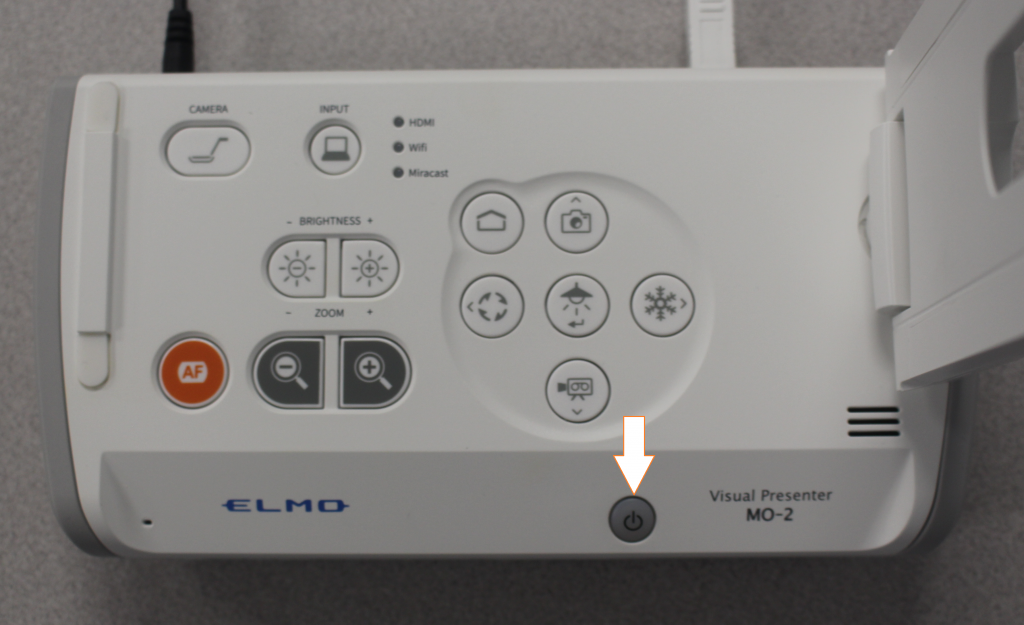
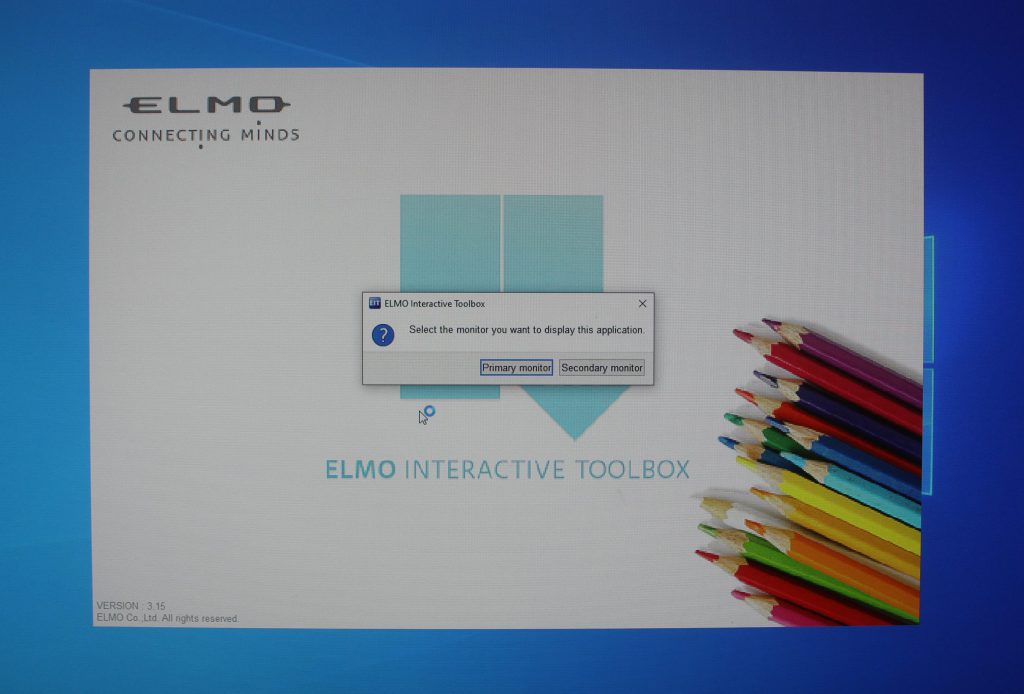
Step 1: Turn on (Blue Light Comes On) the Elmo Document Camera Power
Step 2: Select ‘EIT ICON’ Shortcut on Teachers Workstation.
Step 3: Select ‘Primary Display’ to display the image on Teachers Workstation or Select ‘Secondary Display’ to display the image on Projector Display Screen.
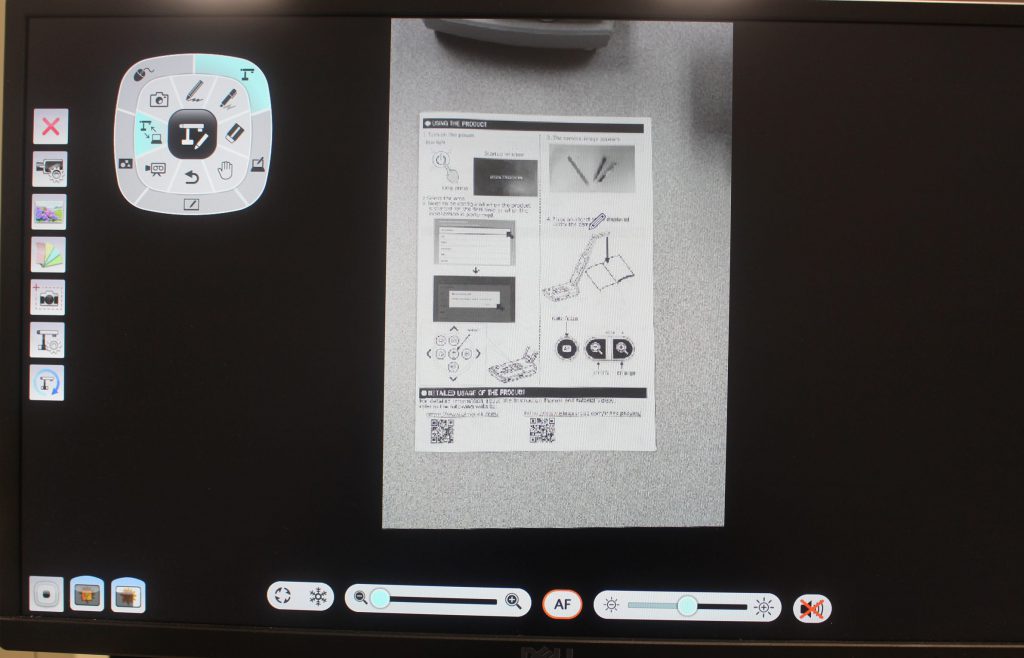
Step 4: Users can use the ‘Pen Feature’ within the EIT Program to mark or edit what is being displayed.
THIS IS AN EXAMPLE OF FULL-SCREEN OPTIONS WHEN USING THE EIT PROGRAM INCLUDING SAMPLE IMAGE DISPLAYED THROUGH DOCUMENT CAMERA.
Step 5: Once you are finished with the unit, make sure you turn the document camera off. (NO Lights on the unit)