Author: TLC

Entering Final Grades in D2L

STEPS TO ENTER FINAL GRADES

As an instructor, it is important that you enter data for each of your students in each of your courses. This information must be submitted to Ellucian Colleague through D2L Brightspace. This data is due on different dates and it MUST BE SUBMITTED ON TIME. Failure to do so impacts South Suburban College financially. If you are uncertain about a deadline for a particular course, please contact your department secretary or dean. It is your responsibility to know the calendar for your course.

Submitting Final Grades

While it isn’t necessary for you to submit daily attendance to the College for your course, it is necessary that you let us know if a student has stopped attending your course by entering the LAST ATTENDANCE DATE. It is not necessary to enter a LAST ATTENDANCE DATE for student that attend your course regularly. This data must be submitted by the deadline. The “Never Attended” box should only be checked at 10th Day when Attendance Verification is submitted. Submitting “Never Attended” at the end of the semester can have negative consequences on a student’s financial aid.

STEPS TO ENTER FINAL GRADES

1. Choose GRADES from the D2L NAV BAR.

D2L Nav Bar

2. If you are not using the grade book in D2L choose ENTER GRADES to access the EXPORT TO SIS option. If are using the D2L grade book you will immediately see the EXPORT TO SIS option here.

D2L Gradebook Link
Export SIS Link

3. Choose FINAL GRADE from the grade type drop-down menu. By default, the menu is set to Final Grades.

Final Grade Drop Down

NOTE: BE SURE TO ENTER FINAL GRADE DATA IN FINAL GRADES. Be sure to use only CAPITAL LETTERS. If you accidentally submitted data in this field earlier in the semester the only way to clear that data from Colleague is to submit a paper Change of Grade form for each student impacted.

4. Enter the final grades into the OVERRIDE GRADE field for each student enrolled.
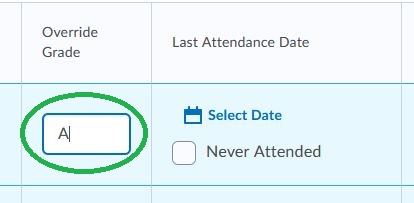
Grade Over Ride Field

5. Be sure to verify there is a CHECK MARK in the box to the left of every student’s name you wish to export. Failure to check the box will result in that student being excluded from the export to ELLUCIAN COLLEAGUE and your data will not be transmitted.
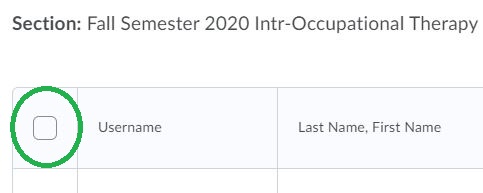
Check Students Name to the Left

6. Click EXPORT on the bottom left-hand side of the screen.

Export Button

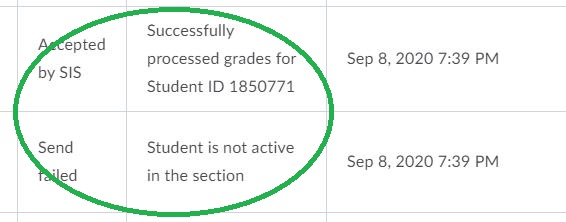
7. Review the export results of the submissions for each student by scrolling to the far right column. If you receive an error other than STUDENT IS NOT ACTIVE IN THE SECTION, try submitting the data a second time. Don’t forget to add a CHECK MARK next to the student’s name you wish to export again. If the process fails a second time, please email ssconline@ssc.edu. An error of STUDENT IS NOT ACTIVE IN THE SECTION requires no further action and is an indication that the student has dropped the course. It is okay to skip this student in the future.
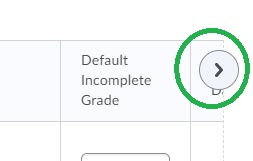
Arrow to Scroll Right
Export Status Message
Always check for errors. They will display immediately after the export is complete.

8. If your course is cross-listed change the section using the drop-down listing the other courses and repeat the steps for each cross-listed section.
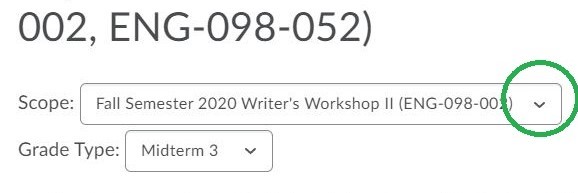
Cross-listed Drop Down Menu
You must select and export section individual to submit data.

NOTE: Students will only be able to see the information you submit through the EXPORT TO SIS in SSC Self-Service unless you build this information into your regular D2L grade book.

Entering Active Pursuit and Midterms in D2L

As an instructor, it is important that you enter data for each of your students in each of your courses. This information must be submitted to Ellucian Colleague through D2L Brightspace. This data is due on different dates and it MUST BE SUBMITTED ON TIME. Failure to do so impacts South Suburban College financially. If you are uncertain about a deadline for a particular course, please contact your department secretary or dean. It is your responsibility to know the calendar for your course.

Submitting Active Pursuit and Midterm Grades

While it isn’t necessary for you to submit daily attendance to the College for your course, it is necessary that you submit Active Pursuit data for each student. Active Pursuit simply lets us know that a student is still attending class. An “S” (satisfactory) or “NS” (not satisfactory) is to be entered into the “Override Grade” field on the Midterm Grade 2 screen. If a student has stopped attending your course by the deadline, that student should be issued an “NS” and as well as their LAST ATTENDANCE DATE should entered on the Midterm Grade 2 screen. This data must be submitted by the deadline. The “Never Attended” box should only be checked at 10th Day when Attendance Verification is submitted. Submitting “Never Attended” at Midterm can have negative consequences on a student’s financial aid.

STEPS TO ENTER ACTIVE PURSUIT

1. Choose GRADES from the D2L NAV BAR.

D2L Nav Bar

2. If you are not using the grade book in D2L choose ENTER GRADES to access the EXPORT TO SIS option. If are using the D2L grade book you will immediately see the EXPORT TO SIS option here.

D2L Gradebook Link
Export SIS Link

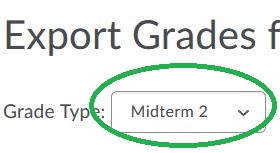
3. Choose Midterm 2 from the grade type drop-down menu. By default, the menu is set to Final Grades.

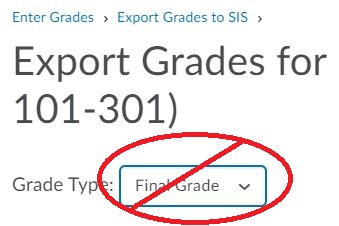
Do Not Use Grade Type is FInal Grade

NOTE: DO NOT ENTER ACTIVE PURSUIT DATA IN FINAL GRADES. If you enter data into the Final Grade Tab by mistake you will be required to submit a paper Change of Grade form for each student individually. This creates a lot of extra work for you, your dean and the Registration team. Be sure to use only CAPITAL LETTERS.

Midterm Grade 2 Drop Down

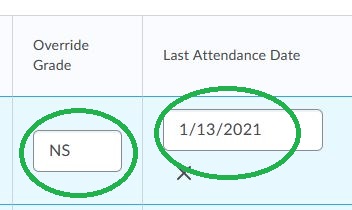
4. Enter either an S or NS into the OVERRIDE GRADE field for each student enrolled. If you are entering an NS for a student please also enter their LAST ATTENDANCE DATE.

Last Attendance Date

5. Be sure to verify there is a CHECK MARK in the box to the left of every student’s name you wish to export. Failure to check the box will result in that student being excluded from the export to ELLUCIAN COLLEAGUE and your data will not be transmitted.

Check Students Name to the Left

6. Click EXPORT on the bottom left-hand side of the screen.

Export Button

7. Review the export results of the submissions for each student by scrolling to the far right column. If you receive an error other than STUDENT IS NOT ACTIVE IN THE SECTION, try submitting the data a second time. Don’t forget to add a CHECK-MARK next to the student’s name you wish to export again. If the process fails a second time, please email ssconline@ssc.edu. An error of STUDENT IS NOT ACTIVE IN THE SECTION requires no further action and is an indication that the student has dropped the course. It is okay to skip this student in the future.

Arrow to Scroll Right
Click this floating arrow to scroll right and verify the status of your export.
Export Status Message
Always check for error. They will display immediately after the export is complete.

8. If your course is cross-listed change the section using the drop-down listing the other courses and repeat the steps for each cross-listed section.

Cross-listed Drop Down Menu
You must select and export each section individually to submit data.

STEPS TO ENTERING MIDTERM GRADES

Do Not Use Grade Type is FInal Grade

NOTE: DO NOT ENTER MIDTERM DATA IN FINAL GRADES. If you enter data into the Final Grade Tab by mistake you will be required to submit a paper Change of Grade form for each student individually. This creates a lot of extra work for you, your dean and the Registration team. Be sure to use only CAPITAL LETTERS.

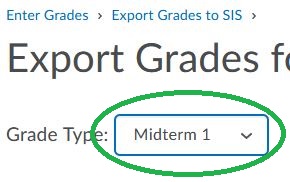
1. Choose Midterm 1 from the grade type drop-down menu. By default, the menu is set to Final Grades.

Midterm Grade 1 Drop Down

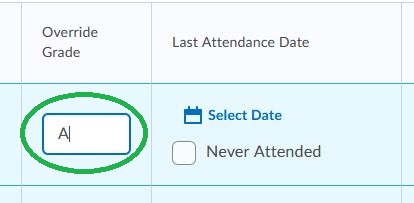
2. Enter your midterm grades into the OVERRIDE GRADE field for each student enrolled.

Field to Overgrade Data

3. Be sure to verify there is a CHECK -MARK in the box to the left of every student’s name you wish to export. Failure to check the box will result in that student being excluded from the export to ELLUCIAN COLLEAGUE and your data will not be transmitted.

Check Students Name to the Left

4. Click EXPORT on the bottom left-hand side of the screen.

Export Button

5. Review the export results of the submissions for each student by scrolling right to the last column. If you receive an error other than STUDENT IS NOT ACTIVE IN THE SECTION, try submitting the data a second time. Don’t forget to add a CHECK-MARK next to the student’s name you wish to export again. If the process fails a second time, please email ssconline@ssc.edu. An error of STUDENT IS NOT ACTIVE IN THE SECTION requires no further action and is an indication that the student has dropped the course. It is okay to skip this student in the future.

Arrow to Scroll Right
Click this floating arrow to scroll right and verify the status of your export.
Export Status Message
Always check for errors. They will display immediately after the export is complete.

6. If your course is cross-listed change the section using the drop-down listing the other courses and repeat the steps for each cross-listed section.

Cross-listed Drop Down Menu
You must select and export each section individually to submit data.

NOTE: Students will only be able to see the information you submit through the EXPORT TO SIS in SSC Self-Service unless you build this information into your regular D2L grade book.
Student Self-Service: Student Planning & Registration

Step 1: Go to https://www.ssc.edu and click on the SELF-SERVICE LOGIN or go directly to https://selfservice.ssc.edu then enter your username and password

College Home Page

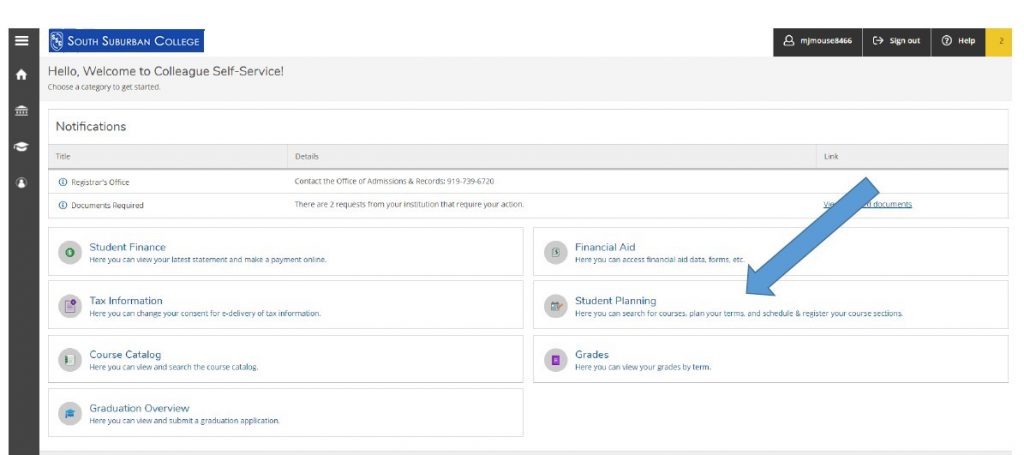
Step 2: Once in Self-Service, you have several options. Click “Student Planning”

Self-Service Homepage

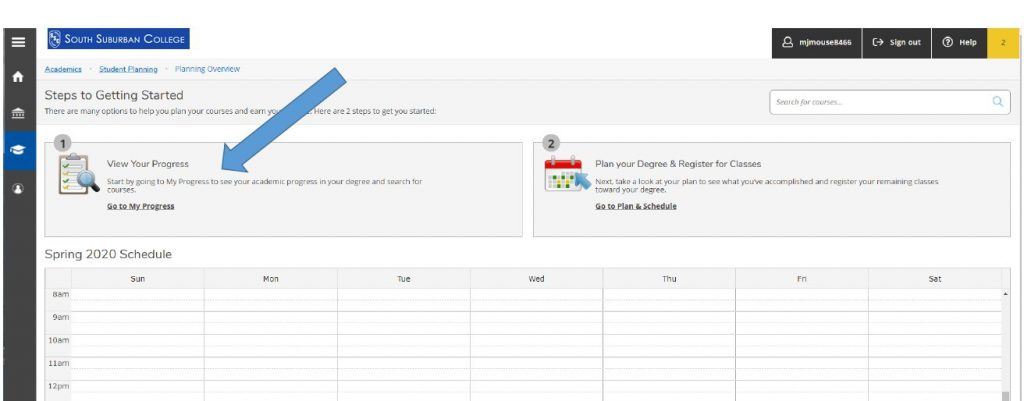
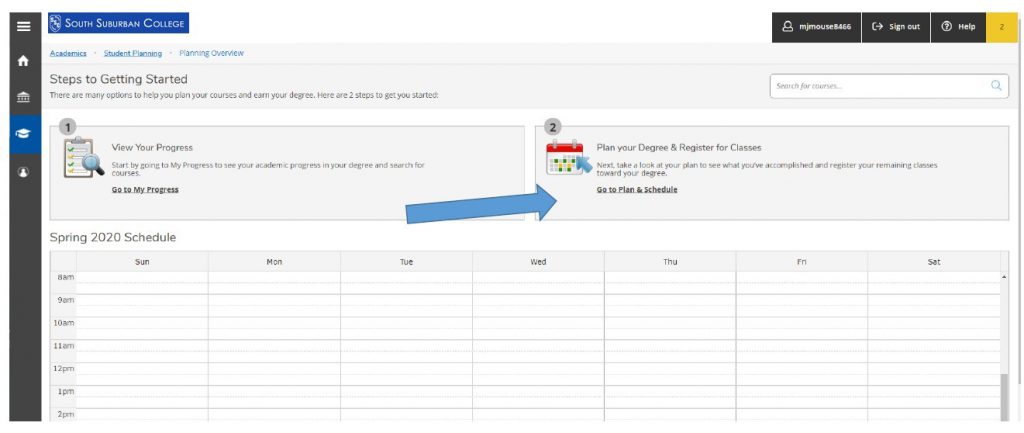
Step 3: Click option 1, “Go to My Progress” to view your academic progress in your degree, determine which courses are still remaining, and search for courses.

Planning Overview

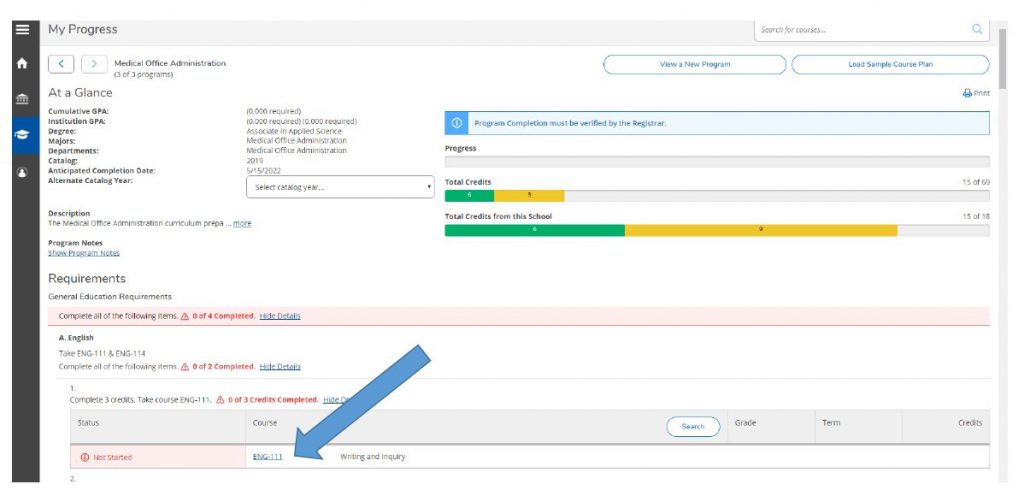
Step 4: View of program progress and requirements page. Click on each course that you would like to plan.

View your programs

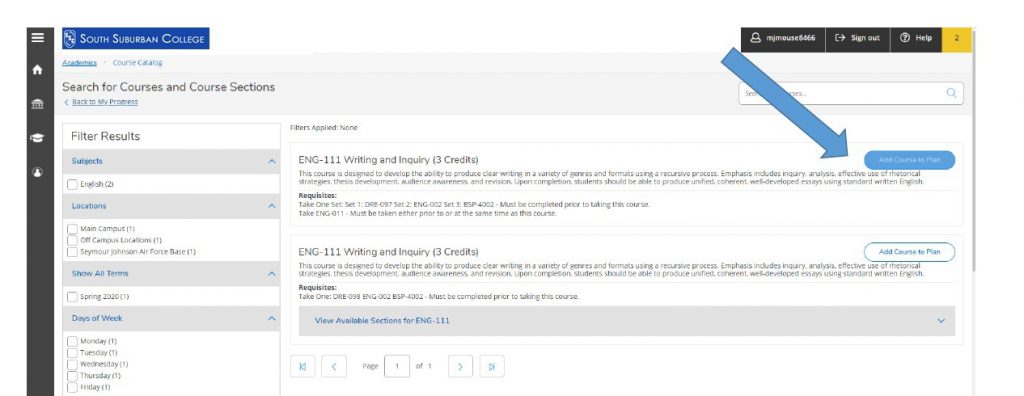
Step 5: Once a course is selected click “Add Course to Plan”

Add Course to Plan

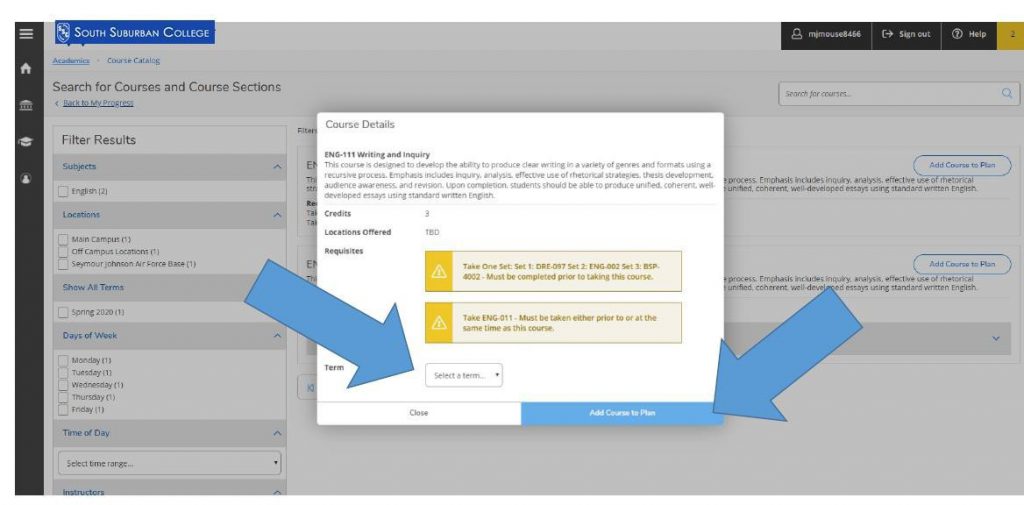
Step 6 & 7: You must “Select a term” that you intend to take the selected course. Then hit “Add Course to Plan.” This will add the course to your timeline.

Search for Courses and Sections

Step 8: Repeat steps 4-7 until all remaining required courses have been added to your plan.

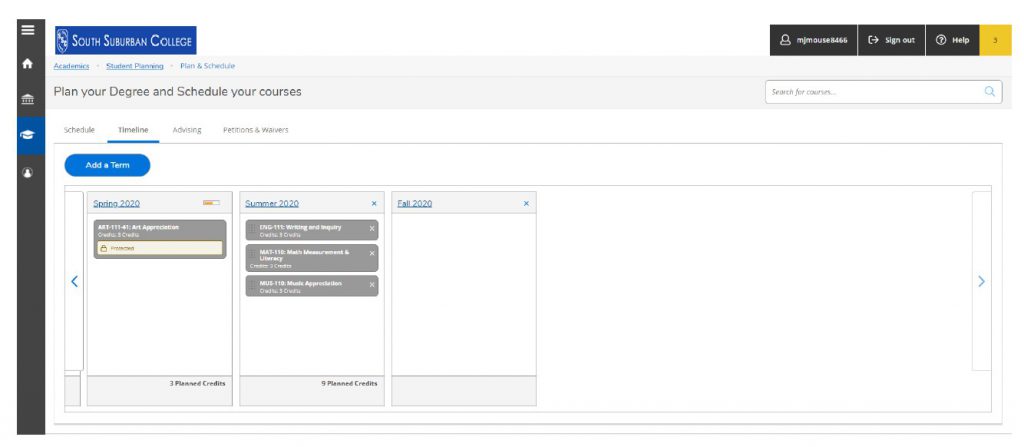
Step 9: Proceed to “Timeline” to review your courses.

Step 10: Your timeline can be viewed by selecting “Student Planning,” then “Plan and Schedule,” then “Timeline”.

Review your timeline

Step 11: When your degree plan planned courses) is ready for review by the counselor, send an email to  counselingcenterquestions@ssc.edu and place “Degree Audit” in the subject line, or contact SSC’s  Counseling center at (708) 596-2000 Ext. 5724 and let them know that you are ready for the counselor to review your plan or Degree Audit.

NOTE:  This does not mean that you are registered for classes.

Please proceed to the next steps to determine how to plan a specific section of a course and register.

Step 12: From the Student Planning overview screen, select option 2: “Plan and schedule.”

Select Register for Classes

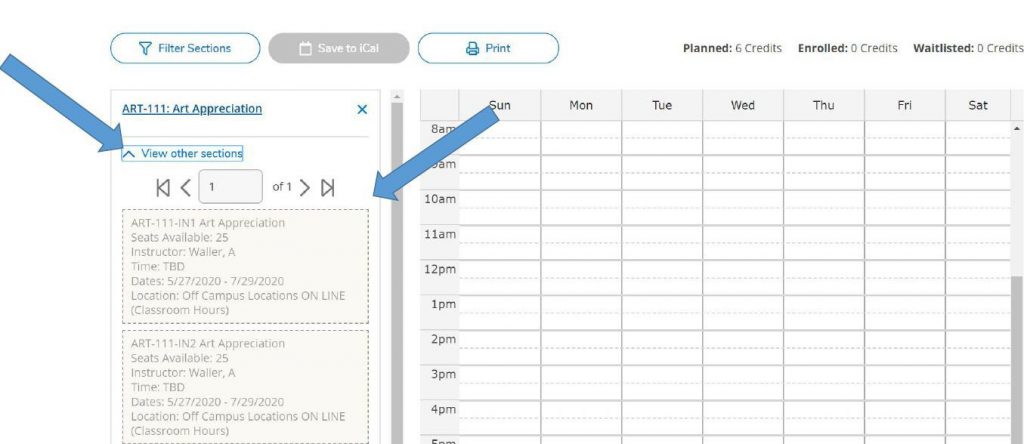
Step 13: View available course sections by clicking “View other sections.” Use the arrows under that link to see more options. Each section block lists the course date and time, available seats, and the instructor.

View available sections

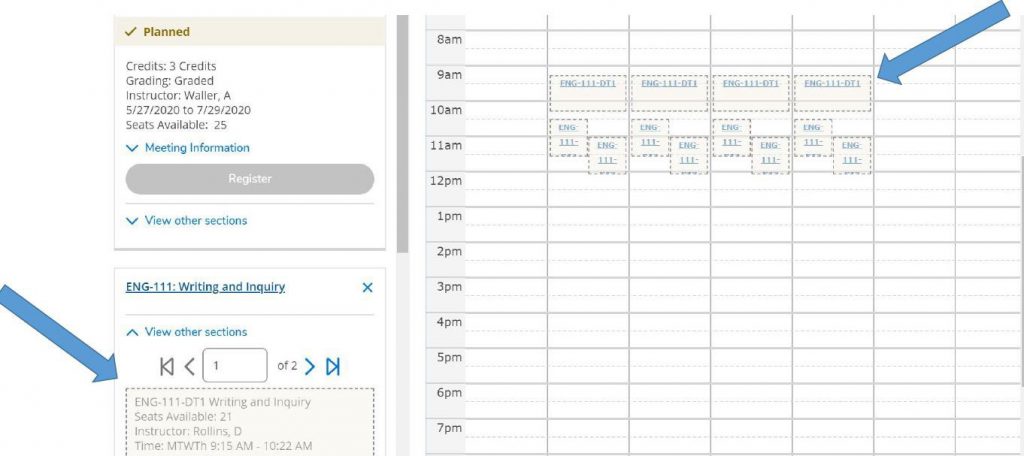
Step 14: Once you find the section you wish to register for, you can click either the box in the section list (left side), or the calendar planner (right side).

Add section to plan

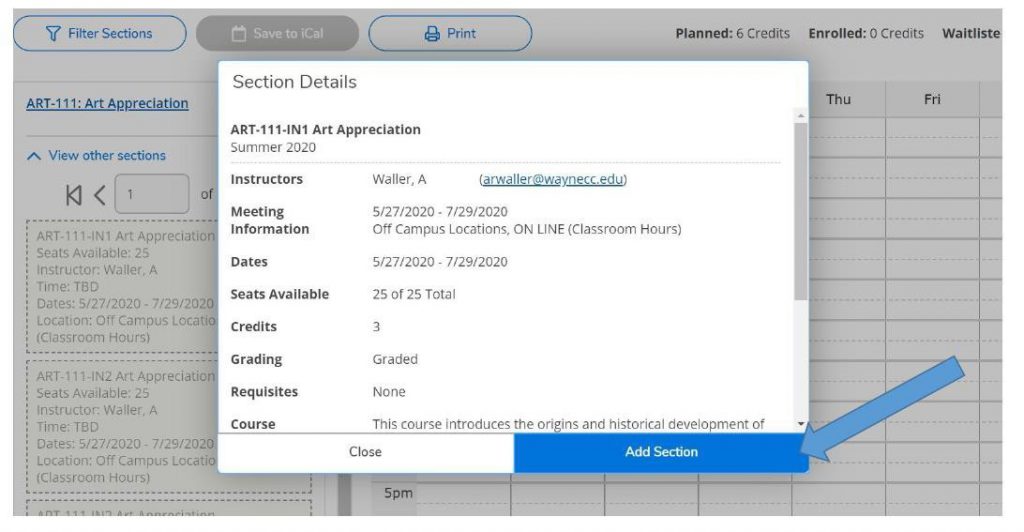
Once you select the section, a pop-up box will open. Click “Add Section

Add the section

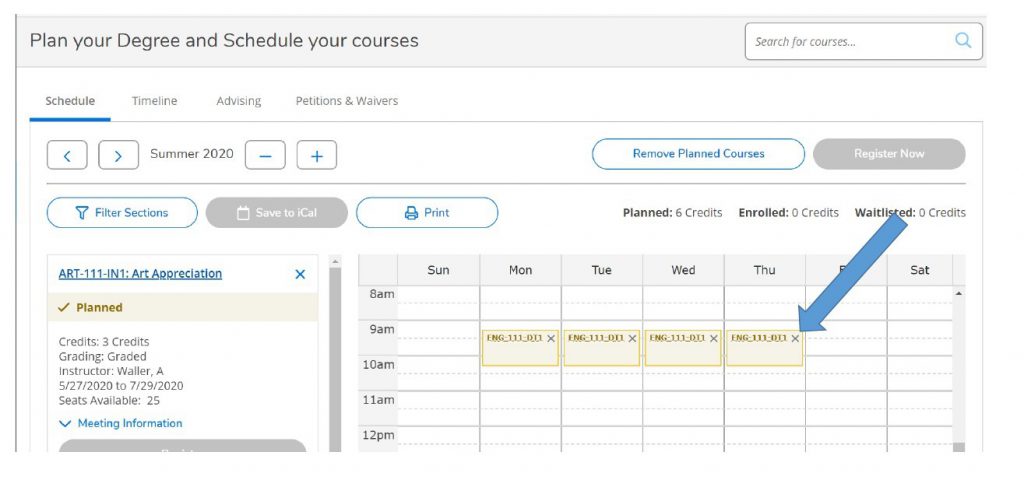
Step 15: Once you add the section, that course will stay on your weekly calendar so you can continue to build your schedule. The planned/selected section will show up in YELLOW.

Planned sections will be in yellow

Step 16: Repeat steps 13-15 until you have a complete schedule. Choose the schedule that best fits your needs. You are almost finished, but you are not registered, yet!

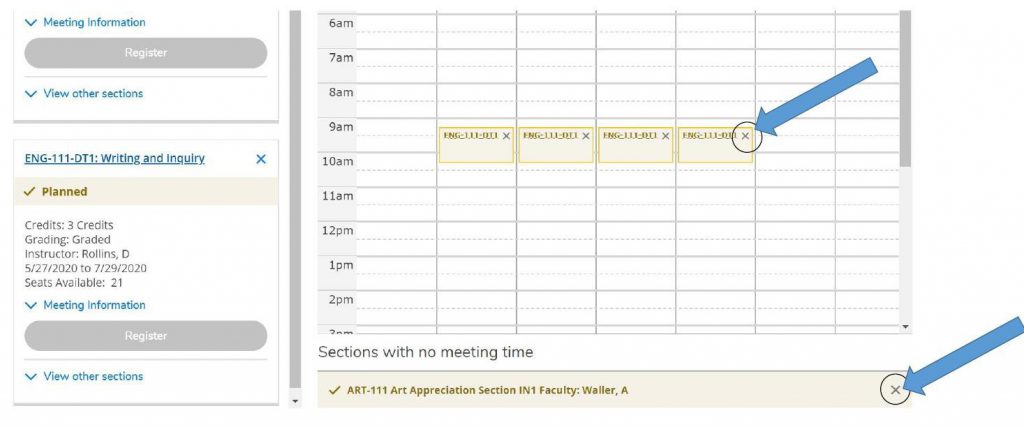
Step 17: Once you have chosen a section for each class, review your schedule one last time. Online classes will be listed at the bottom. You can remove sections by clicking the circled X in each section box.

Remove section by clicking the "x"

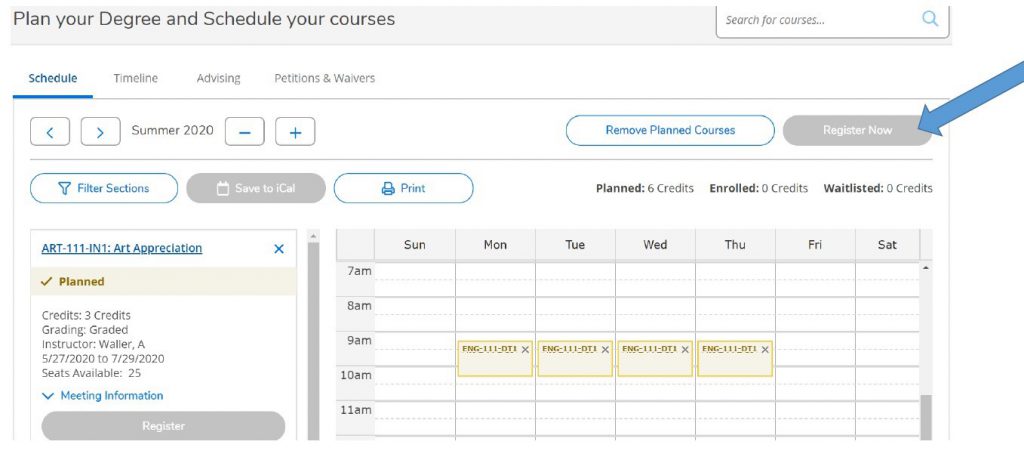
Step 18: When your schedule is complete, click the “Register Now” button in the top right corner. This box will turn BLUE and you will be able to click when registration is open.

Click register now

The yellow boxes will turn green when you have registered.

FINAL STEPS:

  • If any of the sections remain yellow or have a red outline (meaning there are no seats available), you will need to click the circled X in that box and find another section. Make sure each section you try to register for has available seats and is not full.
  • Any notifications about registration holds, business office holds, parking fines, or prerequisite issues will pop up in the top right corner of the screen. If this happens, you will need to contact your advisor.